Step by Step Exadata : Snapshot Filesystem Backup
During the Exadata patching event, it is advisable to take the backup of the filesystem, and the easiest way to take filesystem backup is with a snapshot of the mount point feature. Taking snapshot backup is not an Exadata feature but it is Linux functionality and can be used for any server running with Linux (RHEL/OEL etc.)
By using below mentioned commands and procedure you may take OS backup (compute nodes), considering there is no customization done on Exadata with the default shipped filesystem. However, the same method can be used as well if you created any additional mount points on Exadata for any other purpose e.g. OEM, etc.
Starting with X8M with Oracle Exadata System Software release 19.3, Exadata database server using new filesystem i.e. XFS (earlier it was ext3/ext4).
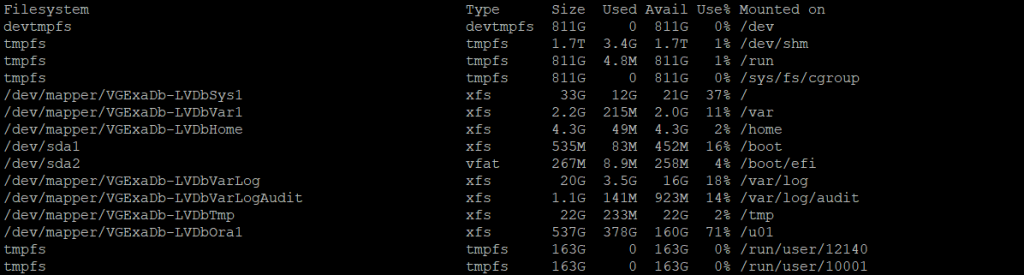
Additionally, arrangement of system layout of filesystem is also changed e.g. additional mount points are created e.g. /home, /var, /tmp, /var/log & /var/log/audit along with /root & /u01. Therefore it is necessary to backup all filesystems (mount points) for OS backup before appliance patching.
I am describing the process for xfs filesystem layout but the same steps can be used for older filesystem layout as well with few changes. I will try to highlight that as well.
Note: You need root access on compute nodes to perform this activity.
Step 1: Mount the share where you want to take backup. In my case, I am taking backup at location “/export/backup_lvm01” but this can be changed as per your environment.
Step 2: Identify active partition for image active on Exadata with imageinfo command

Here, highlighted in the red box is an active partition for the root mount point. There is mirrored of the same partition with the name LVDbSys2. At the time of taking backup, it is important to identify, active partition for root. Here are active partition is LVDbSys1, therefore I will use the same partition in commands but you can identify and change the command accordingly.
Step 3: Create a snap shot of root mount point.
XFS filesystem :
$/sbin/lvcreate -L3G -s -c 32K -n LVDbSys1-SNAP /dev/VGExaDb/LVDbSys1
EXT filesystem:
$/sbin/lvcreate -L3G -s -n LVDbSys1-SNAP /dev/VGExaDb/LVDbSys1
Step 4: Label the snapshot with different name than actual partition. This is mandatory otherwise during patching , system restart will fail during pre-reboot step of Exadata patching.
XFS filesystem :
$xfs_admin -L LVDbSys1_BKP /dev/VGExaDb/LVDbSys1-SNAP
EXT filesystem:
$e2label /dev/VGExaDb/LVDbSys1-SNAP LVDbSys1_BKP
Step 5: Mount the snapshot partition
XFS filesystem:
$mdkir /mnt/backup_snap_root

$mount -o nouuid /dev/VGExaDb/LVDbSys1-SNAP /mnt/backup_snap_root -t xfs
EXT filesystem:
$mdkir /mnt/backup_snap_root

$mount /dev/VGExaDb/LVDbSys1-SNAP /mnt/backup_snap_root
Step 6 : Take backup of files with tar command.
Here you can play around with different tar attributes.
$tar -cpzvf /export/backup_lvm01/OS_BACKUP/`hostname`/LVDbSys1/`hostname`_LVDbSys1}_`date +%F`.tar.gz -C /mnt/backup_snap_root . --acls
Repeat the same steps for the following mount points:
- /u01
- /home
- /tmp
- /var
- /var/log
- /var/log/audit
You can use “lvs” command to identify the logical volume name for each mount point:
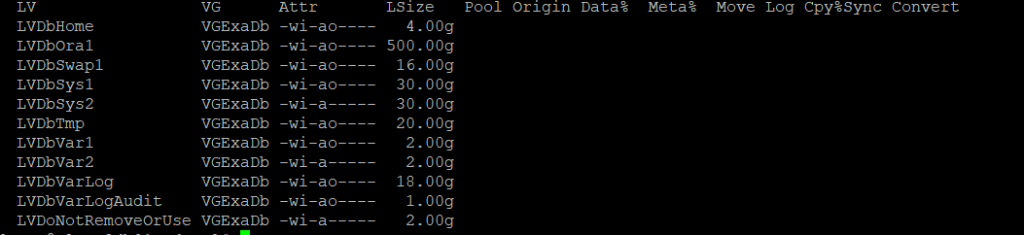
In the above picture, if you noticed there are 2 logical volumes for var mount point. For backup of /var mount point, you need to select correct logical volume depending upon root logical volume group i.e. if the active partition is LVDbSys1 then select LVDbVar1 and if LVDbSys2 is active then select LVDbVar2 for backup of /var mount point.
After backup complete, it is important to remove snapshot logical volume:
$umount /mnt/backup_snap_root

$/sbin/lvremove -f /dev/VGExaDb/LVDbSys1-SNAP
This document is only for learning purpose and always validate in the LAB environment first before applying in the LIVE environment.
Hope so you like this article!
Please share your valuable feedback/comments/subscribe and follow us below and don’t forget to click on the bell icon to get the latest update. Click here to know more about our pursuit.
Related Articles
- Oracle Critical Database Patch ID for April 2026 along with enabled Download Link
- Oracle Critical Database Patch ID for July 2025 along with enabled Download Link
- Oracle Critical Database Patch ID for April 2025 along with enabled Download Link
- Oracle Critical Database Patch ID for January 2025 along with enabled Download Link
- Oracle Critical Database Patch ID for October 2024 along with enabled Download Link
![]()
Thanks a lot.. This is very very useful for beginners to understand both the backup process as Linux Os newbies.
Thanks Sharath for the comment.