ORACLE APPS R12 CLONING STEPS
In this article, we will set up Oracle APPS R12 on the server Oracle Linux. Follow the below ORACLE APPS R12 CLONING STEPS.
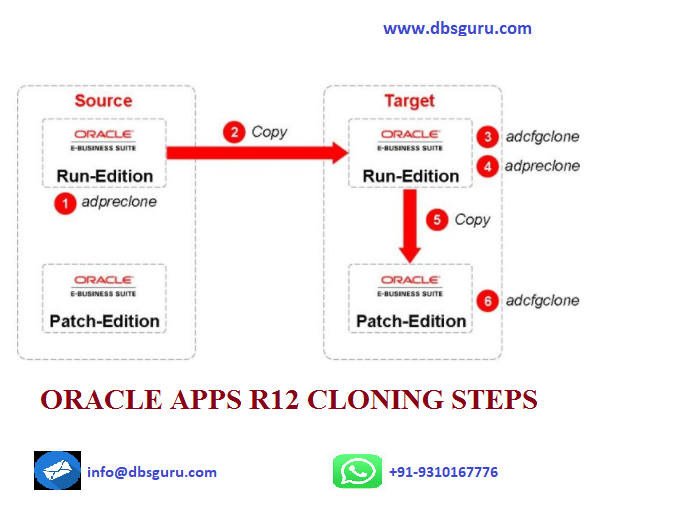
(ON PRODUCTION APPS TIER)
+++++++++++++++++++++++++++++++++++++++++++++++++++++++++++++
- Run adpreclone.pl on Production server. (It will create EBSapps on production)
[appl@DBGURU]$ cd $ADMIN_SCRIPTS_HOME
perl adpreclone.pl appsTier
Now, move EBSapps from Production server to test server through scp. Before moving EBSapps on test server rename the existing EBSapps from there and delete or rename fmw also.
++++++++++++++++++++++++++++++++++++++++++++++++++++++++++++
(ON TEST APPS TIER)
- Stop application – (adstpall.sh will stop the application)
[appltest@DBGURU]$ cd $ADMIN_SCRIPTS_HOME
./adstpall.sh apps/password
- check if the Concurrent processes are still running by-
[appltest@DBGURU]$ ps -ef | grep FNDLIBR
+++++++++++++++++++++++++++++++++++++++++++++++++++++++++++++
TEST DATABASE TIER – (DB Cloning)
- Give permission to rman directory for backup –
[DB@DBGURU]$ chmod 777 / RMAN_BACKUP
++++++++++++++++++++++++++++++++++++++++++++++++++++++++++++++
- Now, we need to Shutdown the database –
[DB@DBGURU]$ sqlplus / as sysdba
shutdown immediate;
++++++++++++++++++++++++++++++++++++++++++++++++++++++++++++++++
- Then Startup database in restricted mode –
startup mount restrict;
++++++++++++++++++++++++++++++++++++++++++++++++++++++++++++++++
- Will drop the existing database –
drop database;
++++++++++++++++++++++++++++++++++++++++++++++++++++++++++++++++
- Now, we need to change the db_name as like production in pfile at test db tier –
[DB@DBGURU]$ cd $ORACLE_HOME/dbs
*.db_name=’TEST‘#Reset to original value by RMAN
Change the db_name –
*.db_name=’PROD‘#Reset to original value by RMAN
++++++++++++++++++++++++++++++++++++++++++++++++++++++++++++++++
- Now, startup database in nomount mode using modified pfile –
[DB@DBGURU]$ sqlplus / as sysdba
SQL> startup nomount pfile='/db/12.2.0/dbs/init.ora';
++++++++++++++++++++++++++++++++++++++++++++++++++++++++++++++++
- Now, we will restore and recover the database and for that we need to Go to rman backup location –
[DB@DBGURU]$ /RMAN_BACKUP/20200805_LEVEL0/ 20200805_LEVEL0
- connect with rman target –
[DB@DBGURU]$ rman target /
- Restore controlfile from backup –
restore controlfile from '/RMAN_BACKUP/20200805_LEVEL0/RMAN_CTLc-21359790-20200805-00';
RMAN> alter database mount;
++++++++++++++++++++++++++++++++++++++++++++++++++++++++++++++++
- Now, run Catalog start with command –
RMAN> catalog start with'/RMAN_BACKUP/20200805_LEVEL0/20200805_LEVEL0';
++++++++++++++++++++++++++++++++++++++++++++++++++++++++++++++++
- Now, Crosscheck the backups-
RMAN> crosscheck backup;
RMAN> report obsolete;
RMAN> delete obsolete;
RMAN> delete expired backup;
++++++++++++++++++++++++++++++++++++++++++++++++++++++++++++++++
- Then run the RMAN restoration scripts with set new name of datafiles (RMAN Script)
[DB@DBGURU]$ /home/db/restore.sql
[DB@DBGURU]$ cat restore.sql
run{
ALLOCATE CHANNEL c1 DEVICE TYPE DISK;
ALLOCATE CHANNEL c2 DEVICE TYPE DISK;
ALLOCATE CHANNEL c3 DEVICE TYPE DISK;
ALLOCATE CHANNEL c4 DEVICE TYPE DISK;
ALLOCATE CHANNEL c5 DEVICE TYPE DISK;
set newname for datafile 1 to '/u02/oracle/test/datafiles/system01.dbf';
set newname for datafile 2 to '/u02/oracle/test/datafiles/ temp01.dbf';
set newname for datafile 3 to '/u02/oracle/test/datafiles/sysaux01.dbf';
set newname for datafile 4 to '/u02/oracle/test/datafiles/app_data01.dbf';
set newname for datafile 5 to '/u02/oracle/test/datafiles/app_ind01.dbf';
restore database;
switch datafile all;
switch tempfile all;
recover database;
RELEASE CHANNEL c1;
RELEASE CHANNEL c2;
RELEASE CHANNEL c3;
RELEASE CHANNEL c4;
RELEASE CHANNEL c5;
}
++++++++++++++++++++++++++++++++++++++++++++++++++++++++++++++++
NOTE – If you receive the error after recover database command (media recovery requesting unknow archivelog for thread 1 with sequence 12345 and for starting scn of ….) then Copy 3 digits before and 3 digits after archivelogs from production and move to test server and then run below recovery command.
RMAN> run{
set until sequence 12345;
recover database;
}
++++++++++++++++++++++++++++++++++++++++++++++++++++++++++++++++
- After recovery we need to rename the prod redo logs –
[DB@DBGURU]$ sqlplus / as sysdba
SQL> col MEMBER for a50;
select group#,member from v$logfile;
ALTER DATABASE RENAME FILE '/prod/redo/log01a.dbf' TO '/db/oracle/test/redo/log01a.dbf';
ALTER DATABASE RENAME FILE '/prod/redo/log02a.dbf' TO '/db/oracle/test/redo/log02a.dbf';
ALTER DATABASE RENAME FILE '/prod/redo/log03a.dbf' TO '/db/oracle/test/redo/log03a.dbf';
ALTER DATABASE RENAME FILE '/prod/redo/log04a.dbf' TO '/db/oracle/test/redo/log04a.dbf';
++++++++++++++++++++++++++++++++++++++++++++++++++++++++++++++++
- Change the block tracking and open db in resetlogs-
SQL> show parameter change;
SQL> alter database disable block change tracking;
SQL> alter database open resetlogs;
++++++++++++++++++++++++++++++++++++++++++++++++++++++++++++++++
- Now, change the password of sys user –
[DB@DBGURU]$ sqlplus / as sysdba
SQL> ALTER USER sys IDENTIFIED BY dbguru1234;
Test the connection –
[DB@DBGURU]$ connect sys/dbguru1234 as sysdba
++++++++++++++++++++++++++++++++++++++++++++++++++++++++++++++++
- shut down the database –
SQL> Shut immediate;
++++++++++++++++++++++++++++++++++++++++++++++++++++++++++++++++
- startup db in mount phase and alter it in noarchive log mode –
SQL> Startup mount;
SQL> alter database noarchivelog;
++++++++++++++++++++++++++++++++++++++++++++++++++++++++++++++++
- Now, check the default temp tablespace via below query –
SQL> column property_value format a25
SELECT property_name,property_value FROM DATABASE_PROPERTIES where PROPERTY_NAME='DEFAULT_TEMP_TABLESPACE';
- Create new temp tablespace and make it default and drop the previous one –
SQL> create TEMPORARY tablespace NEWTEMP tempfile'/u02/oracle/test/datafiles/newtemp01.dbf' size 15G;
MAKE IT DEFAULT –
SQL> ALTER DATABASE DEFAULT TEMPORARY TABLESPACE NEWTEMP;
DROP previous temp –
SQL> DROP TABLESPACE TEMP including contents and datafiles;
- Now, shoutdown the database –
Shut immediate;
Startup mount –
Startup mount;
++++++++++++++++++++++++++++++++++++++++++++++++++++++++++++++++
- Now, run nid command –
[DB@DBGURU]$ nid TARGET=sys/dbguru1234 DBNAME=TEST
++++++++++++++++++++++++++++++++++++++++++++++++++++++++++++++++
- Now, change the name of database from PROD to TEST in pfile.
[DB@DBGURU]$ cd $ORACLE_HOME/dbs
*.db_name=’PROD‘#Reset to original value by RMAN
Change this name –
*.db_name=’TEST‘#Reset to original value by RMAN
Open the database in resetlog mode –
SQL> Alter database open resetlogs;
++++++++++++++++++++++++++++++++++++++++++++++++++++++++++++++++
- Now, go to appsutil directory and run autounfig.sh on Database Tier
[DB@DBGURU]$ cd $ORACLE_HOME/appsutil
sh adautocfg.sh (It will ask apps user password)
++++++++++++++++++++++++++++++++++++++++++++++++++++++++++++++++
- Change the system user password –
SQL> alter user system identified by manager account unlock;
++++++++++++++++++++++++++++++++++++++++++++++++++++++++++++++++
- Run FND_CONC_CLONE.SETUP_CLEAN command –
SQL> EXEC FND_CONC_CLONE.SETUP_CLEAN;
SQL> commit;
++++++++++++++++++++++++++++++++++++++++++++++++++++++++++++++++
TEST APPLICATION TIER – (Application Cloning)
************* steps Before Application Cloning ******************
- go to /var/opt/oracle
[appltest@DBGURU]$ cd /var/opt/oracle
[appltest@DBGURU]$ cat oraInst.loc
inventory_loc=/var/opt/oracle/oraInventory
inst_group=dba —- this entry should be there if not you can write
++++++++++++++++++++++++++++++++++++++++++++++++++++++++++++++++
- go to /var/opt/oracle/oraInventory
[appltest@DBGURU]$ cd /var/opt/oracle/oraInventory
Rename CONTENTSXML –
[appltest@DBGURU]$ mv ContentsXML ContentsXML_bkp6aug20
++++++++++++++++++++++++++++++++++++++++++++++++++++++++++++++++
- Change the permission of oraInventory –
[appltest@DBGURU]$ chmod -R 777 oraInventory
++++++++++++++++++++++++++++++++++++++++++++++++++++++++++++++++
- go to /appl/fs1/EBSapps/comn/clone/bin
[appltest@DBGURU]$ cd /appl/fs1/EBSapps/comn/clone/bin
and run adcfgclone.pl on application server –
[appltest@DBGURU]$ perl adcfgclone.pl appsTier
NOTE- It will ask few information while running adcfgclone.pl
Enter the APPS password :
Enter the Weblogic AdminServer password :
Do you want to add a node (yes/no) [no] :
Target System File Edition type [run] :
Provide the values required for creation of the new APPL_TOP Context file.
Target System Hostname (virtual or normal) [] :
Target System Domain Name : DBGURU
Target System Database SID : TEST
Target System Database Server Node [] :
Target System Database Domain Name [DBGURU] :
Target System Base Directory : /appl
Target System Instance Home Directory [/appl] :
Target System Instance Top set to /appl/fs1/inst/apps/test
Do you want to preserve the Display [appr12:0.0] (y/n) : n
Target System Display [:0.0] : 0
Target System Root Service [enabled] :
Target System Web Entry Point Services [enabled] :
Target System Web Application Services [enabled] :
Target System Batch Processing Services [enabled] :
Target System Other Services [disabled] :
Do you want the target system to have the same port values as the source system (y/n) [y] ? : n
Target System Port Pool [0-99] : 6
Enter the Database listener port [1528] : 1521
UTL_FILE_DIR on database tier consists of the following directories.
1. /usr/tmp
Choose a value which will be set as APPLPTMP value on the target node [1] : 1
++++++++++++++++++++++++++++++++++++++++++++++++++++++++++++++++
- Now, login with application user and change the apps password using below command –
[appltest@DBGURU]$ FNDCPASS apps/password 0 Y system/manager SYSTEM APPLSYS password1
++++++++++++++++++++++++++++++++++++++++++++++++++++++++++++++++
- Change the sysadmin password using below commands –
[appltest@DBGURU]$ FNDCPASS apps/password1 0 Y system/manager USER SYSADMIN dbguru1
++++++++++++++++++++++++++++++++++++++++++++++++++++++++++++++++
- Now, start WLS Adminserver and change the password of apps–
[appltest@DBGURU]$ cd $ADMIN_SCRIPTS_HOME
./adadminsrvctl.sh start
Navigation to change the password of apps in WLS –
Click on Lock & Edit -> service->datasource->ebs_datasouce->connection pool->enter password , confirm password -> Click on Activate
++++++++++++++++++++++++++++++++++++++++++++++++++++++++++++++++
- Afetr changing the password we need to stop WLS Adminserver –
[appltest@DBGURU]$ cd $ADMIN_SCRIPTS_HOME
./adadminsrvctl.sh stop
++++++++++++++++++++++++++++++++++++++++++++++++++++++++++++++++
- Now, run adautocfg.sh on apps tier –
[appltest@DBGURU]$ cd $ADMIN_SCRIPTS_HOME
./adautocfg.sh apps/password1
++++++++++++++++++++++++++++++++++++++++++++++++++++++++++++++++
- Now, Start the application –
[appltest@DBGURU]$ cd $ADMIN_SCRIPTS_HOME
adstrtal.sh apps/password1
This document is only for learning purpose and always validate in the LAB environment first before applying in the LIVE environment.
Hope so you like this article!
Please share your valuable feedback/comments/subscribe and follow us below and don’t forget to click on the bell icon to get the latest update. Click here to know more about our pursuit.
![]()
Excellent😊🙏🏻 very helpful document, tqsomuch DBsGuru, please can you share weblogic cluster nodes documents I ll be tqful to you if you do so.
Thanks, Request to keep visiting us for new articles and provide your valuable feedback to motivate us & keep improving.