Step by Step Oracle 12cR2 Binary Installation and Database Creation On Linux
In this article, we are going to demonstrate Step by Step Oracle 12cR2 (12.2.0.1) enterprise edition binary Installation and database Creation On Linux 7.9 (OEL) using GUI mode. We will complete this article in three parts.
1. Prechecks / Prerequisite
2. Oracle 12cR2 binary installation (runInstaller)
3. Oracle database creation (DBCA)
Key points to remember before start Installation on Linux x86-64:
- Minimum space 7.5 to 8.5 GB require to install Oracle Database Enterprise Edition / Standard Edition 2.
- Minimum 1 GB RAM required for Oracle Database installation but 2 GB RAM recommended.
- Server is connected to the network.
- Minimum server display card 1024 x 768 resolution to launch Oracle Universal Installer (OUI).
- Minimum Runlevel 3 or 5.
- Supported Linux versions 6 & 7.
- Minimum 1GB in temporary directory generally called /tmp.
- Swap space requires as below:
Between 1 GB and 2 GB: 1.5 times the size of the RAM
Between 2 GB and 16 GB: Equal to the size of the RAM
More than 16 GB: 16 GB
1. Prechecks / Prerequisite
1.1. Basics prerequisites: Here we have two options either automatic setup or manual setup which is required to complete basic setup. You can use any one method.
1.1A1.Automatic Setup: In automatic setup using package oracle-database-server-12cR2-preinstall which will perform all prerequisite set up.
[root@DBsGuruN1 ~]# yum install oracle-database-server-12cR2-preinstall
Loaded plugins: langpacks, ulninfo
Resolving Dependencies
--> Running transaction check
---> Package oracle-database-server-12cR2-preinstall.x86_64 0:1.0-5.el7 will be installed
--> Processing Dependency: libaio-devel for package: oracle-database-server-12cR2-preinstall-1.0-5.el7.x86_64
--> Processing Dependency: ksh for package: oracle-database-server-12cR2-preinstall-1.0-5.el7.x86_64
--> Running transaction check
---> Package ksh.x86_64 0:20120801-142.0.1.el7 will be installed
---> Package libaio-devel.x86_64 0:0.3.109-13.el7 will be installed
--> Finished Dependency Resolution

Dependencies Resolved

==============================================================================================================================================================================================================
 Package                                                               Arch                                 Version                                            Repository                                Size
==============================================================================================================================================================================================================
Installing:
 oracle-database-server-12cR2-preinstall                               x86_64                               1.0-5.el7                                          ol7_latest                                19 k
Installing for dependencies:
 ksh                                                                   x86_64                               20120801-142.0.1.el7                               ol7_latest                               882 k
 libaio-devel                                                          x86_64                               0.3.109-13.el7                                     ol7_latest                                12 k

Transaction Summary
==============================================================================================================================================================================================================
Install  1 Package (+2 Dependent packages)

Total download size: 914 k
Installed size: 3.2 M
Is this ok [y/d/N]: y
Downloading packages:
No Presto metadata available for ol7_latest
(1/3): libaio-devel-0.3.109-13.el7.x86_64.rpm                                                                                                                                          |  12 kB  00:00:00
(2/3): oracle-database-server-12cR2-preinstall-1.0-5.el7.x86_64.rpm                                                                                                                    |  19 kB  00:00:00
(3/3): ksh-20120801-142.0.1.el7.x86_64.rpm                                                                                                                                             | 882 kB  00:00:00
--------------------------------------------------------------------------------------------------------------------------------------------------------------------------------------------------------------
Total                                                                                                                                                                         2.5 MB/s | 914 kB  00:00:00
Running transaction check
Running transaction test
Transaction test succeeded
Running transaction
  Installing : ksh-20120801-142.0.1.el7.x86_64                                                                                                                                                            1/3
  Installing : libaio-devel-0.3.109-13.el7.x86_64                                                                                                                                                         2/3
  Installing : oracle-database-server-12cR2-preinstall-1.0-5.el7.x86_64                                                                                                                                   3/3
  Verifying  : oracle-database-server-12cR2-preinstall-1.0-5.el7.x86_64                                                                                                                                   1/3
  Verifying  : libaio-devel-0.3.109-13.el7.x86_64                                                                                                                                                         2/3
  Verifying  : ksh-20120801-142.0.1.el7.x86_64                                                                                                                                                            3/3

Installed:
  oracle-database-server-12cR2-preinstall.x86_64 0:1.0-5.el7

Dependency Installed:
  ksh.x86_64 0:20120801-142.0.1.el7                                                                    libaio-devel.x86_64 0:0.3.109-13.el7

Complete!
1.1.A2. Validate user Oracle & groups: We can validate user Oracle and require groups created and align to user Oracle.
[root@DBsGuruN1 ~]# cat /etc/group| grep -i ora
libstoragemgmt:x:994:
oinstall:x:54321:oracle
dba:x:54322:oracle
oper:x:54323:oracle
backupdba:x:54324:oracle
dgdba:x:54325:oracle
kmdba:x:54326:oracle
racdba:x:54330:oracle

[root@DBsGuruN1 ~]# id oracle
uid=54321(oracle) gid=54321(oinstall) groups=54321(oinstall),54322(dba),54323(oper),54324(backupdba),54325(dgdba),54326(kmdba),54330(racdba)
1.1.B. Manual Setup: We need to follow the mention require setup in the manual.
1.1.B1. Using any text editor, create or edit the /etc/sysctl.d/97-oracle-database-sysctl.conf file, and add or edit lines similar to: (value depends on your system configuration and requirements).
fs.aio-max-nr = 1048576
fs.file-max = 6815744
kernel.shmall = 2097152  ##40 percent of the size of physical memory in pages*1
kernel.shmmax = 4294967295 ##Half the size of physical memory in bytes*2
kernel.shmmni = 4096
kernel.sem = 250 32000 100 128
net.ipv4.ip_local_port_range = 9000 65500
net.core.rmem_default = 262144
net.core.rmem_max = 4194304
net.core.wmem_default = 262144
net.core.wmem_max = 1048576
By specifying the values in the /etc/sysctl.d/97-oracle-database-sysctl.conf file, the values persist on system restarts.
*1. If the server supports multiple databases or uses a large SGA, then set this parameter to a value that is equal to the total amount of shared memory, in 4K pages, that the system can use at one time.
*2. Review My Oracle Support Note 567506.1 for additional information about configuring shmmax.
1.1.B2. To change the current values of the kernel parameters: Change kernel parameters value without a reboot.
[root@DBsGuruN1 ~]# /sbin/sysctl --system
1.1.B3. Validate that the values are set correctly on OS: Validate the output. If the values are incorrect, edit the /etc/sysctl.d/97-oracle-database-sysctl.conf file, then execute the below command again.
[root@DBsGuruN1 ~]# /sbin/sysctl -a
1.1.B4. Reboot machine or execute sysctl –system: Reboot the machine, or run sysctl –system to make the changes in the /etc/sysctl.d/97-oracle-database-sysctl.conf the file available in the active kernel memory.
1.1.B5. Required packages: Below are the required packages including the 32-bit version of some of the packages. Many of the packages should be installed already.
For Oracle Linux 7: The following packages (or later versions) must be installed.
bc
binutils-2.23.52.0.1-12.el7 (x86_64)
compat-libcap1-1.10-3.el7 (x86_64)
compat-libstdc++-33-3.2.3-71.el7 (i686)
compat-libstdc++-33-3.2.3-71.el7 (x86_64)
glibc-2.17-36.el7 (i686)
glibc-2.17-36.el7 (x86_64)
glibc-devel-2.17-36.el7 (i686)
glibc-devel-2.17-36.el7 (x86_64)
ksh
libaio-0.3.109-9.el7 (i686)
libaio-0.3.109-9.el7 (x86_64)
libaio-devel-0.3.109-9.el7 (i686)
libaio-devel-0.3.109-9.el7 (x86_64)
libX11-1.6.0-2.1.el7 (i686)
libX11-1.6.0-2.1.el7 (x86_64)
libXau-1.0.8-2.1.el7 (i686)
libXau-1.0.8-2.1.el7 (x86_64)
libXi-1.7.2-1.el7 (i686)
libXi-1.7.2-1.el7 (x86_64)
libXtst-1.2.2-1.el7 (i686)
libXtst-1.2.2-1.el7 (x86_64)
libXrender (i686)
libXrender (x86_64)
libXrender-devel (i686)
libXrender-devel (x86_64)
libgcc-4.8.2-3.el7 (i686)
libgcc-4.8.2-3.el7 (x86_64)
libstdc++-4.8.2-3.el7 (i686)
libstdc++-4.8.2-3.el7 (x86_64)
libstdc++-devel-4.8.2-3.el7 (i686)
libstdc++-devel-4.8.2-3.el7 (x86_64)
libxcb-1.9-5.el7 (i686)
libxcb-1.9-5.el7 (x86_64)
make-3.82-19.el7 (x86_64)
nfs-utils-1.3.0-0.21.el7.x86_64 (for Oracle ACFS)
net-tools-2.0-0.17.20131004git.el7 (x86_64) (for Oracle RAC and Oracle Clusterware)
smartmontools-6.2-4.el7 (x86_64)
sysstat-10.1.5-1.el7 (x86_64)
For Oracle Linux 6: The following packages (or later versions) must be installed.
bc
binutils-2.20.51.0.2-5.36.el6 (x86_64)
compat-libcap1-1.10-1 (x86_64)
compat-libstdc++-33-3.2.3-69.el6 (x86_64)
compat-libstdc++-33-3.2.3-69.el6 (i686)
e2fsprogs-1.41.12-14.el6 (x86_64)
e2fsprogs-libs-1.41.12-14.el6 (x86_64)
glibc-2.12-1.7.el6 (i686)
glibc-2.12-1.7.el6 (x86_64)
glibc-devel-2.12-1.7.el6 (x86_64)
glibc-devel-2.12-1.7.el6 (i686)
ksh
libgcc-4.4.4-13.el6 (i686)
libgcc-4.4.4-13.el6 (x86_64)
libstdc++-4.4.4-13.el6 (x86_64)
libstdc++-4.4.4-13.el6 (i686)
libstdc++-devel-4.4.4-13.el6 (x86_64)
libstdc++-devel-4.4.4-13.el6 (i686)
libaio-0.3.107-10.el6 (x86_64)
libaio-0.3.107-10.el6 (i686)
libaio-devel-0.3.107-10.el6 (x86_64)
libaio-devel-0.3.107-10.el6 (i686)
libXtst-1.0.99.2 (x86_64)
libXtst-1.0.99.2 (i686)
libX11-1.5.0-4.el6 (i686)
libX11-1.5.0-4.el6 (x86_64)
libXau-1.0.6-4.el6 (i686)
libXau-1.0.6-4.el6 (x86_64)
libxcb-1.8.1-1.el6 (i686)
libxcb-1.8.1-1.el6 (x86_64)
libXi-1.3 (x86_64)
libXi-1.3 (i686)
libXrender (i686)
libXrender (x86_64)
libXrender-devel (i686)
libXrender-devel (x86_64)
make-3.81-19.el6
net-tools-1.60-110.el6_2.x86_64 (for Oracle RAC and Oracle Clusterware)
nfs-utils-1.2.3-15.0.1 (for Oracle ACFS)
sysstat-9.0.4-11.el6 (x86_64)
smartmontools-5.43-1.el6.x86_64
You can use the command yum install <package name> to install or download it from the site and apply it to the server.
1.1.B6. Verify installed packages: Using the blow command validate installed packages.
[root@DBsGuruN1 ~]# rpm -q binutils compat-libcap1 glibc-2.17 glibc-devel-2.17 ksh libaio libaio-devel libX11 \
libXau libXi libXtst libgcc libstdc++- libstdc++-devel libxcb make net-tools smartmontools sysstat
You can add more package names in the above command according to require validation.
1.1.B7. Create require groups and users: Create require groups and user oracle along with assign primary and secondary groups to user Oracle.
[root@DBsGuruN1 ~]# /usr/sbin/groupadd -g 54321 oinstall
[root@DBsGuruN1 ~]# /usr/sbin/groupadd -g 54322 dba
[root@DBsGuruN1 ~]# /usr/sbin/groupadd -g 54323 oper
[root@DBsGuruN1 ~]# /usr/sbin/groupadd -g 54324 backupdba
[root@DBsGuruN1 ~]# /usr/sbin/groupadd -g 54325 dgdba
[root@DBsGuruN1 ~]# /usr/sbin/groupadd -g 54326 kmdba
[root@DBsGuruN1 ~]# /usr/sbin/groupadd -g 54327 asmdba
[root@DBsGuruN1 ~]# /usr/sbin/groupadd -g 54328 asmoper
[root@DBsGuruN1 ~]# /usr/sbin/groupadd -g 54329 asmadmin
[root@DBsGuruN1 ~]# /usr/sbin/groupadd -g 54330 racdba
[root@DBsGuruN1 ~]#
[root@DBsGuruN1 ~]# # /usr/sbin/useradd -u 54321 -g oinstall -G dba,oper,backupdba,dgdba,kmdba,asmdba,asmoper,asmadmin oracle
NOTE: You can create groups as require, above is the complete list of groups.
1.2. Change password: This is required to change the oracle password, either way, we used automatic or manual setup.
[root@DBsGuruN1 ~]# passwd oracle
Changing password for user oracle.
New password:
BAD PASSWORD: The password is shorter than 8 characters
Retype new password:
passwd: all authentication tokens updated successfully.
1.3. Validate new Oracle’s password: Upon completion of the above step, open a new terminal and login to oracle using a new password and validate groups.
[oracle@DBsGuruN1 ~]$ id
uid=54321(oracle) gid=54321(oinstall) groups=54321(oinstall),54322(dba),54323(oper),54324(backupdba),54325(dgdba),54326(kmdba),54330(racdba) context=unconfined_u:unconfined_r:unconfined_t:s0-s0:c0.c1023
[oracle@DBsGuruN1 ~]$
1.4 Verify memory and server hardware configuration: In this section, we will verify memory & various type of server configuration which is required before installation and make the sure value of below command meet to the minimum requirement of Oracle 12cR2 installation.
1.4.1. Validate total physical memory on server:
[root@DBsGuruN1 ~]# grep MemTotal /proc/meminfo
MemTotal:        4021244 kB
1.4.2. Validate configured swap memory on server:
[root@DBsGuruN1 ~]# grep SwapTotal /proc/meminfo
SwapTotal:       4063228 kB
1.4.3. Validate available space in a temporary directory: If space is less as require in directory /tmp so either remove unwanted files from this directory to reach to minimum require space or set the different temporary directory in your environment variables.
[root@DBsGuruN1 ~]# df -h /tmp
Filesystem           Size  Used Avail Use% Mounted on
/dev/mapper/ol-root   36G  9.8G   26G  28% /
1.4.4. Validate free RAM (memory) on the server.
[root@DBsGuruN1 ~]# free -m
              total        used        free      shared  buff/cache   available
Mem:           3926         454        2584          11         887        3227
Swap:          3967           0        3967
1.4.5. Validate the system architecture: It will help to install software i.e require 64-bit software.
[root@DBsGuruN1 ~]# uname -m
x86_64
1.4.6. Validate shared memory which is correctly mounted along with required size.
[root@DBsGuruN1 ~]# df -h /dev/shm
Filesystem      Size  Used Avail Use% Mounted on
tmpfs           2.0G     0  2.0G   0% /dev/shm
1.4.7. Validate distribution and version of installed Linux: Execute any one command to validate it.
[root@DBsGuruN1 ~]# cat /etc/oracle-release
Oracle Linux Server release 7.9
[root@DBsGuruN1 ~]# cat /etc/redhat-release
Red Hat Enterprise Linux Server release 7.9 (Maipo)
[root@DBsGuruN1 ~]# cat /etc/SuSE-release
[root@DBsGuruN1 ~]# lsb_release -id
1.4.7. Validate installed kernel of Linux.
[root@DBsGuruN1 ~]# uname -r
5.4.17-2036.102.0.2.el7uek.x86_64
1.5. Validate hostname along with hostname resolution: Make sure hostname should be resolved either OS name or fully qualified name. To resolve a hostname, we can resolve it either DNS (Domain Name Service), NIS (Network Information Service), or a centrally-maintained TCP/IP host file, such as /etc/hosts. Use the ping command to ensure that your OS hostname is resolvable. Follow the below command to validate it.
[root@DBsGuruN1 ~]# cat /etc/hosts  | grep -i dbsguru
10.0.2.15 DBsGuruN1.labdomain DBsGuruN1
[root@DBsGuruN1 ~]#
[root@DBsGuruN1 ~]# ping -c3 DBsGuruN1
PING DBsGuruN1.labdomain (10.0.2.15) 56(84) bytes of data.
64 bytes from DBsGuruN1.labdomain (10.0.2.15): icmp_seq=1 ttl=64 time=0.030 ms
64 bytes from DBsGuruN1.labdomain (10.0.2.15): icmp_seq=2 ttl=64 time=0.082 ms
64 bytes from DBsGuruN1.labdomain (10.0.2.15): icmp_seq=3 ttl=64 time=0.088 ms

--- DBsGuruN1.labdomain ping statistics ---
3 packets transmitted, 3 received, 0% packet loss, time 2089ms
rtt min/avg/max/mdev = 0.030/0.066/0.088/0.027 ms
[root@DBsGuruN1 ~]#
[root@DBsGuruN1 ~]# ping -c3 DBsGuruN1.labdomain
PING DBsGuruN1.labdomain (10.0.2.15) 56(84) bytes of data.
64 bytes from DBsGuruN1.labdomain (10.0.2.15): icmp_seq=1 ttl=64 time=0.032 ms
64 bytes from DBsGuruN1.labdomain (10.0.2.15): icmp_seq=2 ttl=64 time=0.082 ms
64 bytes from DBsGuruN1.labdomain (10.0.2.15): icmp_seq=3 ttl=64 time=0.084 ms

--- DBsGuruN1.labdomain ping statistics ---
3 packets transmitted, 3 received, 0% packet loss, time 2196ms
rtt min/avg/max/mdev = 0.032/0.066/0.084/0.024 ms
1.5. Set SELINUX=permissive: Change the value of SELINUX in the file /etc/selinux/config using any editor. Once you change the value immediate reboot server to take effect of new values.
[root@DBsGuruN1 ~]# cat /etc/selinux/config | grep SELINUX | grep -v '#'  --Old value
SELINUX=permissive
SELINUXTYPE=permissive
[root@DBsGuruN1 ~]# cat /etc/selinux/config | grep SELINUX | grep -v '#'  --New value
SELINUX=permissive
SELINUXTYPE=targeted
[root@DBsGuruN1 ~]# reboot now
1.6. Disable firewall on OS: Disable firewall if required, follow the below command.
[root@DBsGuruN1 ~]# systemctl stop firewalld
[root@DBsGuruN1 ~]# systemctl disable firewalld
Removed symlink /etc/systemd/system/multi-user.target.wants/firewalld.service.
Removed symlink /etc/systemd/system/dbus-org.fedoraproject.FirewallD1.service.
[root@DBsGuruN1 ~]# systemctl status firewalld
● firewalld.service - firewalld - dynamic firewall daemon
   Loaded: loaded (/usr/lib/systemd/system/firewalld.service; disabled; vendor preset: enabled)
   Active: inactive (dead)
     Docs: man:firewalld(1)

Feb 05 17:14:18 DBsGuruN1.labdomain systemd[1]: Starting firewalld - dynamic firewall daemon...
Feb 05 17:14:21 DBsGuruN1.labdomain systemd[1]: Started firewalld - dynamic firewall daemon.
Feb 05 17:14:21 DBsGuruN1.labdomain firewalld[924]: WARNING: AllowZoneDrifting is enabled. This is considered an insecure configuration option. It will be removed in a future release. Please...bling it now.
Feb 05 17:42:10 DBsGuruN1.labdomain systemd[1]: Stopping firewalld - dynamic firewall daemon...
Feb 05 17:42:12 DBsGuruN1.labdomain systemd[1]: Stopped firewalld - dynamic firewall daemon.
Hint: Some lines were ellipsized, use -l to show in full.
1.7. Create require directories.
[oracle@DBsGuruN1 ~]$ mkdir -p /u02/app/oracle/product/12201/db_1
[oracle@DBsGuruN1 ~]$ mkdir -p /oradata/guru12r2
[oracle@DBsGuruN1 ~]$ mkdir -p /oradata/software
[oracle@DBsGuruN1 ~]$ chown -R oracle:oinstall /u02/ /oradata/
[oracle@DBsGuruN1 ~]$ chmod 775 -R /u02/ /oradata/
[oracle@DBsGuruN1 ~]$ mkdir -p /oradata/fra
[oracle@DBsGuruN1 ~]$ mkdir -p /u02/guru12r2
[oracle@DBsGuruN1 ~]$ ls -ld /u02/app/oracle/product/12201/db_1 /oradata/guru12r2 /oradata/software /oradata/guru12r2/fra /u02/guru12r2
drwxrwxr-x. 2 oracle oinstall 6 Feb  6 10:46 /oradata/guru12r2  --For datafiles
drwxrwxr-x. 2 oracle oinstall 6 Feb  6 10:46 /oradata/software  --For binary
drwxrwxr-x. 2 oracle oinstall 6 Feb  6 10:42 /u02/app/oracle/product/12201/db_1 --For Oracle Home
drwxrwxr-x. 2 oracle oinstall 6 Feb  6 12:45 /oradata/fra  --For FRA
drwxrwxr-x. 2 oracle oinstall 6 Feb  6 12:54 /u02/guru12r2  --For Control file multiplex
1.8. Unzip the software: Move the binary file to /oradata/software and unzip in the same location. After unzip we can see one single directory created by name of database which contains all required files to install.
[oracle@DBsGuruN1 ~]$ cd /oradata/software
[oracle@DBsGuruN1 software]$ ls -lrt
total 3724816
-rw-r--r--. 1 oracle oinstall 3453696911 Feb  6 10:52 V839960-01.zip
[oracle@DBsGuruN1 software]$ unzip V839960-01.zip
Archive:  V839960-01.zip
   creating: database/
   creating: database/sshsetup/
------------Trimmed Data------------
  inflating: database/stage/Components/oracle.blaslapack/12.2.0.1.0/1/DataFiles/filegroup3.jar
  inflating: database/stage/shiphomeinfo.properties
   creating: database/stage/globalvariables/
  inflating: database/stage/globalvariables/variable.properties
  inflating: database/stage/globalvariables/globalvar.xml
  inflating: database/stage/install1.jar
  inflating: database/runInstaller

[oracle@DBsGuruN1 software]$ ls -lrt
total 3724820
drwxr-xr-x. 7 oracle oinstall       4096 Jan 26  2017 database
-rw-r--r--. 1 oracle oinstall 3453696911 Feb  6 10:52 V839960-01.zip
2. Oracle 12cR2 binary installation (runInstaller)
2.1. set DISPLAY as oracle user: export DISPLAY where IP depends on your configuration or tool being used for it, applicable if installing as a remote session.
[oracle@DBsGuruN1 software]$ export DISPLAY=<machine-name/IP>:0.0
2.2. Launch Oracle Universal Installer: Go to directory database and execute command runInstaller to launch Oracle Universal Installer (OUI).
[oracle@DBsGuruN1 software]$ cd database/
[oracle@DBsGuruN1 database]$ ls -lrt
total 24
-rwxr-xr-x.  1 oracle oinstall  500 Feb  7  2013 welcome.html
drwxr-xr-x.  4 oracle oinstall 4096 Jan 26  2017 install
-rwxr-xr-x.  1 oracle oinstall 8771 Jan 26  2017 runInstaller
drwxr-xr-x.  2 oracle oinstall   35 Jan 26  2017 rpm
drwxrwxr-x.  2 oracle oinstall   29 Jan 26  2017 sshsetup
drwxrwxr-x.  2 oracle oinstall   61 Jan 26  2017 response
drwxr-xr-x. 14 oracle oinstall 4096 Jan 26  2017 stage
[oracle@DBsGuruN1 database]$ ./runInstaller
Starting Oracle Universal Installer...

Checking Temp space: must be greater than 500 MB.   Actual 22507 MB    Passed
Checking swap space: must be greater than 150 MB.   Actual 3967 MB    Passed
Checking monitor: must be configured to display at least 256 colors.    Actual 16777216    Passed
Preparing to launch Oracle Universal Installer from /tmp/OraInstall2021-02-06_12-05-46PM. Please wait ...[oracle@DBsGuruN1 database]$
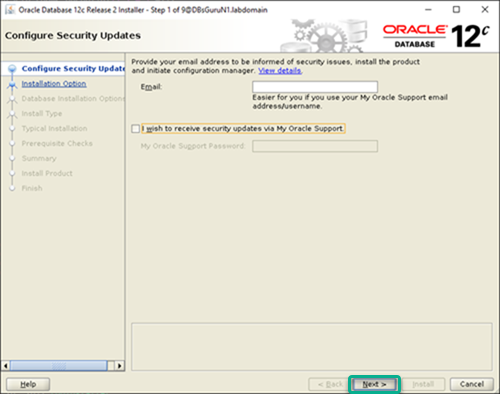
Configure Security Update: After executing the above command we get this 1st screen where we can put email id to get security update or we can keep leave value for Email and click on Next.
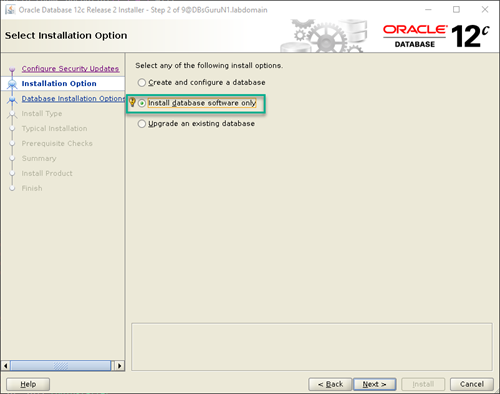
2.3. Installation options: Here we have three options where we will select Install database software only as we decided to create a database in the next phase and click next.
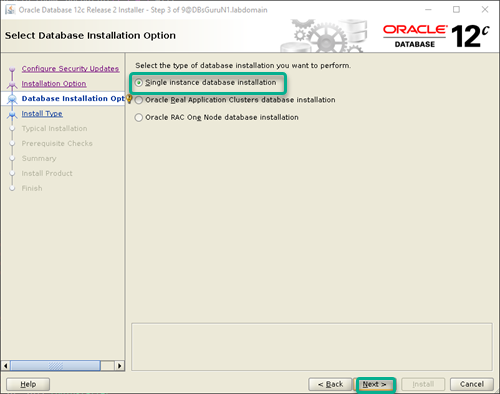
2.4. Database installation option: We are using a standalone server so select option 1 and click on Next.
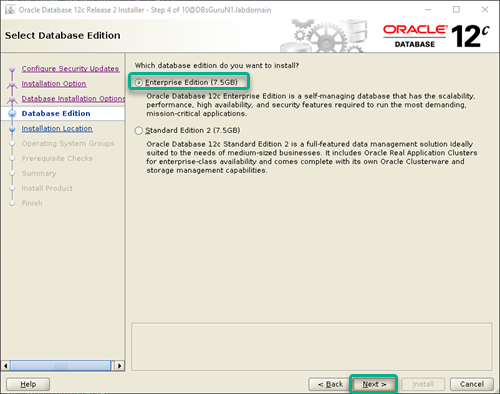
2.5. Database Edition: Select option Enterprise edition or according to your valid license if installing for client/organization then click Next.
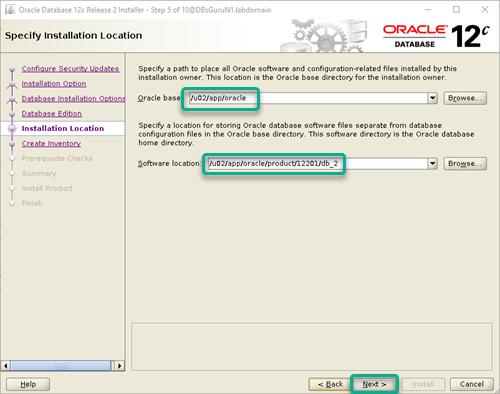
2.6. Installation Location: In this section OUI will select automatically location of ORACLE_HOME but we have already created directory for ORACLE_HOME so will pass this directory under Software location and click on Next.
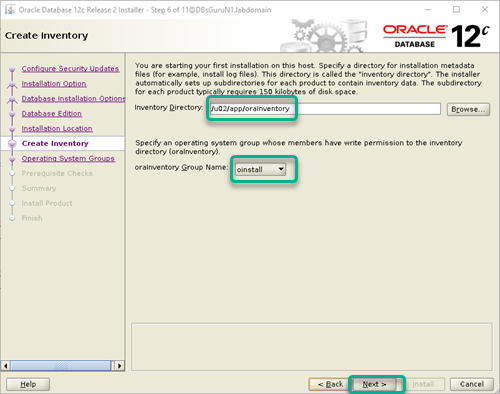
2.7. Create Inventory: Pass the value directory for inventory along with primary group oinstall, it will be set up automatically on base of passed values and click on Next.
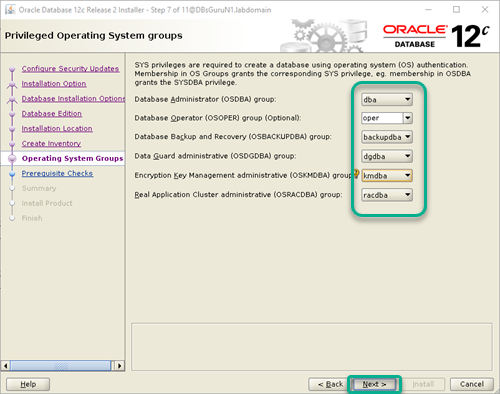
2.8. Operating System Groups: Assign appropriate groups according to require functionality and click on Next.
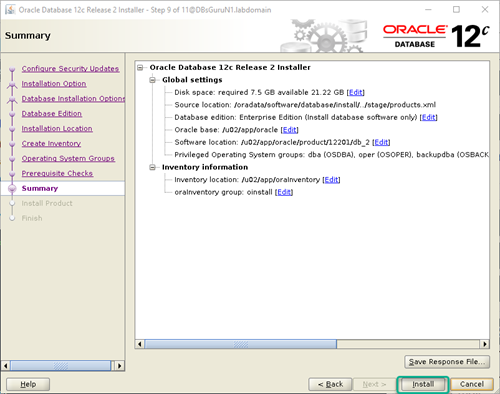
2.9. Summary: Once click on Next on previous screen, OUI performs prechecks. Upon completion of successful prechecks, preview summary page if any thing require to change in this screen still we have opportunity to edit options. Once validate and everything looks good, click on button Install.
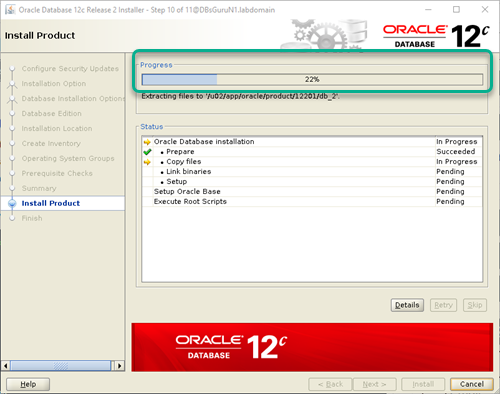
2.10. Install Product: Take a long breath and closely monitor the progress of the installation, keep monitor until the next prompt.
2.11: Upon completion of 93% to 95%, it will ask to execute below two scripts as a root user, Follow instructions and click on OK after successful execution, refer to the output of both scripts.
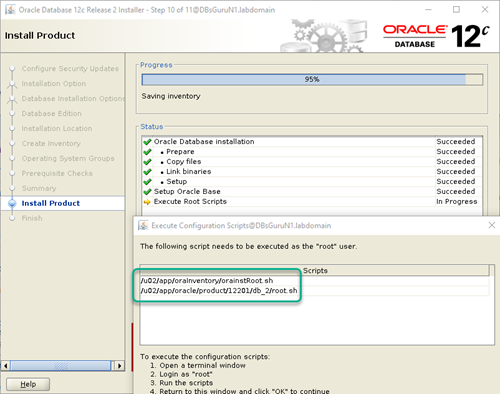
Execute orainstRoot.sh & root.sh as root user.
[root@DBsGuruN1 ~]# /u02/app/oraInventory/orainstRoot.sh
Changing permissions of /u02/app/oraInventory.
Adding read,write permissions for group.
Removing read,write,execute permissions for world.

Changing groupname of /u02/app/oraInventory to oinstall.
The execution of the script is complete.
[root@DBsGuruN1 ~]# /u02/app/oracle/product/12201/db_2/root.sh
Performing root user operation.

The following environment variables are set as:
    ORACLE_OWNER= oracle
    ORACLE_HOME=  /u02/app/oracle/product/12201/db_2

Enter the full pathname of the local bin directory: [/usr/local/bin]:
   Copying dbhome to /usr/local/bin ...
   Copying oraenv to /usr/local/bin ...
   Copying coraenv to /usr/local/bin ...


Creating /etc/oratab file...
Entries will be added to the /etc/oratab file as needed by
Database Configuration Assistant when a database is created
Finished running generic part of root script.
Now product-specific root actions will be performed.
Do you want to setup Oracle Trace File Analyzer (TFA) now ? yes|[no] :
no
Oracle Trace File Analyzer (TFA - User Mode) is available at :
    /u02/app/oracle/product/12201/db_2/suptools/tfa/release/tfa_home/bin/tfactl

OR

Oracle Trace File Analyzer (TFA - Daemon Mode) can be installed by running this script :
    /u02/app/oracle/product/12201/db_2/suptools/tfa/release/tfa_home/install/roottfa.sh
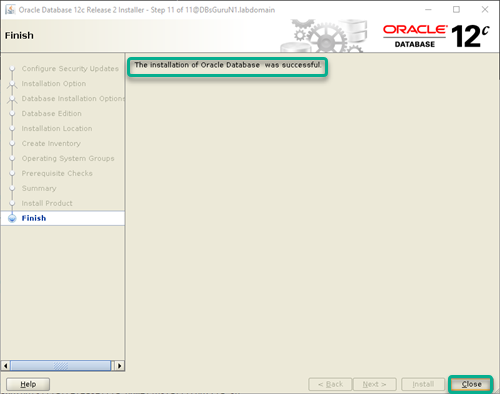
2.12. Finish: This is a final screen that shows successful installation, now click on Close and jump to post validation of installation.
2.13. Post validation: In post validation, we will validate the binary version.
[oracle@DBsGuruN1 ~]$ export ORACLE_HOME=/u02/app/oracle/product/12201/db_2
[oracle@DBsGuruN1 ~]$ export PATH=$ORACLE_HOME/bin:$PATH
[oracle@DBsGuruN1 ~]$ sqlplus -v

SQL*Plus: Release 12.2.0.1.0 Production
3. Oracle database creation (DBCA)
3.1. Set up environment variables: Add below entry in .bash_profile resides in user oracle home directory. In our demonstration it resides on /home/oracle.
export TMP=/tmp
export TMPDIR=$TMP
export ORACLE_HOSTNAME=DBsGuruN1.labdomain
export ORACLE_UNQNAME=guru12r2
export ORACLE_BASE=/u02/app/oracle
export ORACLE_HOME=$ORACLE_BASE/product/12201/db_2
export ORACLE_SID=guru12r2
export PATH=/usr/sbin:$PATH
export PATH=$ORACLE_HOME/bin:$PATH
export LD_LIBRARY_PATH=$ORACLE_HOME/lib:/lib:/usr/lib
export CLASSPATH=$ORACLE_HOME/jlib:$ORACLE_HOME/rdbms/jlib
3.2. Execute environment variables: Here we can execute the environment variables command or go to $ORACLE_HOME/bin to execute dbca command.
[oracle@DBsGuruN1 ~]$ export ORACLE_HOME=/u02/app/oracle/product/12201/db_2
[oracle@DBsGuruN1 ~]$ export PATH=$ORACLE_HOME/bin:$PATH
[oracle@DBsGuruN1 ~]$ which dbca
/u02/app/oracle/product/12201/db_2/bin/dbca
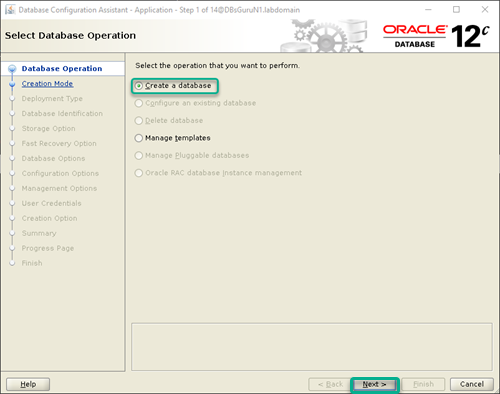
[oracle@DBsGuruN1 ~]$ dbca
3.3. Launch database creation assistant tool: Once you execute dbca, we can see dbca launched a screen and on the first screen, all options are disabled Create database and Manage template, since we are creating the first database for specific ORACLE_HOME. Select option Create a database and click on Next.
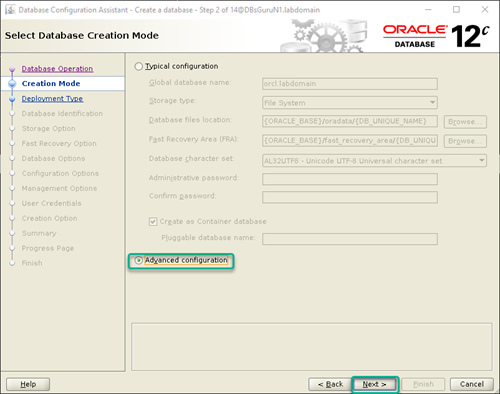
3.4. Creation Mode: In this screen select Advanced configuration to opt for available options like character set, memory, DB files, etc. according to your requirements.
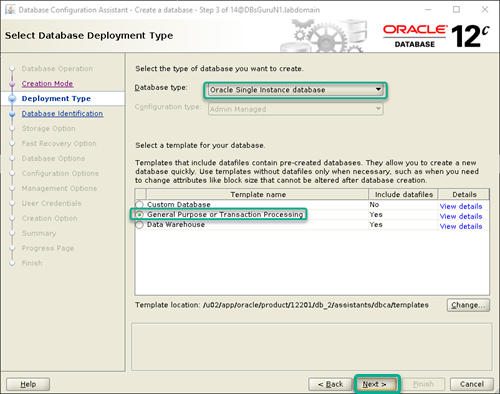
3.5. Deployment Type: In this screen, select Database type: Oracle Single Instance database and Template name: General Purpose then click on Next.
3.6. Database identifier: Pass the value of Global database name / SID and click on Next.
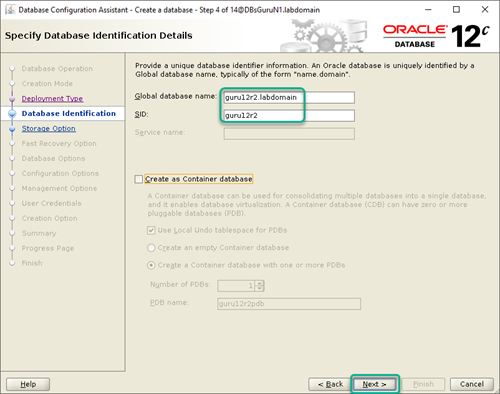
NOTE: You can remove manually the domain name in the Global database name and check/uncheck Create as container database according to your requirements.
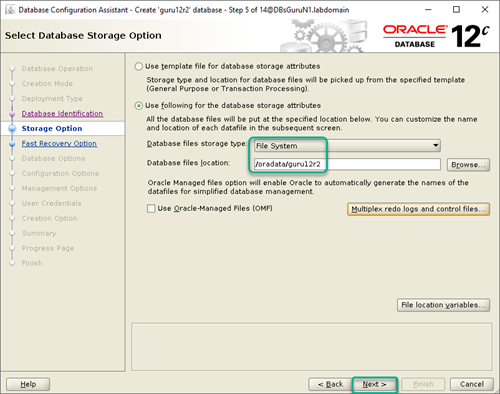
3.7. Storage Option: If you want to create DB files in your desire location then select the second option and browse the directory location, now click on Next.
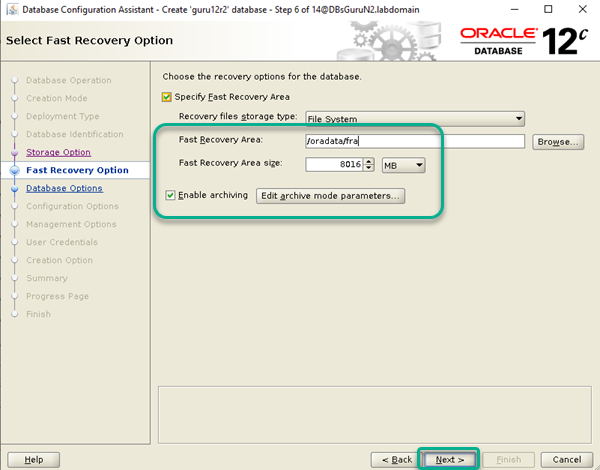
3.8. Fast Recovery Option: In this section, specify an archive location, size of FRA along, and check box to enable archive. If you don’t to enable archive then simply uncheck all boxes. Now click on Next.
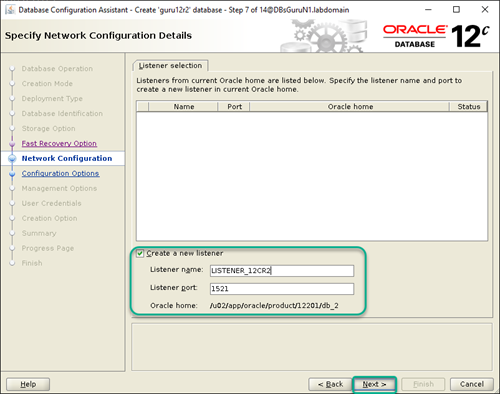
3.9. Network Configuration: Specify a listener name along with a port number if you want to create a non-default listener or dedicated listener for the database.
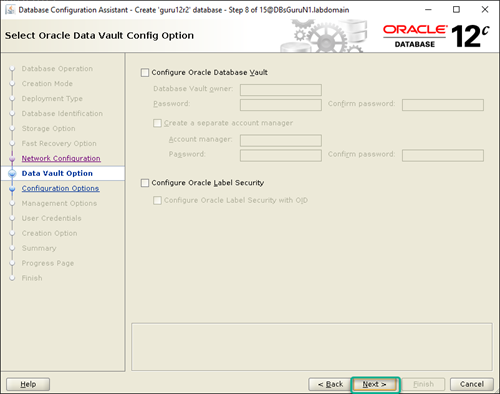
3.10. Database Vault Option: Skip this screen if don’t want to use Database Vault configuration i.e remain to uncheck boxes.
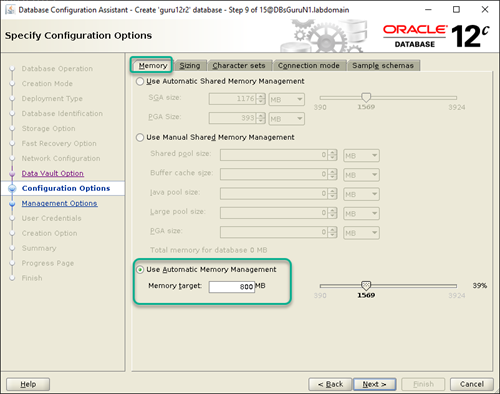
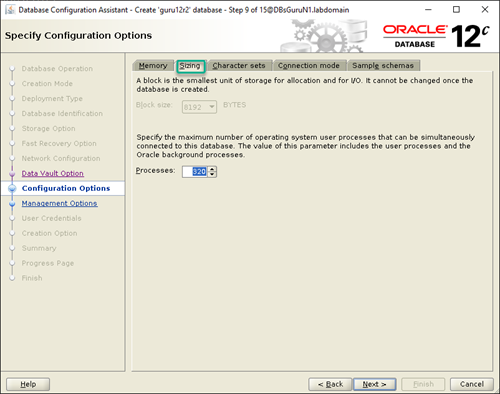
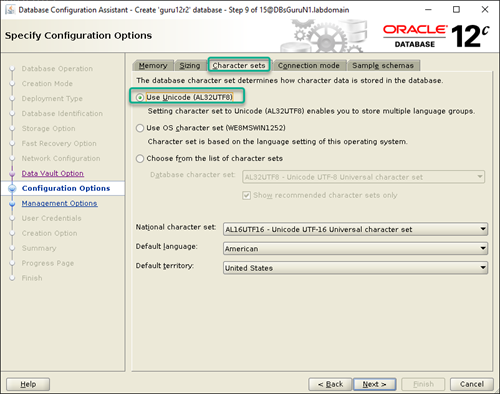
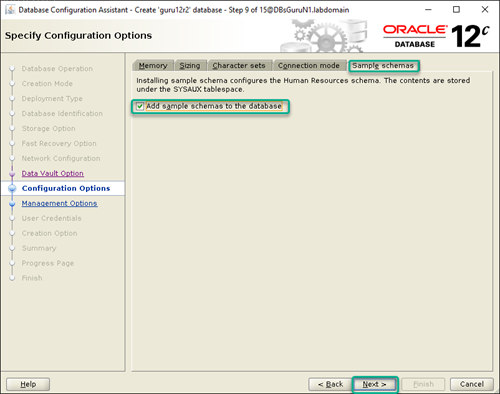
3.11. Configuration options: In this screen, we will click on each tab and do configuration as required.
Memory: Go with either Option-01 Automatic Shared Memory (allocate SGA & PGA) or Option-03 Automatic Memory Management (Memory target).
Sizing: Allocate value of parameter Processes, default value is 300.
Character sets: Select here AL32UTF8 which supports multiple language groups. If any constraints/dependency then go with your requirements.
Connection Mode: Select option-01 Dedicated server mode.

Sample Schema: Check the box Add sample schemas if you require else you may skip it and click on Next.
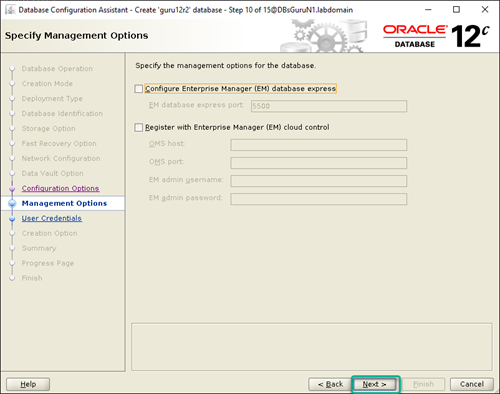
3.12. Management Options: Remain uncheck the box for Enterprise Manager and click on Next.
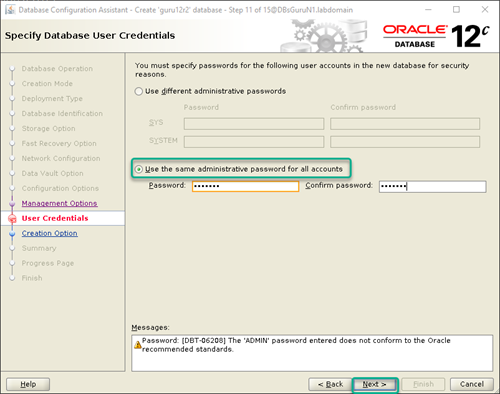
3.13. User Credentials: Pass the value of the password for SYS & SYSTEM and click on Next.
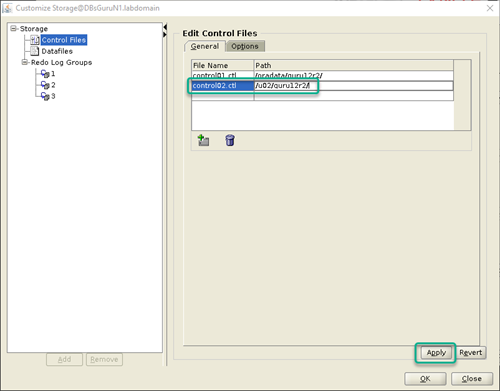
3.14. Creation Options: In this screen, we have options to multiplex control files and redolog files. click on customize Storage Locations and follow the below steps:

Control Files Multiplex: Click on control files add a second control file location then click on Apply.
Redo Log Groups Multiplex: Click to group 1, allocate require file size, add a new member and click on Apply. Follow same for remaining groups 2 &3 then click on Ok.

Once you completed multiplex then click to Next.
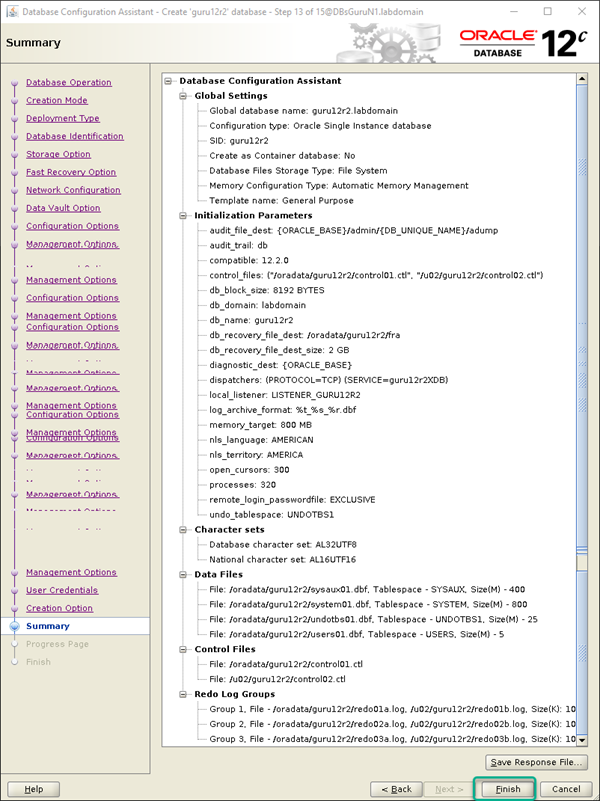
3.15. Summary: This is a final screen to review the summary on the basis of steps 1 to 12 of dbca so review carefully if found anything to change then go back and change the configuration. Once you ready click on Finish.
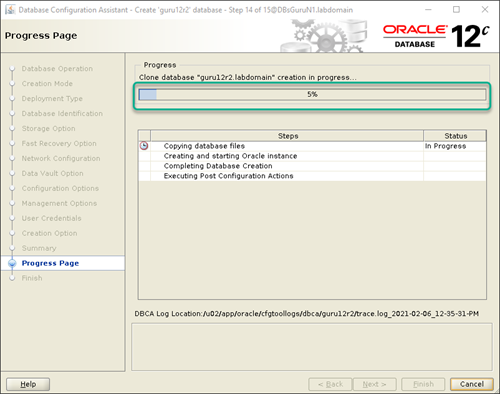
3.16. Progress: Take a long breath and closely monitor the progress of database creation along with the database alert log & DBCA log.
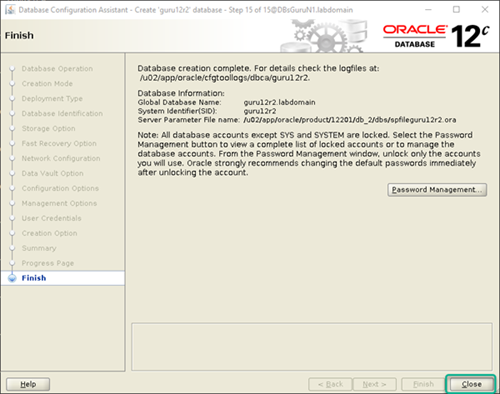
3.17. Finish: Upon successful creation of database GURU12R2, optionally you can click on Password Management to set a new password and unlock the account of sample schemas as require then click on Close.
3.18. Post Validation of database creation: Here we will perform basics validation of the database.
3.18.1: Validate database service along with listener status.
[oracle@DBsGuruN1 ~]$ ps -eaf | grep pmon
oracle   17693     1  0 13:10 ?        00:00:00 ora_pmon_guru12r2
oracle   18175 13311  0 13:12 pts/3    00:00:00 grep --color=auto pmon
[oracle@DBsGuruN1 ~]$ ps -eaf | grep tns
root        36     2  0 11:50 ?        00:00:00 [netns]
oracle   15941     1  0 13:06 ?        00:00:00 /u02/app/oracle/product/12201/db_2/bin/tnslsnr LISTENER_12CR2 -inherit
oracle   18181 13311  0 13:12 pts/3    00:00:00 grep --color=auto tns
[oracle@DBsGuruN1 ~]$ lsnrctl status LISTENER_12CR2

LSNRCTL for Linux: Version 12.2.0.1.0 - Production on 06-FEB-2021 13:13:02

Copyright (c) 1991, 2016, Oracle.  All rights reserved.

Connecting to (DESCRIPTION=(ADDRESS=(PROTOCOL=TCP)(HOST=DBsGuruN1.labdomain)(PORT=1521)))
STATUS of the LISTENER
------------------------
Alias                     LISTENER_12CR2
Version                   TNSLSNR for Linux: Version 12.2.0.1.0 - Production
Start Date                06-FEB-2021 13:06:29
Uptime                    0 days 0 hr. 6 min. 32 sec
Trace Level               off
Security                  ON: Local OS Authentication
SNMP                      OFF
Listener Parameter File   /u02/app/oracle/product/12201/db_2/network/admin/listener.ora
Listener Log File         /u02/app/oracle/diag/tnslsnr/DBsGuruN1/listener_12cr2/alert/log.xml
Listening Endpoints Summary...
  (DESCRIPTION=(ADDRESS=(PROTOCOL=tcp)(HOST=DBsGuruN1.labdomain)(PORT=1521)))
  (DESCRIPTION=(ADDRESS=(PROTOCOL=ipc)(KEY=EXTPROC1521)))
Services Summary...
Service "guru12r2.labdomain" has 1 instance(s).
  Instance "guru12r2", status READY, has 1 handler(s) for this service...
Service "guru12r2XDB.labdomain" has 1 instance(s).
  Instance "guru12r2", status READY, has 1 handler(s) for this service...
The command completed successfully
3.18.2: Validate database startup time, click here to get SQL command for startup time validation.
SQL> @startuptime.sql

'HOSTNAME:'||HOST_NAME
---------------------------------------------------------------------------
'INSTANCENAME:'||INSTANCE_NAME
--------------------------------
STIME
------------------------------------------------------------
SERVER_UPTIME
------------------------------------------------------------
HOSTNAME : DBsGuruN1.labdomain
INSTANCE NAME : guru12r2
STARTED AT : 06-FEB-2021 13:10:48
UPTIME : 0 DAYS(S) 0 HOUR(S) 3 MINUTE(S) 26 SECOND(S)
3.18.3: Validate all physical files, click here to get SQL command for validation of all database files.
SQL> @physical_files.sql

NAME
------------------------------------------------------------
/oradata/guru12r2/control01.ctl
/oradata/guru12r2/redo01a.log
/oradata/guru12r2/redo02a.log
/oradata/guru12r2/redo03a.log
/oradata/guru12r2/sysaux01.dbf
/oradata/guru12r2/system01.dbf
/oradata/guru12r2/temp01.dbf
/oradata/guru12r2/undotbs01.dbf
/oradata/guru12r2/users01.dbf
/u02/guru12r2/control02.ctl
/u02/guru12r2/redo01b.log
/u02/guru12r2/redo02b.log
/u02/guru12r2/redo03b.log

13 rows selected.
Click here for Step by Step Install Oracle Enterprise Linux (OEL) 7.7
This document is only for learning purpose and always validate in the LAB environment first before applying in the LIVE environment.
Hope so you like this article!
Please share your valuable feedback/comments/subscribe and follow us below and don’t forget to click on the bell icon to get the most recent update. Click here to understand more about our pursuit.
Related Articles
- Oracle Critical Database Patch ID for January 2025 along with enabled Download Link
- Oracle Critical Database Patch ID for October 2024 along with enabled Download Link
- Oracle Critical Database Patch ID for July 2024 along with enabled Download Link
- Oracle Critical Database Patch ID for April 2024 along with enabled Download Link
- Oracle Critical Database Patch ID for April 2023 along with enabled Download Link
![]()