Step By Step Upgrade from 18.8 to 19.6 (Patch Apply) in ODA X7-2M

In our previous article under ODA, we have published Step by Step Apply Patch ODA X7-2M from 18.3 to 18.8 click here to read more about the same. In continuation on the same topic, in this article, we will demonstrate Step By Step Upgrade from 18.8 to 19.6 (Patch Apply) in ODA X7-2M. Follow the below steps to apply patch/upgrade from 18.8 to 19.6. Before patching your ODA to 19.6, you must upgrade the operating system to Oracle Linux 7.
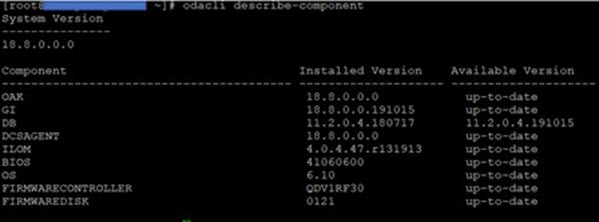
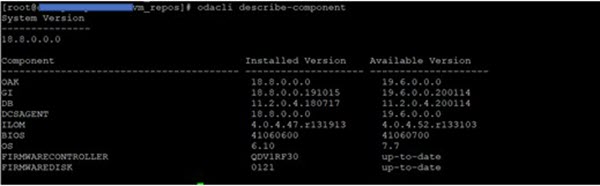
Step 1: Validate the dcs-agent and all other components are up to date with the latest version.
# odacli describe-component
# odacli list-dbhomes
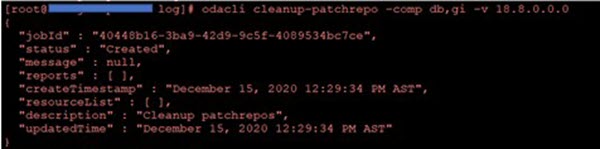
Step 2: If you try to clean the current version DB & GI patch files you will receive the below error.
# odacli cleanup-patchrepo -comp db,gi -v 18.8.0.0.0

Step 3: Install odabr : odabr is required to roll back failed OS patching, odabr will create an LVM-snapshot of (/ (root) /opt /u01) before begin of OS patch. Follow this metalink document ODA (Oracle Database Appliance): ODABR a System Backup/Restore Utility (Doc ID 2466177.1). odabr is required for the patching to 19.6. odabr is a tool to backup and recover an ODA.

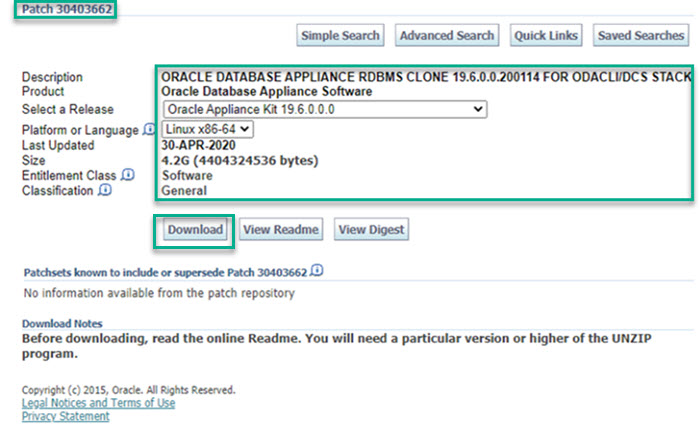
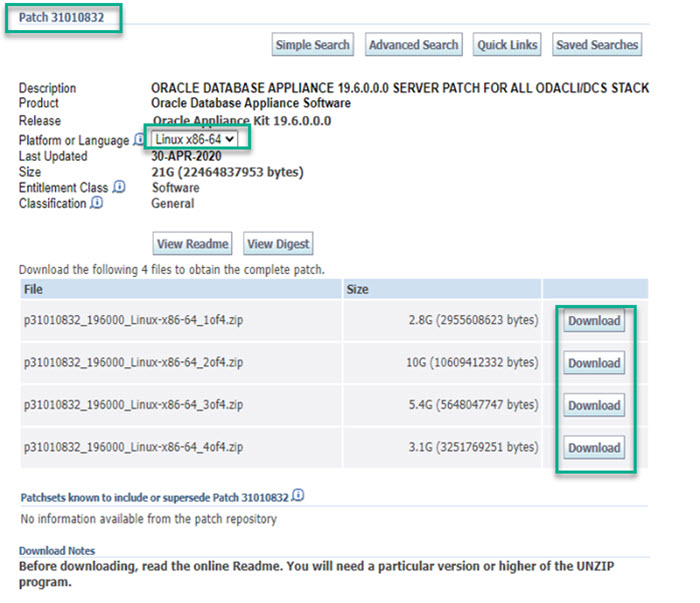
Step 4: Download patches 30403662 & 31010832 and transfers them to ODA Server using the available option. Click on the below patch id to download patches along with reference images to choose patches for the specific platform.
Patch 30403662: ORACLE DATABASE APPLIANCE RDBMS CLONE FOR ODACLI/DCS STACK.
Patch 31010832: ORACLE DATABASE APPLIANCE 19.6.0.0.0 SERVER PATCH FOR ALL ODACLI/DCS STACK.
Patch : 30403662
Patch : 31010832
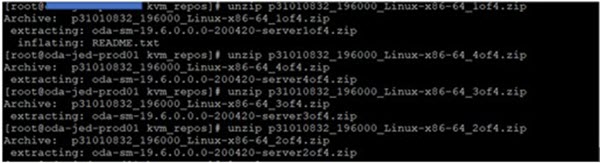
Step 5: Unzip the patches.
# ls -ltr p*

# unzip p31010832_196000_Linux-x86-64_1of4.zip
# unzip p31010832_196000_Linux-x86-64_2of4.zip
# unzip p31010832_196000_Linux-x86-64_3of4.zip
# unzip p31010832_196000_Linux-x86-64_4of4.zip
# unzip p31723973_196010_Linux-x86-64.zip
# ls -ltr oda*

Step 6: Update patch repositories with patch files using odacli update-repository command.
# odacli update-repository -f /kvm_reps/oda-sm-19.6.0.0.0-200420-server1of4.zip,/kvm_reps/oda-sm-19.6.0.0.0-200420-server2of4.zip,/kvm_reps/oda-sm-19.6.0.0.0-200420-server3of4.zip,/kvm_reps/oda-sm-19.6.0.0.0-200420-server4of4.zip

NOTE: command odacli update-repository, the server software is copied to both nodes.
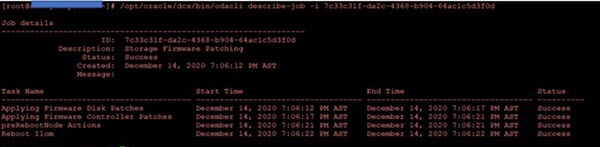
Step 7: Check the status of the job with odacli describe-job and it should be a successful update.
# odacli describe-job -i job_ID

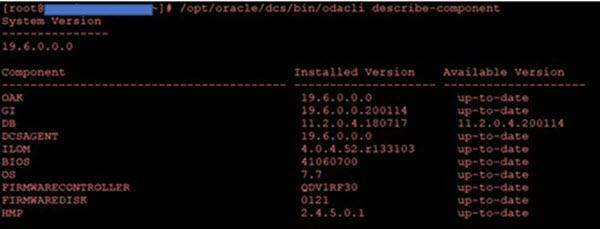
Step 8: Once the update repository job is finished check if 19.6 version is showing as “Available Version”.
# odacli describe-component
Step 9: Update dcsagent. This command updates the DCS agent on both nodes.
# odacli update-dcsagent -v 19.6.0.0.0

Step 10: Check the status of the job, it should be successful.
# odcli describe-job -i <job id>
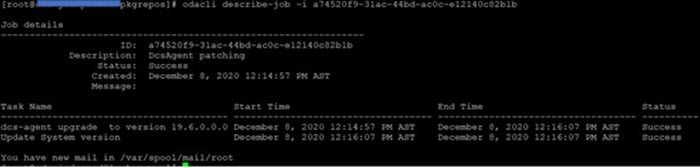
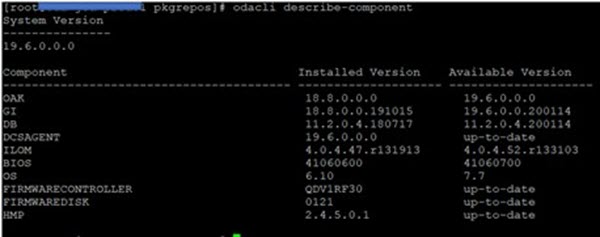
Step 11: Once the job is finish verify dcsgent is showing 19.6 version.
# odacli describe-component
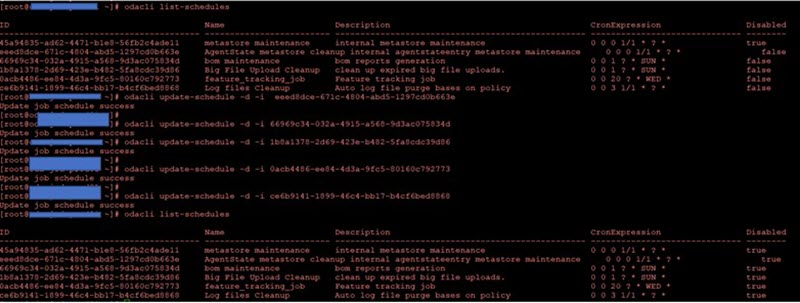
Step 12: Disable schedule job from ODA Server
# odacli list-schedules
# odacli update-schedule -d -i <schedule ID>
# odacli list-schedules
Step 13: Odabr expect 190 GB of free space in your PV (Physical Volume), If you have less space in your PV then you can create a manual snapshot before starting of OS patch using the below command.
# pvs

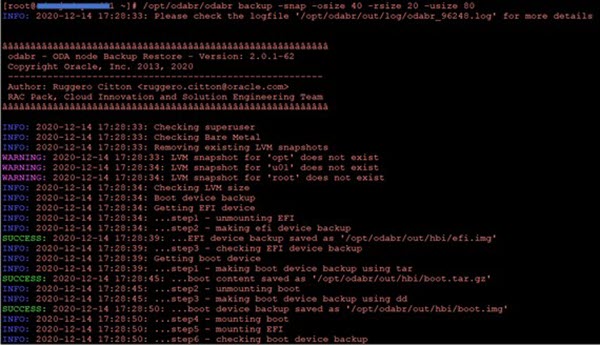
# /opt/odabr/odabr backup -snap -osize 40 -resize 20 -usize 80 Here options rsize is root , usize is u01 and osize is opt. So with below command we are creating snapshot of all three required mountpoint.
Step 14: Verify snapshot info.
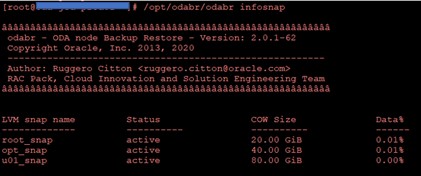
# /opt/odabr/odabr infosnap
Step 15: Create the prepatch report for the operating system (OS) upgrade. This command will generate a report for both nodes.
# odacli create-prepatchreport -v 19.6.0.0.0 -os

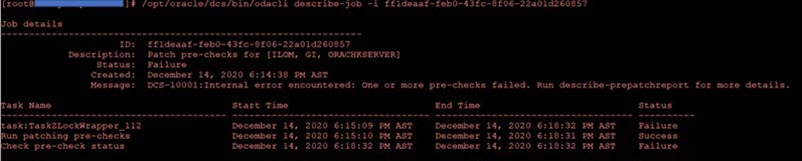
Step 16: Check the status of prepatch report.
# odacli describe-job -i <precheck_job_ID>


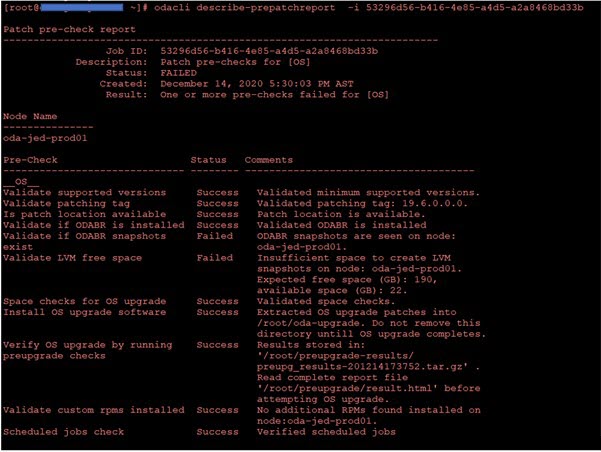
As you can see above, we have failures in the prepatch report.
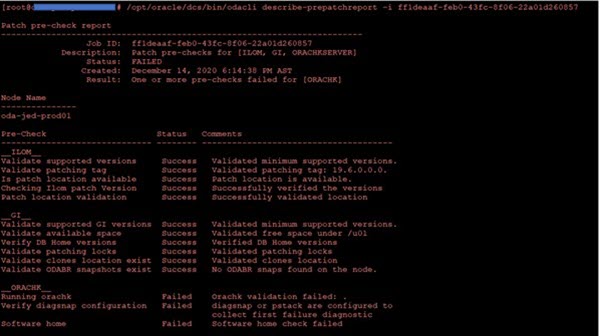
Step 17: Review the status of the prepatch report. Use describe-prepatchreport to identify the reason behind failure, Below error was expected as odabr expect to create snapshots by itself during prepatch steps execution. And we have taken manual snapshot due to less space in PV, except failure related to odabr other checks are successful
# odacli describe-prepatchreport -i <precheck_job_ID>
Step 18: Using putty connect to ILOM IP with root. Once connect to the ILOM and log in as root user.
start /SP/console

Step 19: Start OS upgrade with the below command, Please note I am using –force option because of failure in OS prepatch report.
# odacli update-server -v 19.6.0.0.0 -c os –local –force
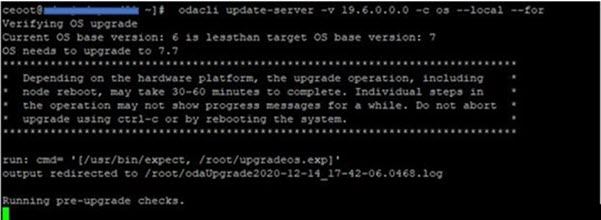
Step 20 You can monitor the OS upgrade using file /root/odaUpgrade2020-12-14_17-42-06.0468.log (logfile generated at the time of execution), Server will reboot and start the OS upgrade steps which take approx 30-60 minutes for each node and timing completely depends on the hardware platform. Upon successful upgrade, the node will reboot automatically.
# tail -333f <log_file.log>
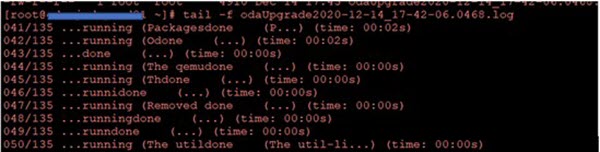
If everything went fine you will be able to see the OEL7.7 after login.

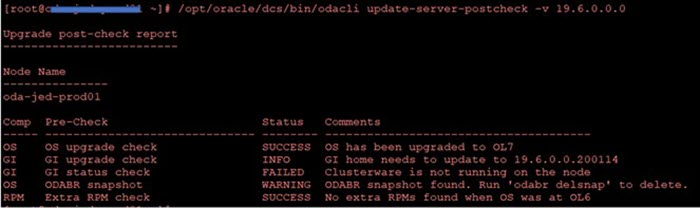
Step 21: Execute postcheck after OS upgrade, A you can see in below screen, my Clusterware showing FAILED, Wait some time to let Clusterware process to start all services.
# odacli update-server-postcheck -v 19.6.0.0.0
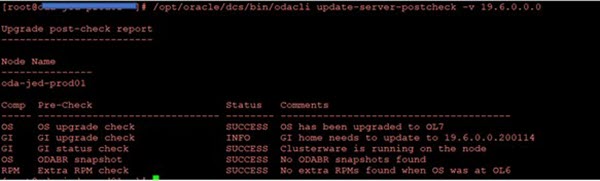
Step 22: Delete snapshot in-between Clusterware services are being up.
# /opt/odabr/odabr delsnap

Step 23: Validate again postcheck status and now all successful.
# odacli update-server-postcheck -v 19.6.0.0.0
Step 24: Now we are good to go for the next step of Server update.
Update DCS admin:
# odacli update-dcsadmin -v 19.6.0.0.0

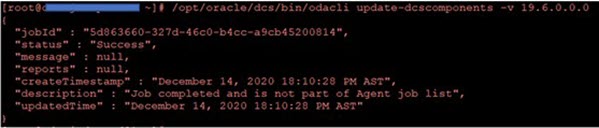
Update DCS Components:
# odacli update-dcscomponents -v 19.6.0.0.0
Before proceeding with the server patch generate prepatch report to validate if everything is fine and we are good to go ahead with the server patch.
Step 25: Create the prepatch report for the operating system (OS) upgrade. This command will generate a report for both nodes.
# odacli create-prepatchreport -s -v 19.6.0.0.0

Step 26: Describe jobid to check status. As you can see Failure in Statuscheck is failed.
# odacli describe-job -i <job_id>
Step 27: Describe prepatch report to review cause for failure, Check is failed for ORACHK which can be ignored.
# odacli describe-prepatchreport -i
Step 28: Start the Server patch with the below command.
# odacli update-server -v 19.6.0.0.0

Step 29: You can tail the file dcs-agent log for monitoring of the patch process.
# /opt/oracle/dcs/log/dcs-agent.log

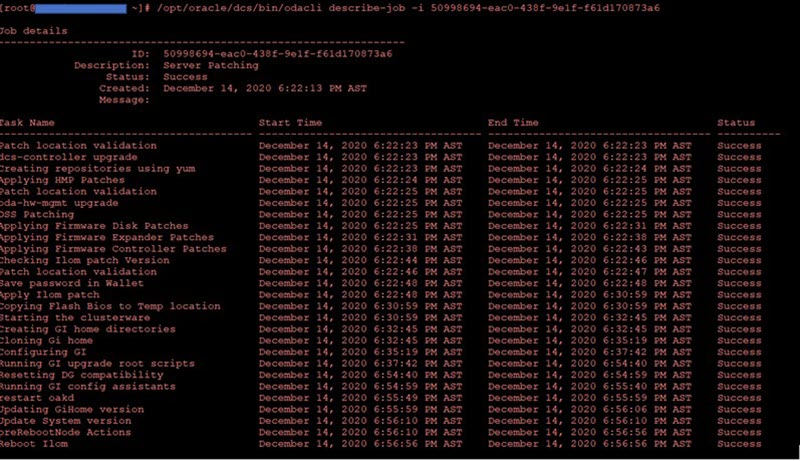
Step 30: Validate server patch update is successful.
# odacli describe-job -i <job_ID>
Step 31: Upon completion of successful Server patch, validate all components
# odacli describe-component
Step 32: Update storage components.
# odacli update-storage -v 19.6.0.0.0

Step 33: Validate storage update is successful.
# odacli describe-job -i <job_ID>
Step 34: Now you can delete files related to components of version 18.8 since it’s successfully upgraded to version 19.6.
# odacli cleanup-patchrepo -comp db,gi -v 18.8.0.0.0
Step 35: Update repository for RDBMS 19c Clone.
# odacli update-repository -f odacli-dcs-19.6.0.0.0-200326-DB-19.6.0.0.0.zip

Step 36: Validate RDBMS update is successful.
# odacli describe-job -i <job_ID>

If you are running KVM (Kernel Virual Machine)and after OS upgrade to OEL 7, VM start command with fail with below error then click here for solution KVM failed to start after ODA upgrade from 18.8 to 19.6.
error: Failed to start domain vm_adhoc
error: Cannot check QEMU binary /usr/libexec/qemu-kvm: No such file or directory
A big Thanks to Jamsher for applying the ODA patch and captured output. Click here to know more about him.
This document is only for learning purposes and always validate in the LAB environment first before applying in the LIVE environment.
Hope so you like this article!
Please share your valuable feedback/comments/subscribe and follow us below and don’t forget to click on the bell icon to get the latest update. Click here to know more about our pursuit.
Related Articles
- Oracle Critical Database Patch ID for April 2026 along with enabled Download Link
- Oracle Critical Database Patch ID for July 2025 along with enabled Download Link
- Oracle Critical Database Patch ID for April 2025 along with enabled Download Link
- Oracle Critical Database Patch ID for January 2025 along with enabled Download Link
- Oracle Critical Database Patch ID for October 2024 along with enabled Download Link
![]()