Configuring the VNC Server in Oracle Linux 7
Virtual Network Computing (VNC) is a system for sharing a graphical desktop over a network. Here we will be configuring the VNC server in Linux 7. A VNC client connects to and can control, a desktop that is shared by a VNC server on a remote system. Because VNC is platform-independent, you can use any operating system with a VNC client to connect to a VNC server. VNC makes remote administration using graphical tools possible.
By default, the VNC server runs the user’s default desktop environment. So while configuring Linux Server you need to install with GUI options. You can also install GUI after Linux installation with the command yum groupinstall “server with gui”.
In below demonstration we will configure VNC Server for OS User: app_user. Follow below steps to configure VNC Server on Oracle Linux 7
Step 1. Install the tigervnc-server package: Install tigervnc-server package using OS yum command
[root@test-machine01 ~]#
[root@test-machine01 ~]# yum install tigervnc-server -y
Loaded plugins: langpacks, ulninfo
ol7_UEKR6                                                                                                                                                              | 3.0 kB  00:00:00
ol7_latest                                                                                                                                                             | 3.6 kB  00:00:00
(1/5): ol7_latest/x86_64/group_gz                                                                                                                                      | 136 kB  00:00:01
(2/5): ol7_UEKR6/x86_64/updateinfo                                                                                                                                     | 289 kB  00:00:01
(3/5): ol7_latest/x86_64/updateinfo                                                                                                                                    | 3.3 MB  00:00:01
(4/5): ol7_UEKR6/x86_64/primary_db                                                                                                                                     |  21 MB  00:00:03
(5/5): ol7_latest/x86_64/primary_db                                                                                                                                    |  35 MB  00:00:10
Resolving Dependencies
--> Running transaction check
---> Package tigervnc-server.x86_64 0:1.8.0-22.el7 will be installed
--> Finished Dependency Resolution

Dependencies Resolved

==============================================================================================================================================================================================
 Package                                           Arch                                     Version                                        Repository                                    Size
==============================================================================================================================================================================================
Installing:
 tigervnc-server                                   x86_64                                   1.8.0-22.el7                                   ol7_latest                                   211 k

Transaction Summary
==============================================================================================================================================================================================
Install  1 Package

Total download size: 211 k
Installed size: 498 k
Downloading packages:
warning: /var/cache/yum/x86_64/7Server/ol7_latest/packages/tigervnc-server-1.8.0-22.el7.x86_64.rpm: Header V3 RSA/SHA256 Signature, key ID ec551f03: NOKEY  ]  0.0 B/s |  94 kB  --:--:-- ETA
Public key for tigervnc-server-1.8.0-22.el7.x86_64.rpm is not installed
tigervnc-server-1.8.0-22.el7.x86_64.rpm
Running transaction check
Running transaction test
Transaction test succeeded
Running transaction
  Installing : tigervnc-server-1.8.0-22.el7.x86_64                                                                                                                                        1/1
  Verifying  : tigervnc-server-1.8.0-22.el7.x86_64                                                                                                                                        1/1

Installed:
  tigervnc-server.x86_64 0:1.8.0-22.el7

Complete!
[root@test-machine01 ~]#
Step 2. Create a service unit configuration file: Copy the vncserver@.service template file from location /usr/lib/systemd/system to location /etc/systemd/system/ with unique display number of the VNC desktop, starting from 1 then replace <USER> with app_user.
[root@test-machine01 ~]#
[root@test-machine01 ~]# cd /usr/lib/systemd/system
[root@test-machine01  system]#
[root@test-machine01 system]# cp vncserver@.service /etc/systemd/system/vncserver@:1.service
[root@test-machine01 system]#
[root@test-machine01 system]# cd /etc/systemd/system/
[root@test-machine01 system]#
[root@test-machine01 system]# vi vncserver@:1.service
# Clean any existing files in /tmp/.X11-unix environment
ExecStartPre=/bin/sh -c '/usr/bin/vncserver -kill %i > /dev/null 2>&1 || :'
ExecStart=/usr/bin/vncserver_wrapper app_user  %i
ExecStop=/bin/sh -c '/usr/bin/vncserver -kill %i > /dev/null 2>&1 || :'

[Install]
WantedBy=multi-user.target
:wq!
[root@rtest-machine01 ystem]#
Step 3. Create the VNC environment for the VNC users: Each VNC desktop on the system runs a VNC server as a particular user. Use the vncpasswd command to create a password for the VNC desktop. The password must be created by the user that runs the VNC server and not root.
[root@test-machine01 system]# su - app_user
Last login: Wed Sep  1 10:41:41 +03 2021 on pts/0
[app_user@test-machine01 ~]$ vncpasswd
Password:
Verify:
Would you like to enter a view-only password (y/n)? n
A view-only password is not used
[app_user@test-machine01 ~]$
Step 4. Start the VNC desktops: Use systemctl command to reload its configuration files and to start and enable the VNC Server services.
[root@test-machine01 system]#
[root@test-machine01  system]# systemctl daemon-reload
[root@test-machine01  system]#
[root@test-machine01 system]#
[root@test-machine01 system]# systemctl start vncserver@:1.service
[root@test-machine01 system]#
[root@test-machine01 system]# systemctl enable vncserver@:1.service
Created symlink from /etc/systemd/system/multi-user.target.wants/vncserver@:1.service to /etc/systemd/system/vncserver@:1.service.
[root@test-machine01 system]#
[root@test-machine01 system]# systemctl status vncserver@:1.service
â vncserver@:1.service - Remote desktop service (VNC)
   Loaded: loaded (/etc/systemd/system/vncserver@:1.service; enabled; vendor preset: disabled)
   Active: active (running) since Wed 2021-09-01 10:47:03 +03; 17s ago
 Main PID: 11420 (vncserver_wrapp)
   CGroup: /system.slice/system-vncserver.slice/vncserver@:1.service
           ââ11420 /bin/sh /usr/bin/vncserver_wrapper app_user :1
           ââ12089 sleep 0.1

Sep 01 10:47:03 test-machine01.local systemd[1]: Starting Remote desktop service (VNC)...
Sep 01 10:47:03 test-machine01.local systemd[1]: Started Remote desktop service (VNC).
Sep 01 10:47:03 test-machine01.local vncserver_wrapper[11420]: xauth:  file /home/ucas_build/.Xauthority does not exist
Sep 01 10:47:16 test-machine01.local vncserver_wrapper[11420]: New test-machine01.local:1 (ucas_build)' desktop is test-machine01.local:1
Sep 01 10:47:16 test-machine01.local vncserver_wrapper[11420]: Creating default startup script /home/ucas_build/.vnc/xstartup
Sep 01 10:47:16 test-machine01.local vncserver_wrapper[11420]: Creating default config /home/ucas_build/.vnc/config
Sep 01 10:47:16 test-machine01.local vncserver_wrapper[11420]: Starting applications specified in /home/ucas_build/.vnc/xstartup
Sep 01 10:47:16 test-machine01local vncserver_wrapper[11420]: Log file is /home/ucas_build/.vnc/test-machine01.local:1.log
[root@test-machine01 system]#
[root@test-machine01 system]# ps -ef|grep Xvnc
ucas_bu+  11462      1  2 10:47 ?        00:00:00 /usr/bin/Xvnc :1 -auth /home/ucas_build/.Xauthority -desktop test-machine01.local:1 (ucas_build) -fp catalogue:/etc/X11/fontpath.d -geometry 1024x768 -pn -rfbauth /home/ucas_build/.vnc/passwd -rfbport 5901 -rfbwait 30000
root      12457  11038  0 10:47 pts/0    00:00:00 grep --color=auto Xvnc
[root@test-machine01 system]#
[root@test-machine01 system]#
Step 5. Configure the firewall: Enable VNC Server port in firewall using below commands.
[root@test-machine01 system]#
[root@test-machine01 system]# firewall-cmd --zone=public --add-service=vnc-server
success
[root@test-machine01 system]# firewall-cmd --zone=public --add-service=vnc-server --permanent
success
[root@test-machine01 system]#
[root@test-machine01 system]# firewall-cmd --list-services
dhcpv6-client ssh vnc-server
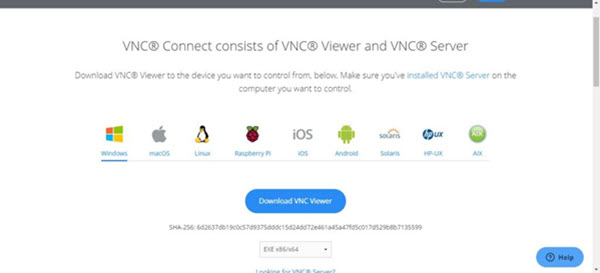
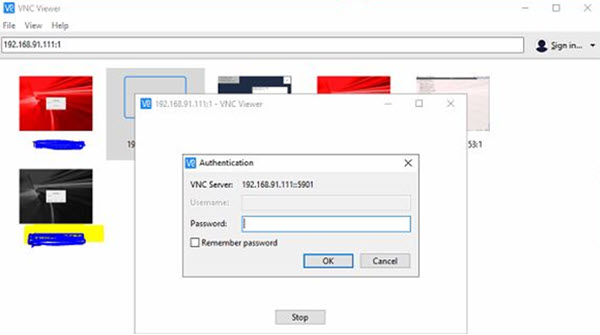
Step 6. Download VNC Viewer: Once above steps are done we are ready to Download & Install VNC Viewer for Windows from URL: https://www.realvnc.com/en/connect/download/viewer/. Once the software is downloaded install it on your window machine. Launch VNC Viewer and enter <Server IP> : <Display number>. Then enter VNC Password, we set in Step 3 and then actual OS app_user password.
Reference: Chapter 9 Configuring the VNC Service: https://docs.oracle.com/en/operating-systems/oracle-linux/7/network/ol7-vnc.html#ol7-vnc-about
This document is just for learning purpose and always validate in the LAB environment first before applying in the LIVE environment.
Hope so you like this article!
Please share your valuable feedback/comments/subscribe and follow us below and don’t forget to click on the bell icon to get the most recent update. Click here to understand more about our pursuit.
Related Articles
- How to Enable PasswordLess SSH login in Linux
- Steps to Install & Configure SNMP in Oracle Linux 7
- Steps to Add and Extend Swap Space in Linux
- Steps To Increase Mount Point Space In Oracle Linux
- Steps to Move ISCSI Target to Another Linux Server
![]()


