Steps To Increase Mount Point Space In Oracle Linux
Sometimes we need to increase our server mount point space if we are running out of disk space. We are performing this demonstration on VMware Workstation to increase mount point space in Oracle Linux, and we will extend our /u01 mount point which is 50GB in space and 90% already utilized. We need to increase this mount point space to 80GB.
Follow the below steps
1. Identify Linux disk and VMware Virtual disk
2. Stop VM and Increase space of VMware Virtual disk
3. Repartition the disk
4. Expand the file system
5. Mount the mount point
Step 1. Identify Linux disk and VMware Virtual disk: Use command df -Th to get device name and file system type and current utilization. Please note our /u01 mount point device name is /dev/sdf1 and file system is xfs. Mapping between Linux disk and Virtual disk is easy if you have a very fewer number of disks attached to the VM host. For more number of disks, we can use the command dmesg | grep -i attached | grep disk to figure out mapping. Please note from below output of command device [sdf] has Linux SCSI ID: 32:0:5:0 this will map to VM SCSI ID: 0:5. To get VM SCSI ID Click on VM Tab > Click Settings > Select Hard Disk > Click Advance Button.
[oracle@test-machine03 19c_patch]$
[oracle@test-machine03 19c_patch]$ df -Th /u01
Filesystem     Type  Size  Used Avail Use% Mounted on
/dev/sdf1      xfs    50G   45G   5.3G  90% /u01
[oracle@test-machine03 19c_patch]$
[oracle@test-machine03 19c_patch]$

[root@test-machine03 ~]#
[root@test-machine03 ~]# dmesg |grep -i attached  |grep disk
[    2.872351] sd 32:0:5:0: [sdf] Attached SCSI disk
[    2.873709] sd 32:0:3:0: [sdd] Attached SCSI disk
[    2.874411] sd 32:0:4:0: [sde] Attached SCSI disk
[    2.875988] sd 32:0:2:0: [sdc] Attached SCSI disk
[    2.878656] sd 32:0:1:0: [sdb] Attached SCSI disk
[    2.878700] sd 32:0:0:0: [sda] Attached SCSI disk
[root@test-machine03 ~]#
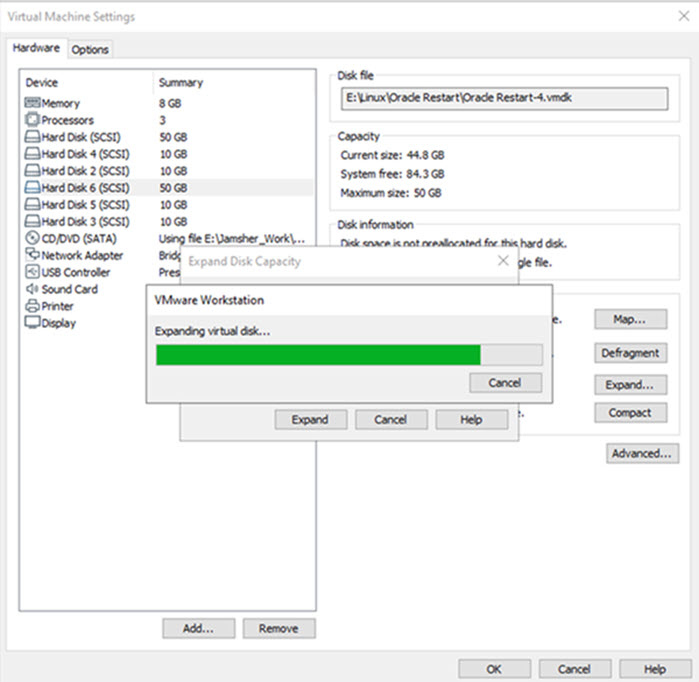
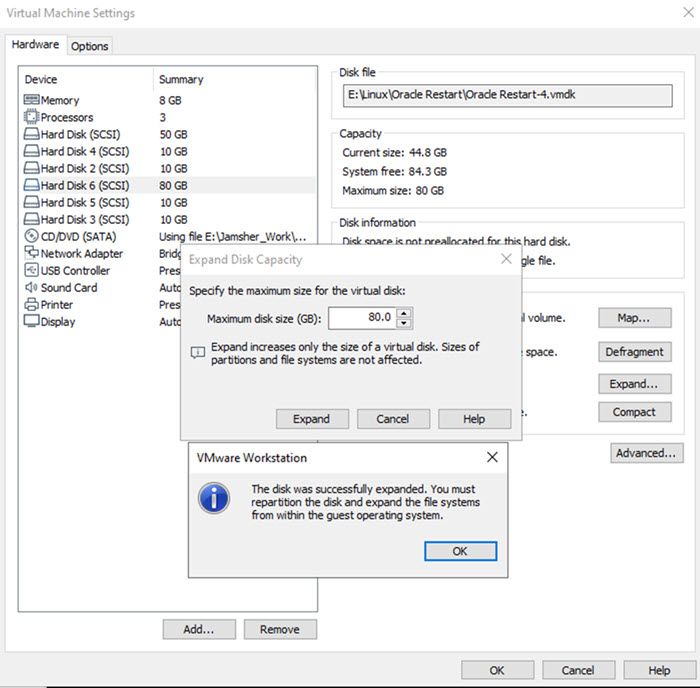
Step 2. Stop VM and Increase space of VMware Virtual disk: Stop the VM machine and Click on VM Tab > Click Settings > Select Hard Disk > Click Expand Button and Enter maximum disk size in GB and Click on Expand button. Once disk expand operation is finished you will get a clear message to perform “Repartition and Expand Filesystem“.
Step 3. Repartition of the disk: Start the VM machine and login with root user. Use command fdisk to perform repartition. Please note we are using option d to delete a partition and then creating a new partition using option n. Please note deleting the partition will not cause any data loss. After repartition number of blocks will increase.
[root@test-machine03 ~]#
[root@test-machine03 ~]# fdisk -l /dev/sdf

Disk /dev/sdf: 85.9 GB, 85899345920 bytes, 167772160 sectors
Units = sectors of 1 * 512 = 512 bytes
Sector size (logical/physical): 512 bytes / 512 bytes
I/O size (minimum/optimal): 512 bytes / 512 bytes
Disk label type: dos
Disk identifier: 0xcfab32ac

   Device Boot      Start         End      Blocks   Id  System
/dev/sdf1            2048   104857599    52427776   83  Linux
[root@test-machine03 ~]#

[root@test-machine03 ~]#
[root@test-machine03 ~]# fdisk /dev/sdf
Welcome to fdisk (util-linux 2.23.2).

Changes will remain in memory only, until you decide to write them.
Be careful before using the write command.


Command (m for help): d
Selected partition 1
Partition 1 is deleted

Command (m for help): n
Partition type:
   p   primary (0 primary, 0 extended, 4 free)
   e   extended
Select (default p): p
Partition number (1-4, default 1): 1
First sector (2048-167772159, default 2048):
Using default value 2048
Last sector, +sectors or +size{K,M,G} (2048-167772159, default 167772159):
Using default value 167772159
Partition 1 of type Linux and of size 80 GiB is set

Command (m for help): w
The partition table has been altered!

Calling ioctl() to re-read partition table.
Syncing disks.
[root@test-machine03 ~]#

[root@test-machine03 ~]#
[root@test-machine03 ~]# fdisk -l /dev/sdf

Disk /dev/sdf: 85.9 GB, 85899345920 bytes, 167772160 sectors
Units = sectors of 1 * 512 = 512 bytes
Sector size (logical/physical): 512 bytes / 512 bytes
I/O size (minimum/optimal): 512 bytes / 512 bytes
Disk label type: dos
Disk identifier: 0xcfab32ac

   Device Boot      Start         End      Blocks   Id  System
/dev/sdf1            2048   167772159    83885056   83  Linux
[root@test-machine03 ~]#
[root@test-machine03 ~]#
Step 4. Expand the file system: Next step is to expand filesystem this operation is depend on device filesystem if we are using xfs filesystem we can use xfs_growfs command and for ext4 and ext3 filesystem we can use e2fsck & resize2fs.
For XFS File System
[root@test-machine03 ~]#
[root@test-machine03 ~]# cd /
[root@test-machine03 /]#

[root@test-machine03 /]#
[root@test-machine03 /]# xfs_growfs u01
meta-data=/dev/sdf1              isize=256    agcount=4, agsize=3276736 blks
         =                       sectsz=512   attr=2, projid32bit=1
         =                       crc=0        finobt=0 spinodes=0
data     =                       bsize=4096   blocks=13106944, imaxpct=25
         =                       sunit=0      swidth=0 blks
naming   =version 2              bsize=4096   ascii-ci=0 ftype=1
log      =internal               bsize=4096   blocks=6399, version=2
         =                       sectsz=512   sunit=0 blks, lazy-count=1
realtime =none                   extsz=4096   blocks=0, rtextents=0
data blocks changed from 13106944 to 20971264
[root@test-machine03 /]#

[root@test-machine03 /]#
[root@test-machine03 /]# xfs_info u01
meta-data=/dev/sdf1              isize=256    agcount=7, agsize=3276736 blks
         =                       sectsz=512   attr=2, projid32bit=1
         =                       crc=0        finobt=0 spinodes=0
data     =                       bsize=4096   blocks=20971264, imaxpct=25
         =                       sunit=0      swidth=0 blks
naming   =version 2              bsize=4096   ascii-ci=0 ftype=1
log      =internal               bsize=4096   blocks=6399, version=2
         =                       sectsz=512   sunit=0 blks, lazy-count=1
realtime =none                   extsz=4096   blocks=0, rtextents=0
[root@test-machine03 /]#
For ext3/ext4 File System
[root@test-machine03 ~]#
[root@test-machine03 ~]# e2fsck -f /dev/sde1
e2fsck 1.42.9 (28-Dec-2013)
Pass 1: Checking inodes, blocks, and sizes
Pass 2: Checking directory structure
Pass 3: Checking directory connectivity
Pass 4: Checking reference counts
Pass 5: Checking group summary information
/dev/sde1: 13/196608 files (0.0% non-contiguous), 438082/786176 blocks

[root@test-machine03 ~]# resize2fs -f /dev/sde1
resize2fs 1.42.9 (28-Dec-2013)
Filesystem at /dev/sde1 is mounted on /ext04; on-line resizing required
old_desc_blocks = 1, new_desc_blocks = 1
The filesystem on /dev/sde1 is now 1310464 blocks long.
[root@test-machine03 ~]#
Step 5. Mount the mount point: Once the above steps are done mount the mount point /u01 and verify space.
[root@test-machine03 /]#
[root@test-machine03 /]# mount -a
[root@test-machine03 /]#

[root@test-machine03 /]#
[root@test-machine03 /]# df -h /u01
Filesystem      Size  Used Avail Use% Mounted on
/dev/sdf1        80G   45G   36G  56% /u01
[root@test-machine03 /]#
[root@test-machine03 /]#
Hope so you like this article!
Please share your valuable feedback/comments/subscribe and follow us below and don’t forget to click on the bell icon to get the most recent update. Click here to understand more about our pursuit.
Related Articles
- How to Enable PasswordLess SSH login in Linux
- Steps to Install & Configure SNMP in Oracle Linux 7
- Steps to Add and Extend Swap Space in Linux
- Steps To Increase Mount Point Space In Oracle Linux
- Steps to Move ISCSI Target to Another Linux Server
![]()


