Step by Step Install Linux 8 (OEL) along with Guest Addition
In this article, we are going to perform step by step install Oracle Enterprise Linux 8.3 along with Oracle VM VirtualBox 6.1.22 install, configure require hardware, network, memory, etc. on VM, and enable guest edition.
To complete this demonstration, we will perform in the below four parts:
1. Install Oracle VM
2. Configure and install Linux 8
3. Enable guest addition
4. Post validations
1. Install Oracle VM
In this section, we will install Oracle VM VirtualBox 6.1.22 on a windows machine to fulfill Linux 8 installation. Click here to download Oracle VM VirtualBox and follow the below step for VirtualBox installation.
1.1. Download software Oracle VM VirtualBox: Double click on executable (VirtualBox-6.1.22-144080-Win) file to start the installation.
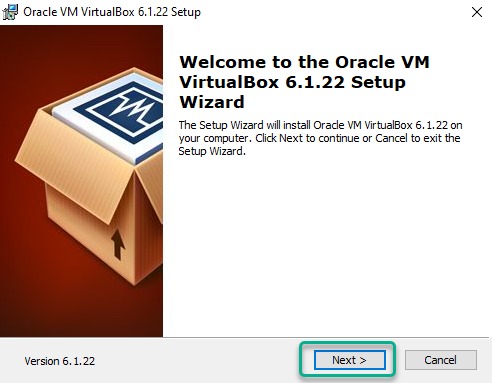
1.2. Welcome page: Click on Next.
1.3. Select the required features and click on Next.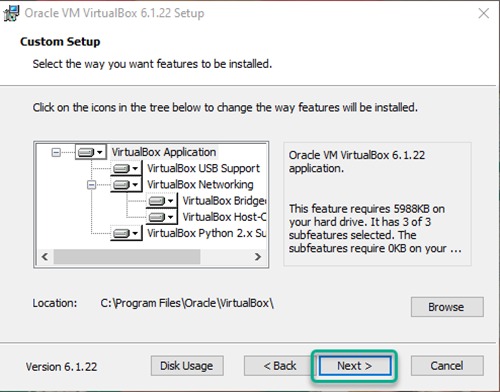
1.4. Select all boxes and click on Next.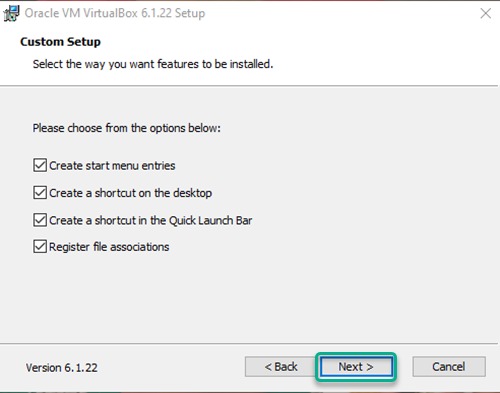
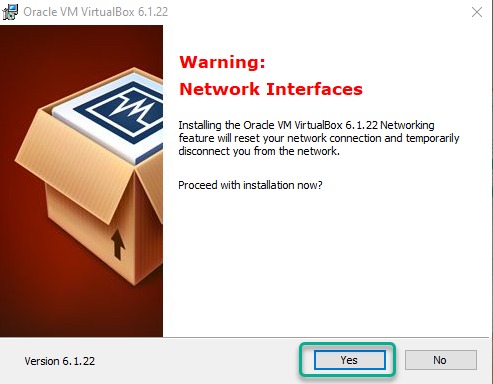
1.5. Click Yes for Network Interfaces.
1.6. Click on Install to begin the installation.
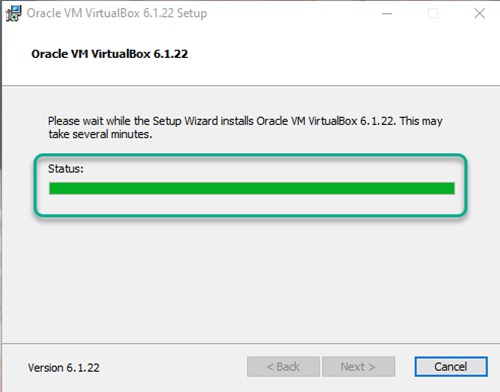
1.7. Monitor the progress of the installation.
1.8. Check the box to launch VM and click on Finish.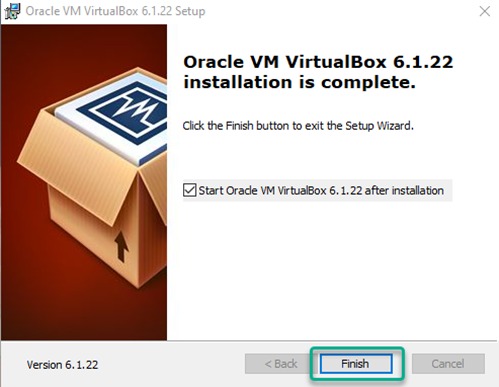
2. Configure and install Linux 8
In this section, we will create a new machine (VM) where we will configure require Hardware, Memory, Network, etc. to install Linux 8. Click here to download OEL ISO image file. Foll0w the below steps and refer each image and marked in Green Border which are require attention for successful configuration/installation.
2.1. New Machine: Click on tab Machine then New.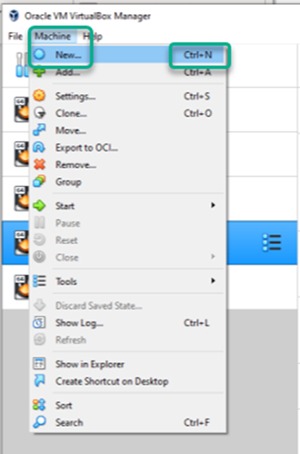
2.2. Name and operating system: Define machine name, select machine type and version of the operating system.
2.3. Memory size: Allocate requires memory.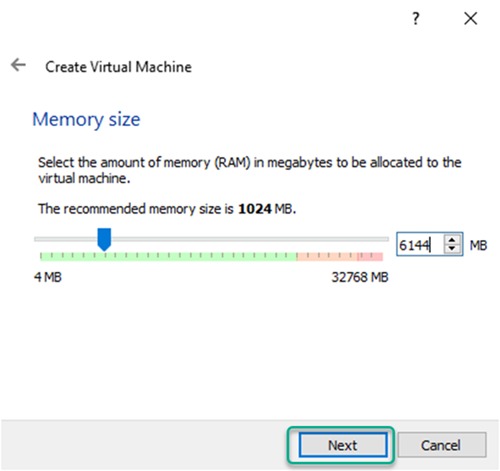
2.4. Hard disk: Create virtual disk.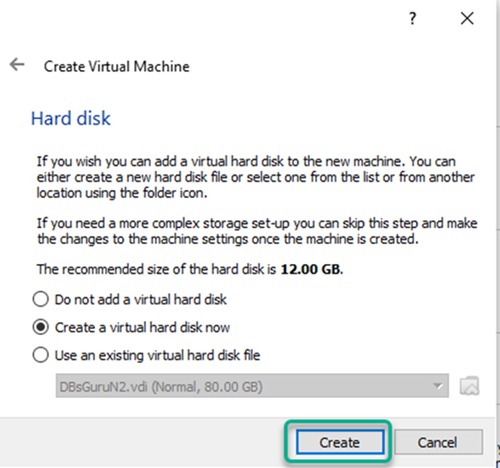
2.5. Hard disk file type: Select VirtualBox Disk Image.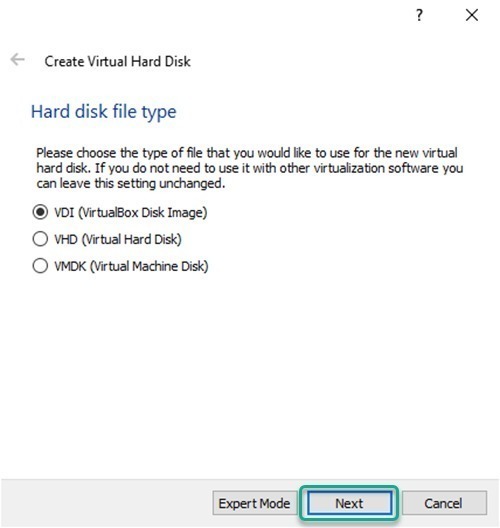
2.6. Storage on physical hard disk: Dynamically allocated option will grow up to the size of the disk.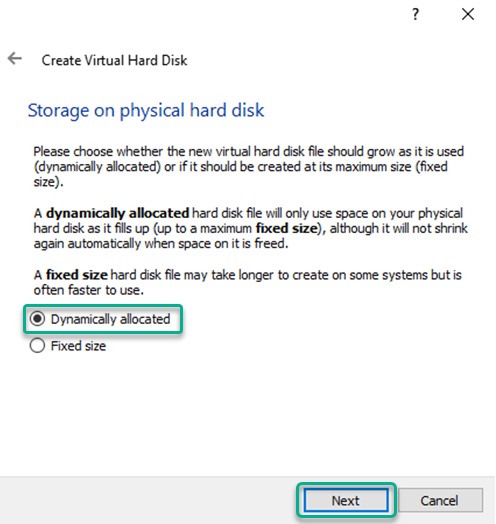
2.7. File location and size: Allocate requires disk size and the same size should be available on the specified location.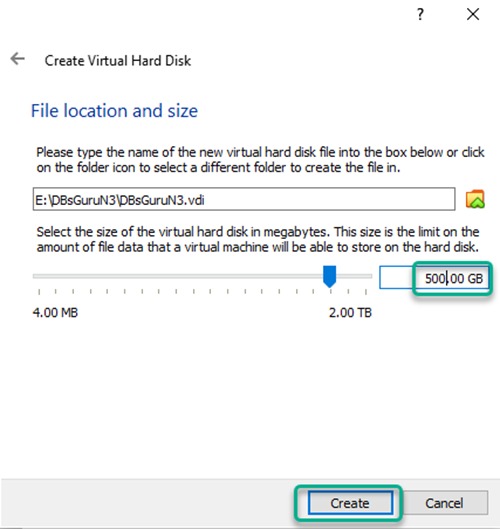
2.8. Configuration: Click on the setting button for remaining to require configuration.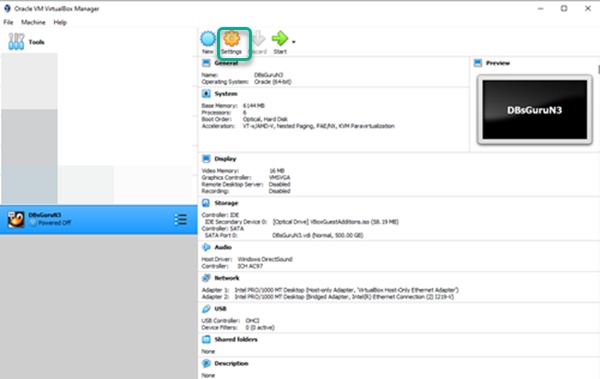
2.9. General > Advanced: Select Bidirectional.
2.10. System > Motherboard: Select sequence of OS boot.
2.11. Click on System > Processor: Allocate processors subject available to a total processor on Windows.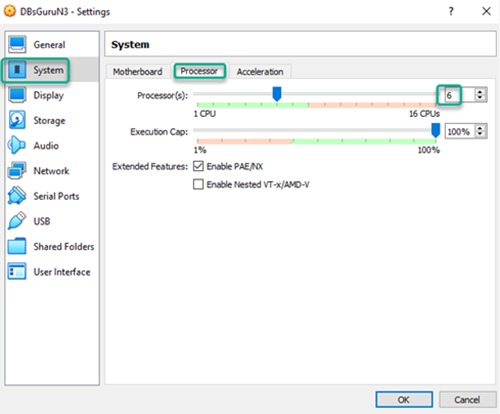
2.12. Storage: Select require ISO image file under tab Optical Drive.
2.13.1. Network > Adaptor1: Set up adaptor 1.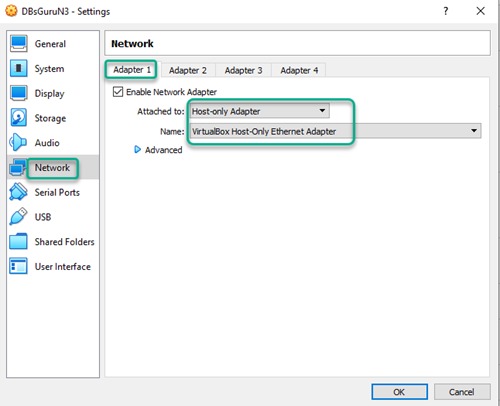
2.13.2. Network > Adaptor2: Set up adaptor 2 then click on the button OK.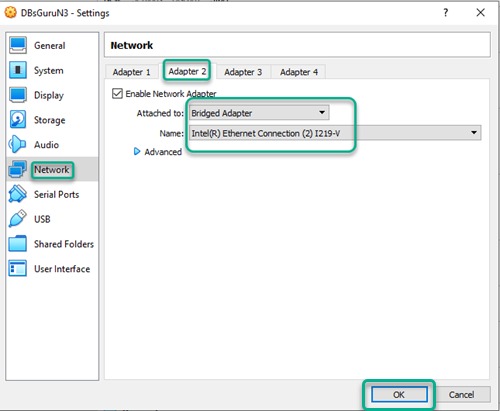
2.14. Review & start installation configuration: Review this screen and click on the Start button.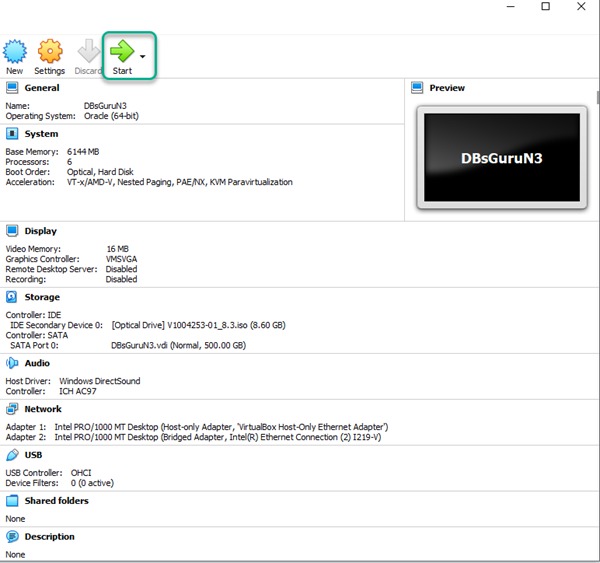
2.15. ISO file: Select correct start-up ISO image (same as selected in step and click on Start.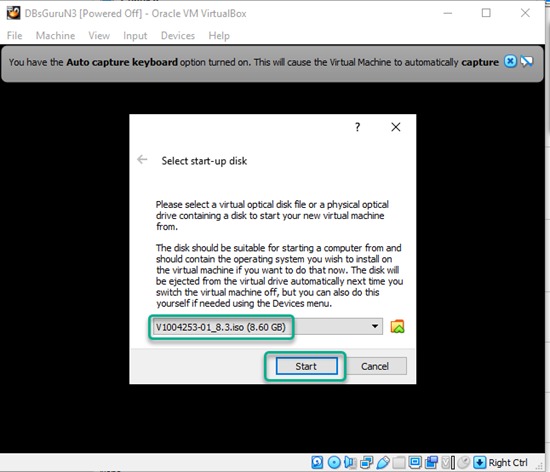
2.16. Automatic boot: Wait for the completion of the automatic boot.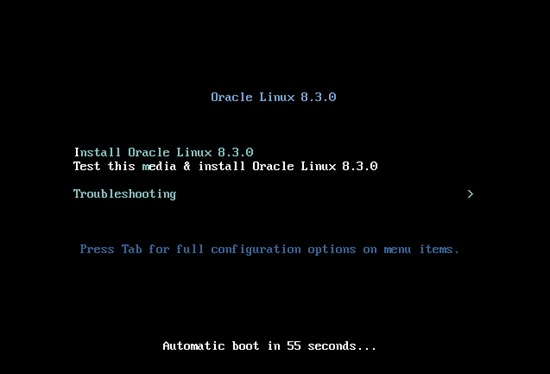
2.17. Check the status: Wait for check completion and next screen prompt click on each parameter and do configuration as required.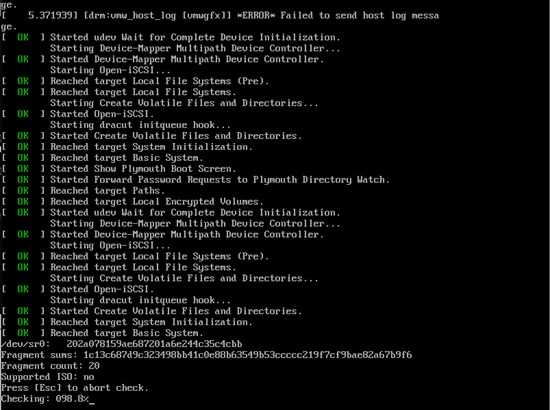
2.18. Set Language.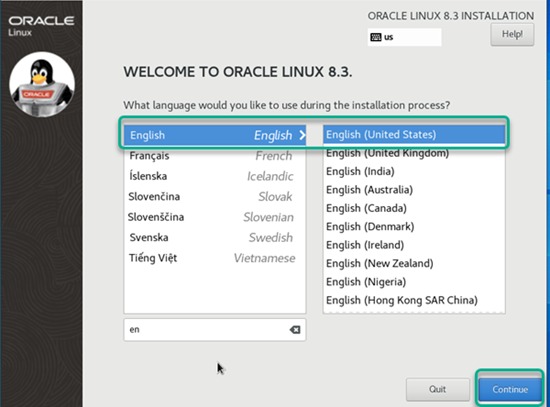
2.19. Installation source: Choose Auto detector installation mode, optionally you may click on verify.
2.20. Installation destination: Select Automatic for storage configure partitioning with this option, Hard disk will be a partition with LVM (Logical Volume Manager) and formatted with xfs file system.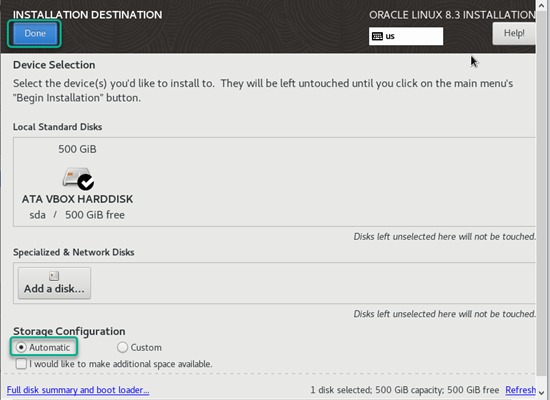
2.21. Keyboard layout.
2.22. Software selection: In base requirements select environment. For this installation, I opted Server with GUI and also select require additional software. If unsure about it then select all additional software for the selected environment.
2,23. KDUMP: We have disabled Kdump since it’s our LAB environment.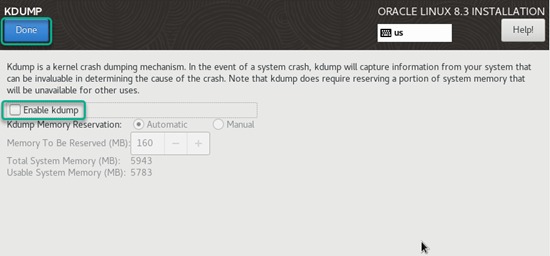
2.24. Time & date: Select Region, City, and timestamp format. After selection of required fields makes sure time & date reflected correctly as per the selected region.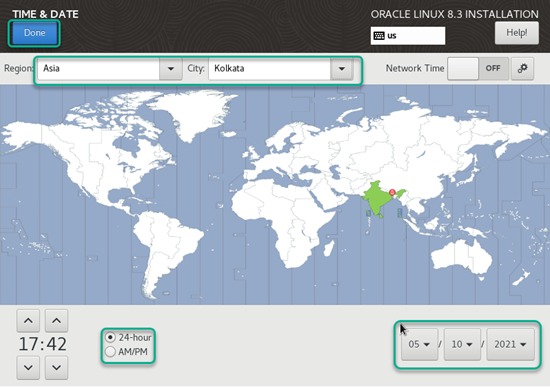
2.25. Network and Hostname: In this section network card attached to the system will be visible. Enable NIC by clicking on ON Button and Enter Hostname (fully qualified) for the machine and click Apply button once both these changes is done click on the Configure button here we can define static IPs or DHCP option. For Static IP, we need to enter IP Address, Netmask, Gateway in the 6th TAB IPv4 Setting. Here we are using the DHCP option. Follow the below images for network configuration:
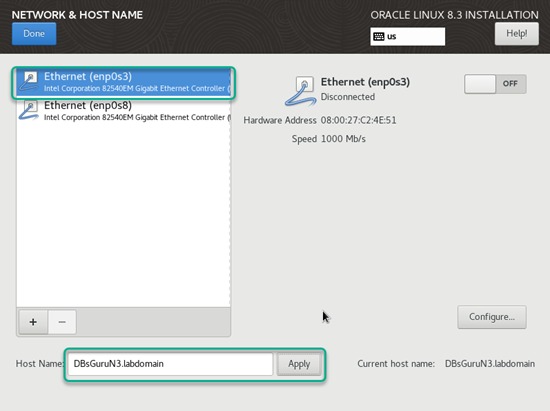
To configure network enp0s3: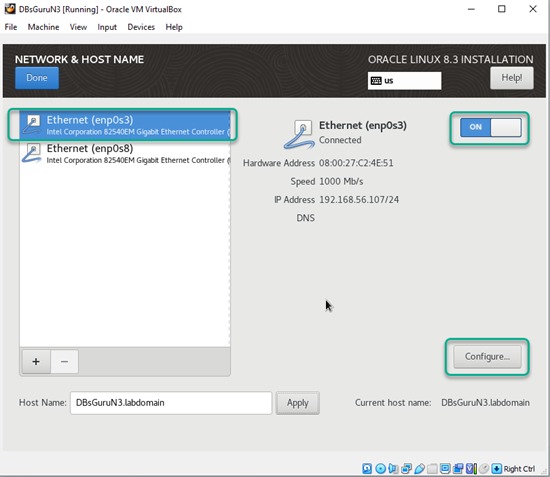
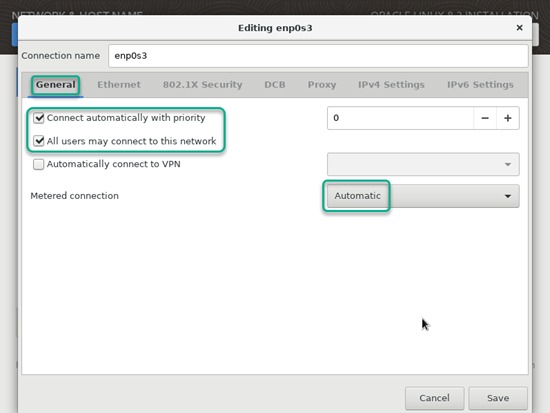
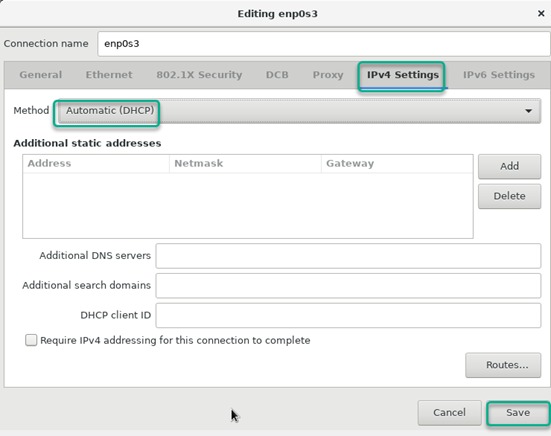
To configure network enp0s8: Repeat the same step for network enp0s8 same as above enp0s3, after completion click on Done.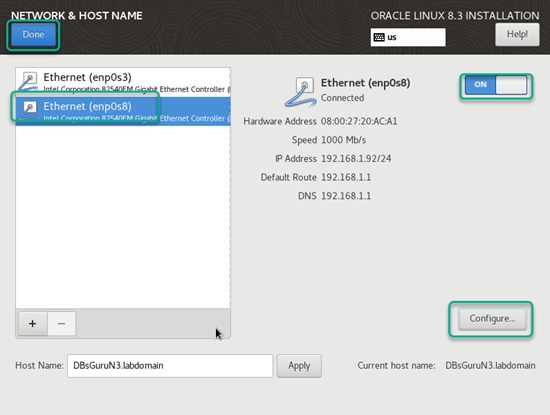
2.26. Security Policy: Apply security policy ON.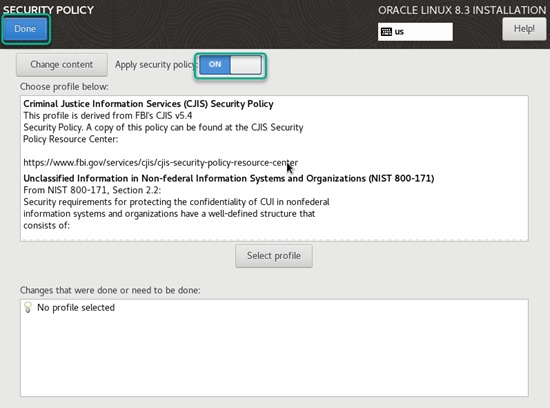
2.27. Root password: Set root password.
2.28. Create User: Create a user and the same user can be made/add as administrator. 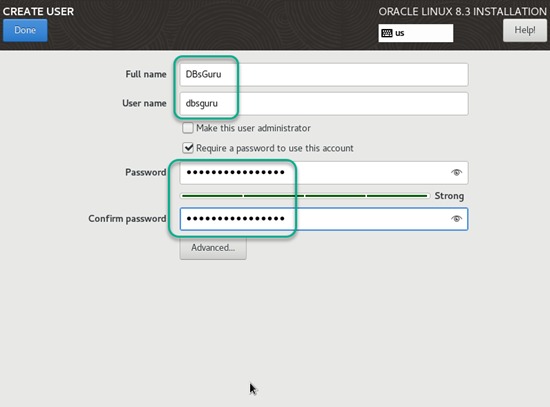
2.29. Begin Installation: Once complete all configuration click on the button Begin Installation to start Linux 8.3 installation.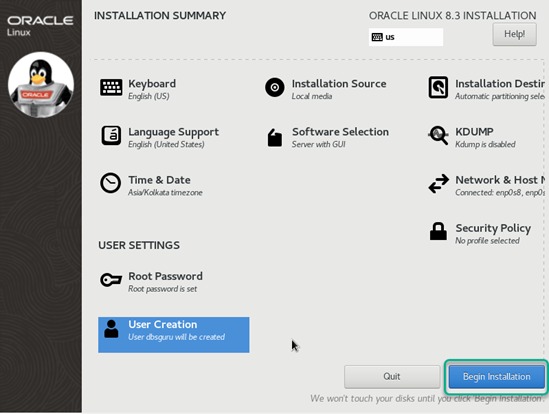
2.30. Monitor the progress.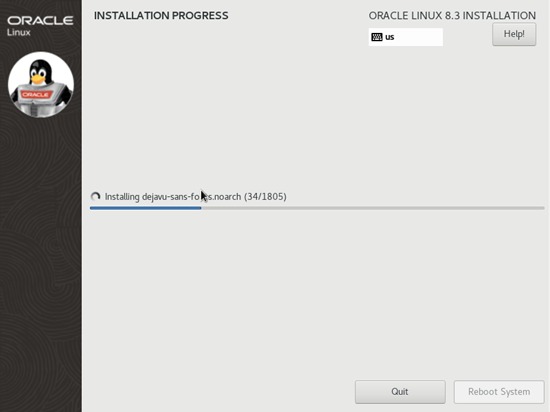
2.31. Reboot System: Once installation complete, click on Reboot System.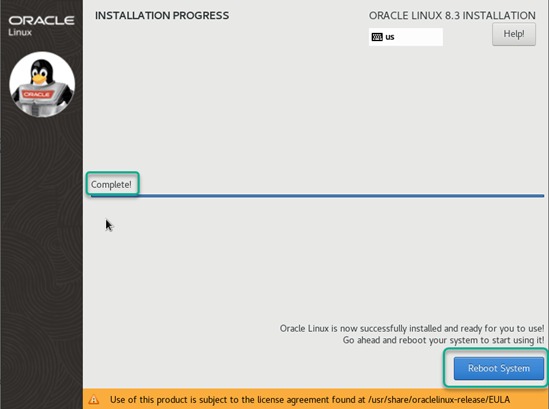
2.32. Oracle Linux License Agreement: Accept the license and click on Done.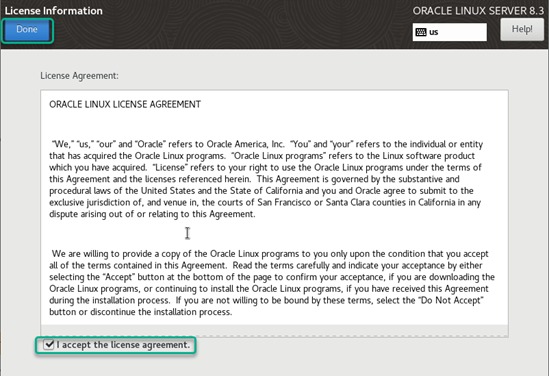
2.33. Initial Setup: Click on License Information then FINISH CONFIGURATION.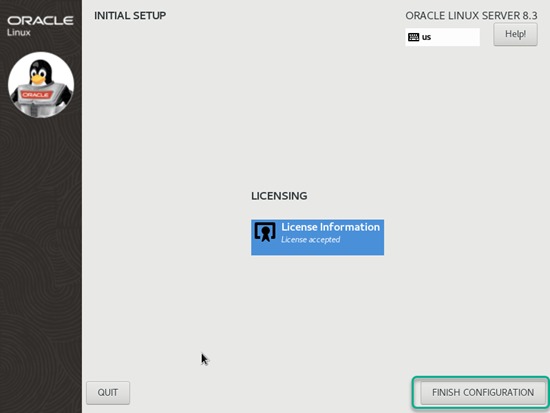
2.34. Login: Validate login with any one of the user, here we are using DBsGuru.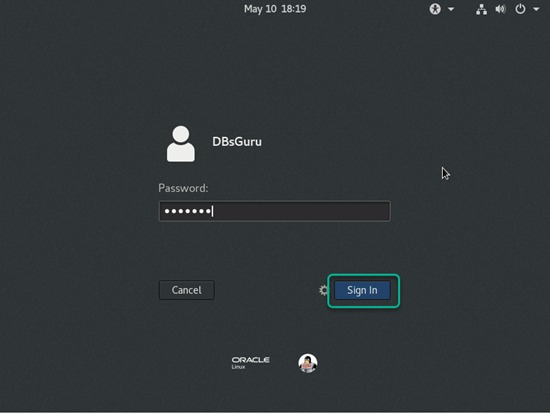
2.35. Gnome Initial Setup: This setup is required for each user whenever login first time. On the Welcome screen select preferred language.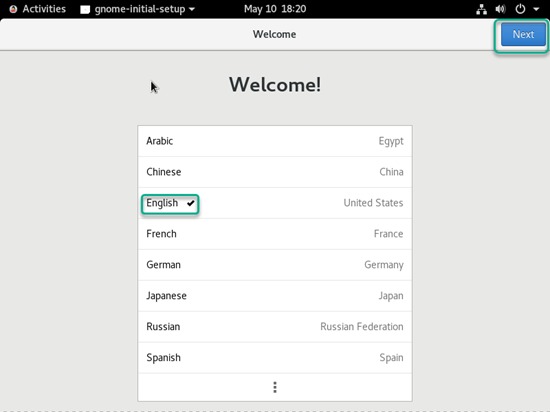
2.36. Typing: Select typing language.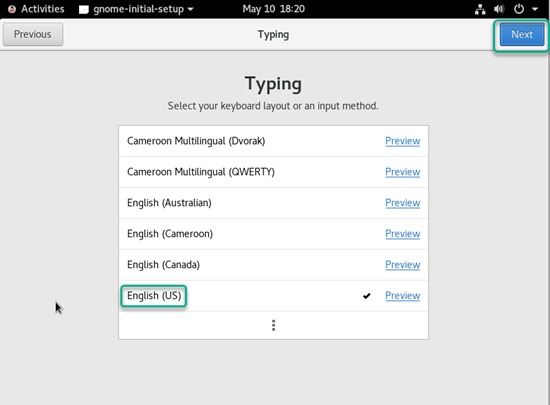
2.37. Privacy: Make it ON.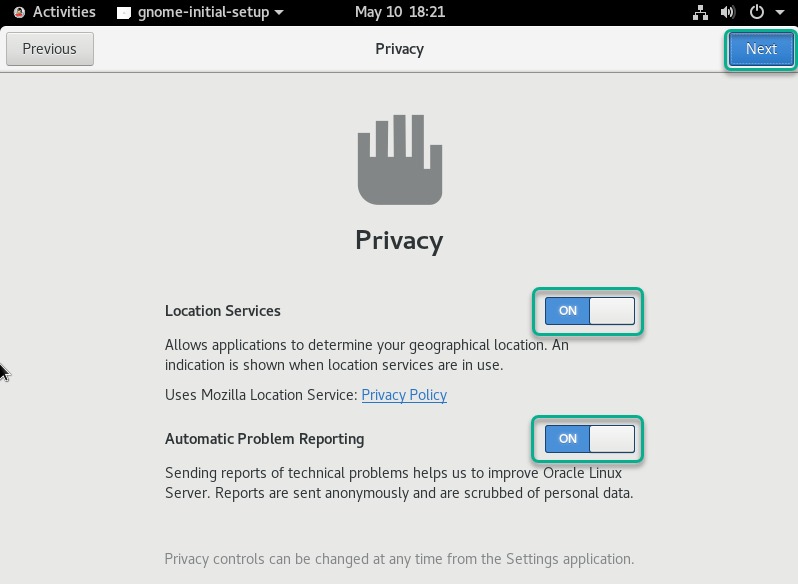
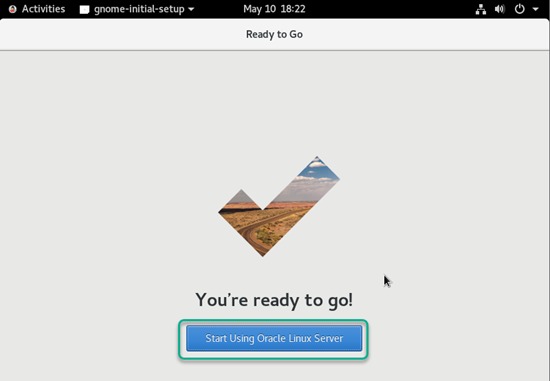
2.38. Ready to Go: Click on Start Using Oracle Linux Server.
3. Enable guest addition
To enable guest addition on OS is one more way for better performance along with copy & paste text, enable shared folder between guest to host vice versa, release the cursor, etc.
3.1 Enable Guest Addition: Click on Device > Insert Guest Addition CD image.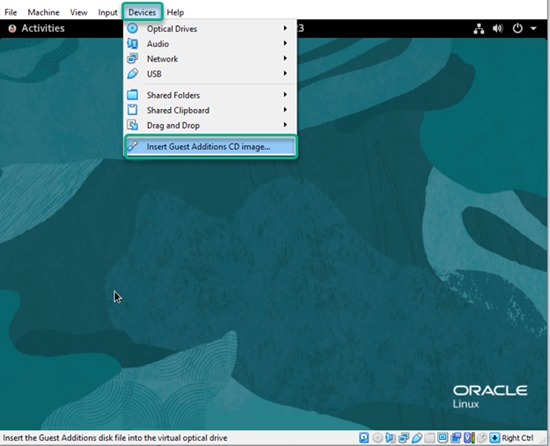
3.2. Click on Run.
3.3. Authenticate: Provide root password.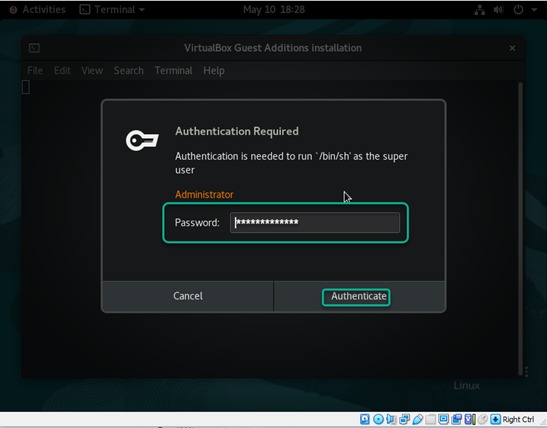
As you can see, guest addition failed due to a mismatch of kernel-release. To resolve this issue, we will follow a workaround.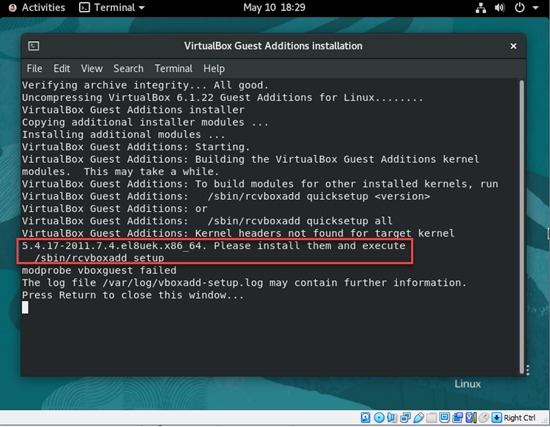
3.4 Workaround:
3.4.1. Install/upgrade correct gcc and make.
[root@DBsGuruN3 VBox_GAs_6.1.22]# yum -y install gcc make
Last metadata expiration check: 0:33:40 ago on Mon 10 May 2021 06:26:56 PM IST.
Package gcc-8.3.1-5.1.0.1.el8.x86_64 is already installed.
Package make-1:4.2.1-10.el8.x86_64 is already installed.
Dependencies resolved.
==============================================================================================================================================================================================================
Package Architecture Version Repository Size
==============================================================================================================================================================================================================
Upgrading:
cpp x86_64 8.3.1-5.1.0.2.el8 ol8_appstream 10 M
gcc x86_64 8.3.1-5.1.0.2.el8 ol8_appstream 23 M
gcc-c++ x86_64 8.3.1-5.1.0.2.el8 ol8_appstream 12 M
gcc-gdb-plugin x86_64 8.3.1-5.1.0.2.el8 ol8_appstream 124 k
libgcc x86_64 8.3.1-5.1.0.2.el8 ol8_baseos_latest 85 k
libgomp x86_64 8.3.1-5.1.0.2.el8 ol8_baseos_latest 211 k
libstdc++ x86_64 8.3.1-5.1.0.2.el8 ol8_baseos_latest 458 k
libstdc++-devel x86_64 8.3.1-5.1.0.2.el8 ol8_appstream 2.1 M
Transaction Summary
==============================================================================================================================================================================================================
Upgrade 8 Packages
Total download size: 49 M
Downloading Packages:
(1/8): libgcc-8.3.1-5.1.0.2.el8.x86_64.rpm 649 kB/s | 85 kB 00:00
(2/8): libstdc++-8.3.1-5.1.0.2.el8.x86_64.rpm 3.1 MB/s | 458 kB 00:00
(3/8): libgomp-8.3.1-5.1.0.2.el8.x86_64.rpm 1.3 MB/s | 211 kB 00:00
(4/8): gcc-gdb-plugin-8.3.1-5.1.0.2.el8.x86_64.rpm 82 kB/s | 124 kB 00:01
(5/8): libstdc++-devel-8.3.1-5.1.0.2.el8.x86_64.rpm 2.0 MB/s | 2.1 MB 00:01
(6/8): cpp-8.3.1-5.1.0.2.el8.x86_64.rpm 2.0 MB/s | 10 MB 00:05
(7/8): gcc-c++-8.3.1-5.1.0.2.el8.x86_64.rpm 1.6 MB/s | 12 MB 00:07
(8/8): gcc-8.3.1-5.1.0.2.el8.x86_64.rpm 2.8 MB/s | 23 MB 00:08
--------------------------------------------------------------------------------------------------------------------------------------------------------------------------------------------------------------
Total 5.7 MB/s | 49 MB 00:08
warning: /var/cache/dnf/ol8_baseos_latest-e4c6155830ad002c/packages/libstdc++-8.3.1-5.1.0.2.el8.x86_64.rpm: Header V3 RSA/SHA256 Signature, key ID ad986da3: NOKEY
Oracle Linux 8 BaseOS Latest (x86_64) 3.0 MB/s | 3.1 kB 00:00
Importing GPG key 0xAD986DA3:
Userid : "Oracle OSS group (Open Source Software group) <build@oss.oracle.com>"
Fingerprint: 76FD 3DB1 3AB6 7410 B89D B10E 8256 2EA9 AD98 6DA3
From : /etc/pki/rpm-gpg/RPM-GPG-KEY-oracle
Key imported successfully
Running transaction check
Transaction check succeeded.
Running transaction test
Transaction test succeeded.
Running transaction
Preparing : 1/1
Upgrading : libgcc-8.3.1-5.1.0.2.el8.x86_64 1/16
Running scriptlet: libgcc-8.3.1-5.1.0.2.el8.x86_64 1/16
Upgrading : libstdc++-8.3.1-5.1.0.2.el8.x86_64 2/16
Running scriptlet: libstdc++-8.3.1-5.1.0.2.el8.x86_64 2/16
Upgrading : libstdc++-devel-8.3.1-5.1.0.2.el8.x86_64 3/16
Upgrading : cpp-8.3.1-5.1.0.2.el8.x86_64 4/16
Running scriptlet: cpp-8.3.1-5.1.0.2.el8.x86_64 4/16
Upgrading : libgomp-8.3.1-5.1.0.2.el8.x86_64 5/16
Running scriptlet: libgomp-8.3.1-5.1.0.2.el8.x86_64 5/16
Upgrading : gcc-8.3.1-5.1.0.2.el8.x86_64 6/16
Running scriptlet: gcc-8.3.1-5.1.0.2.el8.x86_64 6/16
Upgrading : gcc-c++-8.3.1-5.1.0.2.el8.x86_64 7/16
Upgrading : gcc-gdb-plugin-8.3.1-5.1.0.2.el8.x86_64 8/16
Running scriptlet: gcc-gdb-plugin-8.3.1-5.1.0.2.el8.x86_64 8/16
Cleanup : gcc-gdb-plugin-8.3.1-5.1.0.1.el8.x86_64 9/16
Running scriptlet: gcc-gdb-plugin-8.3.1-5.1.0.1.el8.x86_64 9/16
Cleanup : gcc-c++-8.3.1-5.1.0.1.el8.x86_64 10/16
Cleanup : libstdc++-devel-8.3.1-5.1.0.1.el8.x86_64 11/16
Cleanup : libstdc++-8.3.1-5.1.0.1.el8.x86_64 12/16
Running scriptlet: libstdc++-8.3.1-5.1.0.1.el8.x86_64 12/16
Running scriptlet: gcc-8.3.1-5.1.0.1.el8.x86_64 13/16
Cleanup : gcc-8.3.1-5.1.0.1.el8.x86_64 13/16
Running scriptlet: cpp-8.3.1-5.1.0.1.el8.x86_64 14/16
Cleanup : cpp-8.3.1-5.1.0.1.el8.x86_64 14/16
Cleanup : libgcc-8.3.1-5.1.0.1.el8.x86_64 15/16
Running scriptlet: libgcc-8.3.1-5.1.0.1.el8.x86_64 15/16
Running scriptlet: libgomp-8.3.1-5.1.0.1.el8.x86_64 16/16
Cleanup : libgomp-8.3.1-5.1.0.1.el8.x86_64 16/16
Running scriptlet: libgomp-8.3.1-5.1.0.1.el8.x86_64 16/16
Verifying : libstdc++-8.3.1-5.1.0.2.el8.x86_64 1/16
Verifying : libstdc++-8.3.1-5.1.0.1.el8.x86_64 2/16
Verifying : libgomp-8.3.1-5.1.0.2.el8.x86_64 3/16
Verifying : libgomp-8.3.1-5.1.0.1.el8.x86_64 4/16
Verifying : libgcc-8.3.1-5.1.0.2.el8.x86_64 5/16
Verifying : libgcc-8.3.1-5.1.0.1.el8.x86_64 6/16
Verifying : gcc-c++-8.3.1-5.1.0.2.el8.x86_64 7/16
Verifying : gcc-c++-8.3.1-5.1.0.1.el8.x86_64 8/16
Verifying : gcc-gdb-plugin-8.3.1-5.1.0.2.el8.x86_64 9/16
Verifying : gcc-gdb-plugin-8.3.1-5.1.0.1.el8.x86_64 10/16
Verifying : gcc-8.3.1-5.1.0.2.el8.x86_64 11/16
Verifying : gcc-8.3.1-5.1.0.1.el8.x86_64 12/16
Verifying : libstdc++-devel-8.3.1-5.1.0.2.el8.x86_64 13/16
Verifying : libstdc++-devel-8.3.1-5.1.0.1.el8.x86_64 14/16
Verifying : cpp-8.3.1-5.1.0.2.el8.x86_64 15/16
Verifying : cpp-8.3.1-5.1.0.1.el8.x86_64 16/16
Upgraded:
cpp-8.3.1-5.1.0.2.el8.x86_64 gcc-8.3.1-5.1.0.2.el8.x86_64 gcc-c++-8.3.1-5.1.0.2.el8.x86_64 gcc-gdb-plugin-8.3.1-5.1.0.2.el8.x86_64 libgcc-8.3.1-5.1.0.2.el8.x86_64
libgomp-8.3.1-5.1.0.2.el8.x86_64 libstdc++-8.3.1-5.1.0.2.el8.x86_64 libstdc++-devel-8.3.1-5.1.0.2.el8.x86_64
Complete!
3.4.2. Upgrade/install devl packages.
[root@DBsGuruN3 VBox_GAs_6.1.22]# yum -y install kernel-uek-devel-`uname -r`
Last metadata expiration check: 0:34:19 ago on Mon 10 May 2021 06:26:56 PM IST.
Dependencies resolved.
==============================================================================================================================================================================================================
 Package                                           Architecture                            Version                                                   Repository                                          Size
==============================================================================================================================================================================================================
Installing:
 kernel-uek-devel                                  x86_64                                  5.4.17-2011.7.4.el8uek                                    ol8_UEKR6                                           17 M
Installing dependencies:
 binutils-devel                                    x86_64                                  2.30-79.0.1.el8                                           ol8_appstream                                      1.1 M
 zlib-devel                                        x86_64                                  1.2.11-16.el8_2                                           ol8_baseos_latest                                   57 k

Transaction Summary
==============================================================================================================================================================================================================
Install  3 Packages

Total download size: 18 M
Installed size: 80 M
Downloading Packages:
(1/3): zlib-devel-1.2.11-16.el8_2.x86_64.rpm                                                                                                                                  825 kB/s |  57 kB     00:00
(2/3): binutils-devel-2.30-79.0.1.el8.x86_64.rpm                                                                                                                              2.7 MB/s | 1.1 MB     00:00
(3/3): kernel-uek-devel-5.4.17-2011.7.4.el8uek.x86_64.rpm                                                                                                                     4.8 MB/s |  17 MB     00:03
--------------------------------------------------------------------------------------------------------------------------------------------------------------------------------------------------------------
Total                                                                                                                                                                         5.2 MB/s |  18 MB     00:03
Running transaction check
Transaction check succeeded.
Running transaction test
Transaction test succeeded.
Running transaction
  Preparing        :                                                                                                                                                                                      1/1
  Installing       : zlib-devel-1.2.11-16.el8_2.x86_64                                                                                                                                                    1/3
  Installing       : binutils-devel-2.30-79.0.1.el8.x86_64                                                                                                                                                2/3
  Installing       : kernel-uek-devel-5.4.17-2011.7.4.el8uek.x86_64                                                                                                                                       3/3
  Running scriptlet: kernel-uek-devel-5.4.17-2011.7.4.el8uek.x86_64                                                                                                                                       3/3
  Verifying        : zlib-devel-1.2.11-16.el8_2.x86_64                                                                                                                                                    1/3
  Verifying        : binutils-devel-2.30-79.0.1.el8.x86_64                                                                                                                                                2/3
  Verifying        : kernel-uek-devel-5.4.17-2011.7.4.el8uek.x86_64                                                                                                                                       3/3

Installed:
  binutils-devel-2.30-79.0.1.el8.x86_64                             kernel-uek-devel-5.4.17-2011.7.4.el8uek.x86_64                             zlib-devel-1.2.11-16.el8_2.x86_64

Complete!
NOTE: Workaround depends on error to error.
3.4.3. After completion of above two steps successful, install guest addition.
[root@DBsGuruN3 VBox_GAs_6.1.22]# ./VBoxLinuxAdditions.run
Verifying archive integrity... All good.
Uncompressing VirtualBox 6.1.22 Guest Additions for Linux........
VirtualBox Guest Additions installer
Removing installed version 6.1.22 of VirtualBox Guest Additions...
Copying additional installer modules ...
Installing additional modules ...
VirtualBox Guest Additions: Starting.
VirtualBox Guest Additions: Building the VirtualBox Guest Additions kernel
modules.  This may take a while.
VirtualBox Guest Additions: To build modules for other installed kernels, run
VirtualBox Guest Additions:   /sbin/rcvboxadd quicksetup <version>
VirtualBox Guest Additions: or
VirtualBox Guest Additions:   /sbin/rcvboxadd quicksetup all
VirtualBox Guest Additions: Building the modules for kernel
5.4.17-2011.7.4.el8uek.x86_64.
ValueError: File context for /opt/VBoxGuestAdditions-6.1.22/other/mount.vboxsf already defined
3.4.4. To take effect of guest addition reboot the machine.
[root@DBsGuruN3 VBox_GAs_6.1.22]# reboot
3.4.5. Validate status of vbox.
[root@DBsGuruN3 ~]# ps -eaf | grep vbox
root        2838       1  0 19:08 ?        00:00:00 /usr/sbin/VBoxService --pidfile /var/run/vboxadd-service.sh
root        4233    4176  0 19:09 pts/0    00:00:00 grep --color=auto vbox
[root@DBsGuruN3 ~]# lsmod | grep -io vboxguest
vboxguest
[root@DBsGuruN3 ~]# modinfo vboxguest
filename:       /lib/modules/5.4.17-2011.7.4.el8uek.x86_64/misc/vboxguest.ko
version:        6.1.22 r144080
license:        GPL
description:    Oracle VM VirtualBox Guest Additions for Linux Module
author:         Oracle Corporation
srcversion:     C765B996E302A573430B45C
alias:          pci:v000080EEd0000CAFEsv00000000sd00000000bc*sc*i*
depends:
retpoline:      Y
name:           vboxguest
vermagic:       5.4.17-2011.7.4.el8uek.x86_64 SMP mod_unload modversions
4. Post validations
Congratulations! The machine is ready to use. We will perform basic validation after successful installation.
4.1 Release and kernel validation.
[root@DBsGuruN3 ~]# cat /etc/redhat-release
Red Hat Enterprise Linux release 8.3 (Ootpa)
[root@DBsGuruN3 ~]# cat /etc/oracle-release
Oracle Linux Server release 8.3
[root@DBsGuruN3 ~]# uname -a
Linux DBsGuruN3.labdomain 5.4.17-2011.7.4.el8uek.x86_64 #2 SMP Fri Oct 2 14:39:04 PDT 2020 x86_64 x86_64 x86_64 GNU/Linux
[root@DBsGuruN3 ~]# hostname
DBsGuruN3.labdomain
4.2. Network validation.
[root@DBsGuruN3 ~]# ip a
1: lo: <LOOPBACK,UP,LOWER_UP> mtu 65536 qdisc noqueue state UNKNOWN group default qlen 1000
    link/loopback 00:00:00:00:00:00 brd 00:00:00:00:00:00
    inet 127.0.0.1/8 scope host lo
       valid_lft forever preferred_lft forever
    inet6 ::1/128 scope host
       valid_lft forever preferred_lft forever
2: enp0s3: <BROADCAST,MULTICAST,UP,LOWER_UP> mtu 1500 qdisc fq_codel state UP group default qlen 1000
    link/ether 08:00:27:c2:4e:51 brd ff:ff:ff:ff:ff:ff
    inet 192.168.56.107/24 brd 192.168.56.255 scope global dynamic noprefixroute enp0s3
       valid_lft 416sec preferred_lft 416sec
    inet6 fe80::bd68:a0af:2020:d7b7/64 scope link noprefixroute
       valid_lft forever preferred_lft forever
3: enp0s8: <BROADCAST,MULTICAST,UP,LOWER_UP> mtu 1500 qdisc fq_codel state UP group default qlen 1000
    link/ether 08:00:27:20:ac:a1 brd ff:ff:ff:ff:ff:ff
    inet 192.168.1.92/24 brd 192.168.1.255 scope global dynamic noprefixroute enp0s8
       valid_lft 83515sec preferred_lft 83515sec
    inet6 fe80::191b:9974:6ae9:3eaf/64 scope link noprefixroute
       valid_lft forever preferred_lft forever
4: virbr0: <NO-CARRIER,BROADCAST,MULTICAST,UP> mtu 1500 qdisc noqueue state DOWN group default qlen 1000
    link/ether 52:54:00:e5:5c:9c brd ff:ff:ff:ff:ff:ff
    inet 192.168.122.1/24 brd 192.168.122.255 scope global virbr0
       valid_lft forever preferred_lft forever
5: virbr0-nic: <BROADCAST,MULTICAST> mtu 1500 qdisc fq_codel master virbr0 state DOWN group default qlen 1000
    link/ether 52:54:00:e5:5c:9c brd ff:ff:ff:ff:ff:ff
[root@DBsGuruN3 ~]# ping -c 5 dbsguru.com
PING dbsguru.com (207.244.254.185) 56(84) bytes of data.
64 bytes from kolkata.viewen.com (207.244.254.185): icmp_seq=1 ttl=51 time=295 ms
64 bytes from kolkata.viewen.com (207.244.254.185): icmp_seq=2 ttl=51 time=294 ms
64 bytes from kolkata.viewen.com (207.244.254.185): icmp_seq=3 ttl=51 time=295 ms
64 bytes from kolkata.viewen.com (207.244.254.185): icmp_seq=4 ttl=51 time=295 ms
64 bytes from kolkata.viewen.com (207.244.254.185): icmp_seq=5 ttl=50 time=290 ms

--- dbsguru.com ping statistics ---
5 packets transmitted, 5 received, 0% packet loss, time 20ms
rtt min/avg/max/mdev = 289.036/289.336/289.574/0.628 ms
4.3 Directory & partition validation: While installation we allocated 500GB harddisk with an auto partition which is divided into 3 partitions, one is used as the root partition, the second is used as /home, and the third used as a boot partition. The root partition is using LVM.
[root@DBsGuruN3 ~]# df -hT
Filesystem          Type      Size  Used Avail Use% Mounted on
devtmpfs            devtmpfs  2.9G     0  2.9G   0% /dev
tmpfs               tmpfs     2.9G     0  2.9G   0% /dev/shm
tmpfs               tmpfs     2.9G  9.5M  2.9G   1% /run
tmpfs               tmpfs     2.9G     0  2.9G   0% /sys/fs/cgroup
/dev/mapper/ol-root xfs        70G  7.4G   63G  11% /
/dev/mapper/ol-home xfs       423G  3.0G  420G   1% /home
/dev/sda1           xfs      1014M  286M  729M  29% /boot
tmpfs               tmpfs     594M  1.2M  593M   1% /run/user/42
tmpfs               tmpfs     594M  4.6M  590M   1% /run/user/0
/dev/sr0            iso9660    59M   59M     0 100% /run/media/root/VBox_GAs_6.1.22
[root@DBsGuruN3 ~]# pvs
  PV         VG Fmt  Attr PSize    PFree
  /dev/sda2  ol lvm2 a--  <499.00g    0
[root@DBsGuruN3 ~]# lvs
  LV   VG Attr       LSize    Pool Origin Data%  Meta%  Move Log Cpy%Sync Convert
  home ol -wi-ao---- <423.07g
  root ol -wi-ao----   70.00g
  swap ol -wi-ao----   <5.93g
[root@DBsGuruN3 ~]# fdisk -l /dev/sda
Disk /dev/sda: 500 GiB, 536870912000 bytes, 1048576000 sectors
Units: sectors of 1 * 512 = 512 bytes
Sector size (logical/physical): 512 bytes / 512 bytes
I/O size (minimum/optimal): 512 bytes / 512 bytes
Click here to know more about Step by Step Oracle 12cR2 Binary Installation and Database Creation On Linux
Click here to know about Oracle Database 19c RPM Installation On Oracle Linux 7
This document is just for learning purposes and always validate in the LAB environment first before applying in the LIVE environment.
Hope so you like this article!
Please share your valuable feedback/comments/subscribe and follow us below and don’t forget to click on the bell icon to get the most recent update. Click here to understand more about our pursuit.
Related Articles
- How to Enable PasswordLess SSH login in Linux
- Steps to Install & Configure SNMP in Oracle Linux 7
- Steps to Add and Extend Swap Space in Linux
- Steps To Increase Mount Point Space In Oracle Linux
- Steps to Move ISCSI Target to Another Linux Server
![]()


