How To Bootstrap MySQL Router For InnoDB ReplicaSet

In the previous blog, we saw How to Configure InnoDB ReplicaSet Click here to read more & How to perform Switchover/Failover in MySql InnoDB ReplicaSet Click here to read more. We will use the same configuration to install and bootstrap mysql router.
Bootstrap MySQL Router against an InnoDB ReplicaSet to automatically configure the routing of incoming client connections to mysql instances.
To bootstrap MySQL Router at the command-line, pass in the –bootstrap option when you start the mysqlrouter command, and it retrieves the topology information from the metadata and configures routing connections to the server instances.
MySQL Router automatically redirects client connections to the instances based on the incoming port, for example, 6646 is used by default for read-write connections using classic MySQL protocol. In the event of a topology change, for example, due to an unexpected failure of an instance, MySQL Router detects the change and adjusts the routing to the remaining instances automatically. This removes the need for client applications to handle failover, or to be aware of the underlying topology.
Step 1. Install mysql router: Use yum system command to install mysql router. For production deployment, it is recommend deploying one MySQL Router instance to each machine used to host applications. But for demo purpose we will install its in same machine of master mysql instance.
[root@test-machine01 tmp]# yum install mysql-router -y
--> Running transaction check
---> Package mysql-router-community.x86_64 0:8.0.22-1.el7 will be installed
--> Finished Dependency Resolution

Dependencies Resolved

==============================================================================================================================================================================================
 Package                                             Arch                                Version                                     Repository                                          Size
==============================================================================================================================================================================================
Installing:
 mysql-router-community                              x86_64                              8.0.22-1.el7                                mysql-tools-community                               31 M

Transaction Summary
==============================================================================================================================================================================================
Install  1 Package
Installed:
  mysql-router-community.x86_64 0:8.0.22-1.el7

Complete!
Step 2. Deploying MySQL Router: Use below command to bootstrap mysql router against ReplicaSet : TestReplicaSet. Once configuration is done mysql router will provide port for connection.
[root@test-machine01 ~]# mysqlrouter --bootstrap rsadmin@test-machine01:3306 --user mysqlrouter
Please enter MySQL password for rsadmin:
# Bootstrapping system MySQL Router instance...

- Creating account(s) (only those that are needed, if any)
- Verifying account (using it to run SQL queries that would be run by Router)
- Storing account in keyring
- Adjusting permissions of generated files
- Creating configuration /etc/mysqlrouter/mysqlrouter.conf

Existing configuration backed up to '/etc/mysqlrouter/mysqlrouter.conf.bak'

# MySQL Router configured for the InnoDB ReplicaSet 'TestReplicaSet'

After this MySQL Router has been started with the generated configuration

    $ /etc/init.d/mysqlrouter restart
or
    $ systemctl start mysqlrouter
or
    $ mysqlrouter -c /etc/mysqlrouter/mysqlrouter.conf

the cluster 'TestReplicaSet' can be reached by connecting to:

## MySQL Classic protocol

- Read/Write Connections: localhost:6446
- Read/Only Connections:  localhost:6447

## MySQL X protocol

- Read/Write Connections: localhost:64460
- Read/Only Connections:  localhost:64470

[root@test-machine01 ~]#
Step 3. Start Mysql Router: Use systemctl system command to start mysql router. You can monitor mysql router logfile in the directory: /var/log/mysqlrouter/mysqlrouter.log.
,8[root@test-machine01 ~]# systemctl status mysqlrouter
â mysqlrouter.service - MySQL Router
   Loaded: loaded (/usr/lib/systemd/system/mysqlrouter.service; disabled; vendor preset: disabled)
   Active: inactive (dead)
[root@test-machine01 ~]#
[root@test-machine01 ~]# systemctl start mysqlrouter
[root@test-machine01 ~]#
[root@test-machine01 ~]#  systemctl status mysqlrouter
â mysqlrouter.service - MySQL Router
   Loaded: loaded (/usr/lib/systemd/system/mysqlrouter.service; disabled; vendor preset: disabled)
   Active: active (running) since Mon 2021-03-22 12:06:32 +03; 3s ago
 Main PID: 14141 (mysqlrouter)
   CGroup: /system.slice/mysqlrouter.service
           ââ14141 /usr/bin/mysqlrouter

Mar 22 12:06:31 test-machine01 systemd[1]: Starting MySQL Router...
Mar 22 12:06:32 test-machine01 mysqlrouter[14141]: logging facility initialized, switching logging to loggers specified in configuration
Mar 22 12:06:32 test-machine01 systemd[1]: Started MySQL Router.
[root@test-machine01 ~]#


[root@test-machine01 mysqlrouter]# pwd
/var/log/mysqlrouter
[root@test-machine01 mysqlrouter]# ls
mysqlrouter.log
[root@test-machine01 mysqlrouter]#
Step 4. Verify Mysql Router metadata in ReplicaSet: Login to mysqlsh using clusteradmin user and use the function ReplicaSet.listRouters() to retrieve mysql router information.
[root@test-machine01 ~]# mysqlsh
MySQL Shell 8.0.23

Copyright (c) 2016, 2021, Oracle and/or its affiliates.
Oracle is a registered trademark of Oracle Corporation and/or its affiliates.
Other names may be trademarks of their respective owners.

Type '\help' or '\?' for help; '\quit' to exit.
 MySQL  JS >
 MySQL  JS > \connect  rsadmin@test-machine01:3306
Creating a session to 'rsadmin@test-machine01:3306'
Fetching schema names for autocompletion... Press ^C to stop.
Your MySQL connection id is 120
Server version: 8.0.22 MySQL Community Server - GPL
No default schema selected; type \use <schema> to set one.
 MySQL  test-machine01:3306 ssl  JS >


 MySQL  test-machine01:3306 ssl  JS >
 MySQL  test-machine01:3306 ssl  JS > var rs =dba.getReplicaSet()
You are connected to a member of replicaset 'TestReplicaSet'.
 MySQL  test-machine01:3306 ssl  JS >


 MySQL  test-machine01:3306 ssl  JS >
 MySQL  test-machine01:3306 ssl  JS > rs.listRouters()
{
    "replicaSetName": "TestReplicaSet",
    "routers": {
        "test-machine01::system": {
            "hostname": "test-machine01",
            "lastCheckIn": "2021-03-22 12:09:52",
            "roPort": 6447,
            "roXPort": 64470,
            "rwPort": 6446,
            "rwXPort": 64460,
            "version": "8.0.22"
        }
    }
}
 MySQL  test-machine01:3306 ssl  JS >
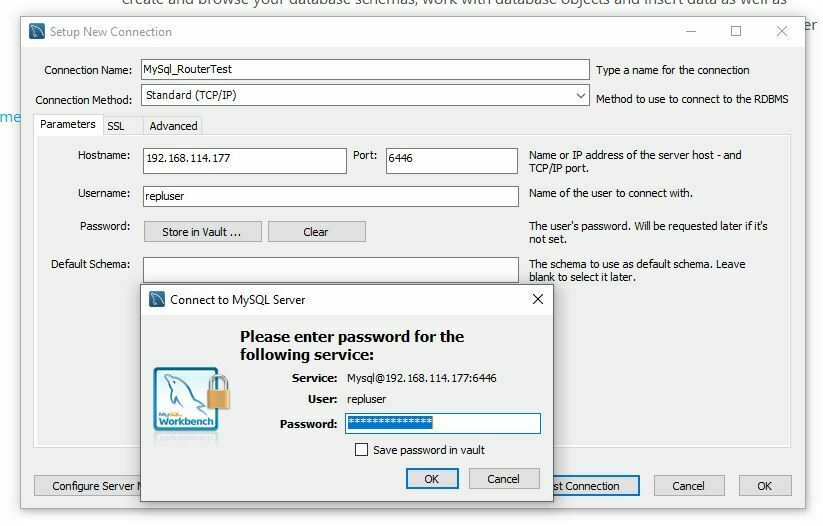
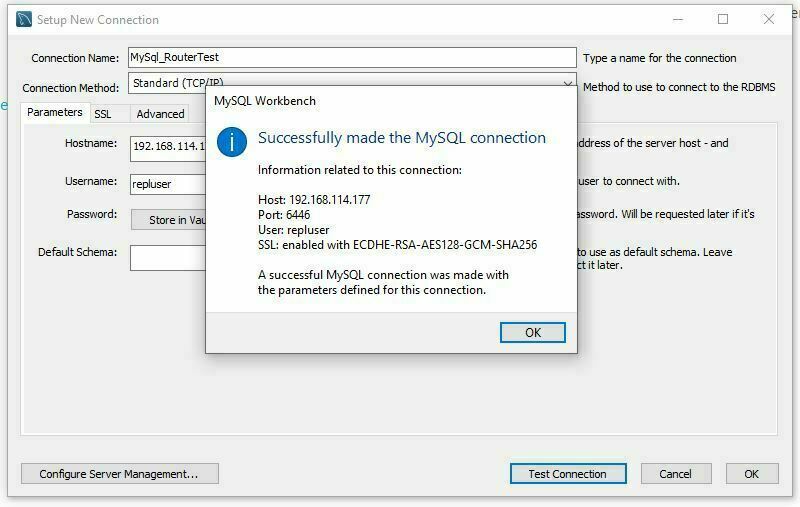
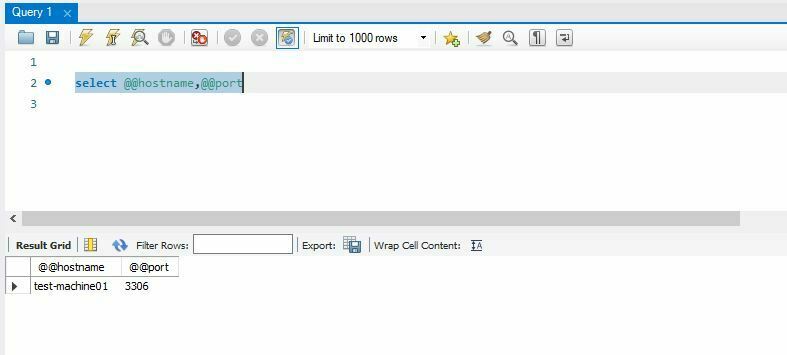
Step 5: Lets Test Mysql Router Automatic Routing: We will use mysql workbench as a client application for testing purposes. Connect to mysql router server (test-machine01) to port 6446 for read/write & 6447 for read-only.
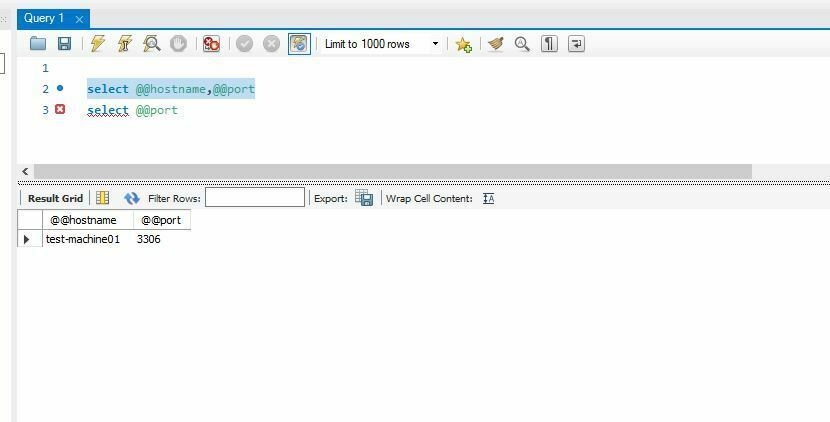
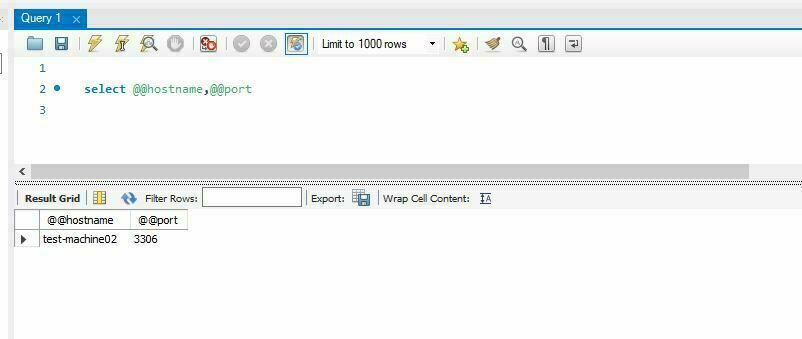
Let perform a switchover to test-machine02:3306, For Switchover procedure follow the blog (How to perform Switchover/Failover in MySql InnoDB ReplicaSet Click here to read more). The existing connection will reset. After you login again to mysql workbench it will connect to test-machine02:3306 automatically without any client-side connection properties change.
Let perform a failover to test-machine01:3306, For Failover procedure follows the blog (How to perform Switchover/Failover in MySql InnoDB ReplicaSet Click here to read more). The existing connection will reset. After you login again to mysql workbench it will connect to test-machine01:3306 automatically without any client-side connection properties change.
Reference : Bootstrapping MySQL Router : https://dev.mysql.com/doc/mysql-shell/8.0/en/admin-api-bootstrapping-router.html
Part I : How to Configure InnoDB ReplicaSet Click here to read more
Part II : How to perform Switchover/Failover in MySql InnoDB ReplicaSet Click here to read more
This document is only for learning purpose and always validate in the LAB environment first before applying in the LIVE environment.
Hope so you like this article!
Please share your valuable feedback/comments/subscribe and follow us below and don’t forget to click on the bell icon to get the latest update. Click here to know more about our pursuit.
Recent articles
- Oracle Critical Database Patch ID for April 2026 along with enabled Download Link
- Oracle Critical Database Patch ID for July 2025 along with enabled Download Link
- Oracle Critical Database Patch ID for April 2025 along with enabled Download Link
- Oracle Critical Database Patch ID for January 2025 along with enabled Download Link
- Oracle Critical Database Patch ID for October 2024 along with enabled Download Link
![]()