Enable Remote Connection on PostgreSQL

In the previous blog, we saw How To Install PostgreSQL 13 on Linux. Click here to read more. By default, PostgreSQL installation is operating through a socket on the localhost. So remote connection will not work, To make it work we need to enable remote connection in couple of configuration files.
If you try remote connection from psql (terminal-based front-end) directly after installation you will receive the below error.
[root@test-machine01 ~]# su - postgres
Last login: Mon Jan 11 16:34:18 +03 2021 on pts/1
-bash-4.2$
-bash-4.2$ psql -h test-machine02 -U postgres -d postgres
psql: error: could not connect to server: No route to host
        Is the server running on host "test-machine02" (192.168.114.176) and accepting
        TCP/IP connections on port 5432?
-bash-4.2$
If you try to connect using pgAdmin (Web Interface Tool) directly after installation you will receive below error.
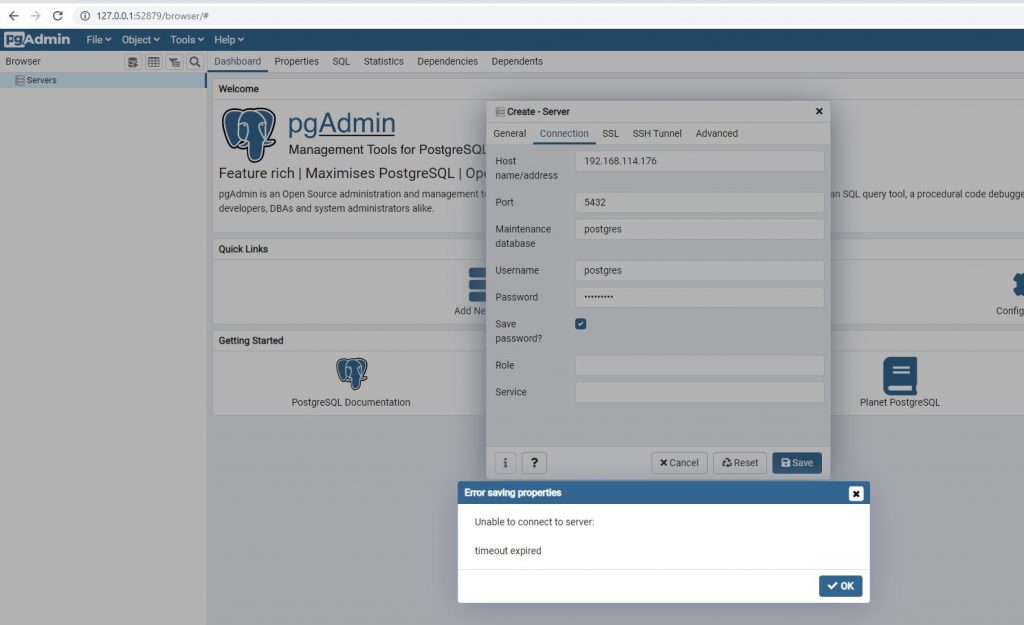
Follow the below steps to enable remote connection
Step 1. Set password for postgres user: Login locally from the server where you installed PostgreSQL 13 and set the password for user: postgres. We have installed in machine test-machine02 (IP: 192.168.114.176)
[root@test-machine02 data]# su - postgres
-bash-4.2$
-bash-4.2$ psql
postgres=#
postgres=# ALTER USER postgres PASSWORD 'Root@1234';
ALTER ROLE
postgres=#
Step 2. Enable Firewall Port: Follow the below steps only if the firewall is enabled in your machine. With OS command firewall –add-service=postgresql, Port: 5432 was not showing in list, Hence we add Port: 5432 as well with firewall –add-port=5432/tcp command.
[root@test-machine02 ~]# service firewalld status
Redirecting to /bin/systemctl status firewalld.service
â firewalld.service - firewalld - dynamic firewall daemon
   Loaded: loaded (/usr/lib/systemd/system/firewalld.service; enabled; vendor preset: enabled)
   Active: active (running) since Tue 2021-04-27 11:32:05 +03; 6 days ago
     Docs: man:firewalld(1)
 Main PID: 47250 (firewalld)
   CGroup: /system.slice/firewalld.service
           ââ47250 /usr/bin/python2 -Es /usr/sbin/firewalld --nofork --nopid

[root@test-machine02 13]# firewall-cmd --permanent --add-service=postgresql
success
[root@test-machine02 13]#
[root@test-machine02 13]# firewall-cmd --reload
success
[root@test-machine02 13]#
[root@test-machine02 13]# firewall-cmd --list-all
public (active)
  target: default
  icmp-block-inversion: no
  interfaces: ens33
  sources:
  services: dhcpv6-client mysql postgresql ssh
  ports: 3307/tcp 3306/tcp 33061/tcp 24901/tcp 24902/tcp 33071/tcp
  protocols:
  masquerade: no
  forward-ports:
  source-ports:
  icmp-blocks:
  rich rules:

[root@test-machine02 13]#  firewall-cmd --zone=public --add-port=5432/tcp --permanent
success
[root@test-machine02 13]#  firewall-cmd --reload
success
[root@test-machine02 13]# firewall-cmd --list-all
public (active)
  target: default
  icmp-block-inversion: no
  interfaces: ens33
  sources:
  services: dhcpv6-client mysql postgresql ssh
  ports: 3307/tcp 3306/tcp 33061/tcp 24901/tcp 24902/tcp 33071/tcp 5432/tcp
  protocols:
  masquerade: no
  forward-ports:
  source-ports:
  icmp-blocks:
  rich rules:
Step 3. Edit postgresql.conf Configuration File: We will tell PostgreSQL to start listening to our network interfaces. This is done by making a change in /var/lib/pgsql/13/data/postgresql.conf. Find this section: and change it by uncommenting the listen_addresses line and changing localhost to * as below.
root@test-machine02 data]# pwd
/var/lib/pgsql/13/data
[root@test-machine02 data]# vi postgresql.conf (Configuration File)

#------------------------------------------------------------------------------
# CONNECTIONS AND AUTHENTICATION
#------------------------------------------------------------------------------

# - Connection Settings -

listen_addresses = '*'          # what IP address(es) to listen on;
                                        # comma-separated list of addresses;
                                        # defaults to 'localhost'; use '*' for all
                                        # (change requires restart)
#port = 5432                            # (change requires restart)
max_connections = 100                   # (change requires restart)
Step 4. Edit pg_hba.conf authentication config file: We will edit file /var/lib/pgsql/13/data/pg_hba.conf and tell to PostgreSQL that we want to accept connections from a specific IP address or range. Please note we have added line host all all 192.168.114.0/24 scram-sha-256 in section : # IPv4 local connections. If you are not sure about your IP subnet you can use 0.0.0.0/0 which mean all IP in Test Env.
,[root@test-machine02 data]# pwd
/var/lib/pgsql/13/data
[root@test-machine02 data]# vi pg_hba.conf (Postgres authentication config file )
# IPv4 local connections:
host    all             all             127.0.0.1/32            scram-sha-256
host    all             all             192.168.114.0/24        scram-sha-256

[root@test-machine02 data]#
Step 5. Restart PostgreSQL service: Once all above changes are done restart PostgreSQL service.
[root@test-machine02 data]#
[root@test-machine02 data]# systemctl restart postgresql-13
[root@test-machine02 data]#
Step 6. Test Remote Connection: Please note we are doing a remote connection from test-machine01 (192.168.114.177) to test-machine02 (192.168.114.176) and remote connection is able to connect successfully.
[root@test-machine01 ~]# su - postgres
Last login: Mon Jan 11 16:34:18 +03 2021 on pts/1
-bash-4.2$
-bash-4.2$  psql -h test-machine02 -U postgres -d postgres -W
Password:
psql (13.1, server 13.2)
Type "help" for help.

postgres=#
postgres=# \du
                                   List of roles
 Role name |                         Attributes                         | Member of
-----------+------------------------------------------------------------+-----------
 postgres  | Superuser, Create role, Create DB, Replication, Bypass RLS | {}

postgres=#
This document is just for learning purpose and always validate in the LAB environment first before applying in the LIVE environment.
Hope so you like this article!
Please share your valuable feedback/comments/subscribe and follow us below and don’t forget to click on the bell icon to get the most recent update. Click here to understand more about our pursuit.
Related Articles
- Access the MSSQL database from PostgreSQL using TDS Foreign Data Wrapper (TDS_FDW)
- Access MySql database from PostgreSQL using MySQL Foreign Data Wrapper (MYSQL_FDW)
- Configure and monitor using pg_profile in PostgreSQL
- Monitor PostgreSQL Cluster using pgCenter
- Install and Configure pg_repack in PostgreSQL
![]()