Step by Step Oracle 19c Binary Installation and Database Creation On Linux

In this article, we are going to demonstrate Step by Step Oracle19c (19.3) enterprise edition binary Installation and database Creation On Linux 8.3 (OEL) using GUI mode. We will complete this article in three parts.
1. Prechecks / Prerequisite
2. Oracle 19c binary installation (runInstaller)
3. Oracle database creation (DBCA)
Key points to remember before start Installation on Linux x86-64:
- Minimum space 7.5 to 11 GB require to install Oracle Database Enterprise Edition / Standard Edition 2.
- Minimum 1 GB RAM required for Oracle Database installation but 2 GB RAM recommended.
- Server is connected to the network.
- Minimum server display card 1024 x 768 resolution to launch Oracle Universal Installer (OUI).
- Minimum Runlevel 3 or 5.
- Supported Linux versions 7 & 8.
Oracle Linux 8.1 with the Unbreakable Enterprise Kernel 6: 5.4.17-2011.0.7.el8uek.x86_64 or later
Oracle Linux 7.4 with the Unbreakable Enterprise Kernel 4: 4.1.12-124.19.2.el7uek.x86_64 or later - Minimum 1GB in temporary directory generally called /tmp.
- Swap space requires as below:
Between 1 GB and 2 GB: 1.5 times the size of the RAM
Between 8 GB and 16 GB: Equal to the size of the RAM
More than 16 GB: 16 GB
Below are a few new features for Oracle database installation in Oracle 19c.
- Oracle Memory Speed (OMS) Support for potential of persistent memory (PMEM) Devices.
- Root Scripts Automation Support for Oracle Database Installation.
- Simplified Image-Based Oracle Database Client Installation.
1. Prechecks / Prerequisite
1.1. Basics prerequisites: Here we have two options either automatic setup or manual setup which is required to complete basic setup. You can use any one method.
1.1A1. Automatic Setup: In automatic setup using package oracle-database-preinstall-19c which will perform all prerequisite set up.
[root@DBsGuruN3 ~]# yum install oracle-database-preinstall-19c  ==>Applicable to Linux 7
[root@DBsGuruN3 ~]# dnf install oracle-database-preinstall-19c
Last metadata expiration check: 0:27:17 ago on Mon 27 Dec 2021 04:12:16 PM IST.
Dependencies resolved.
==============================================================================================================================================================================================================
 Package                                                      Architecture                         Version                                              Repository                                       Size
==============================================================================================================================================================================================================
Installing:
 oracle-database-preinstall-19c                               x86_64                               1.0-2.el8                                            ol8_appstream                                    31 k
Installing dependencies:
 ksh                                                          x86_64                               20120801-254.0.1.el8                                 ol8_appstream                                   927 k
 libaio-devel                                                 x86_64                               0.3.112-1.el8                                        ol8_baseos_latest                                19 k
 libnsl                                                       x86_64                               2.28-127.0.1.el8                                     ol8_baseos_latest                                99 k
 libstdc++-devel                                              x86_64                               8.3.1-5.1.0.2.el8                                    ol8_appstream                                   2.1 M

Transaction Summary
==============================================================================================================================================================================================================
Install  5 Packages

Total download size: 3.1 M
Installed size: 15 M
Is this ok [y/N]: y
Downloading Packages:
(1/5): libaio-devel-0.3.112-1.el8.x86_64.rpm                                                                                                                                   72 kB/s |  19 kB     00:00
(2/5): ksh-20120801-254.0.1.el8.x86_64.rpm                                                                                                                                    3.0 MB/s | 927 kB     00:00
(3/5): oracle-database-preinstall-19c-1.0-2.el8.x86_64.rpm                                                                                                                    4.9 MB/s |  31 kB     00:00
(4/5): libstdc++-devel-8.3.1-5.1.0.2.el8.x86_64.rpm                                                                                                                           6.0 MB/s | 2.1 MB     00:00
(5/5): libnsl-2.28-127.0.1.el8.x86_64.rpm                                                                                                                                      25 kB/s |  99 kB     00:03
--------------------------------------------------------------------------------------------------------------------------------------------------------------------------------------------------------------
Total                                                                                                                                                                         808 kB/s | 3.1 MB     00:03
Running transaction check
Transaction check succeeded.
Running transaction test
Transaction test succeeded.
Running transaction
  Preparing        :                                                                                                                                                                                      1/1
  Installing       : libstdc++-devel-8.3.1-5.1.0.2.el8.x86_64                                                                                                                                             1/5
  Installing       : ksh-20120801-254.0.1.el8.x86_64                                                                                                                                                      2/5
  Running scriptlet: ksh-20120801-254.0.1.el8.x86_64                                                                                                                                                      2/5
  Installing       : libnsl-2.28-127.0.1.el8.x86_64                                                                                                                                                       3/5
  Installing       : libaio-devel-0.3.112-1.el8.x86_64                                                                                                                                                    4/5
  Running scriptlet: oracle-database-preinstall-19c-1.0-2.el8.x86_64                                                                                                                                      5/5
  Installing       : oracle-database-preinstall-19c-1.0-2.el8.x86_64                                                                                                                                      5/5
  Running scriptlet: oracle-database-preinstall-19c-1.0-2.el8.x86_64                                                                                                                                      5/5
  Verifying        : libaio-devel-0.3.112-1.el8.x86_64                                                                                                                                                    1/5
  Verifying        : libnsl-2.28-127.0.1.el8.x86_64                                                                                                                                                       2/5
  Verifying        : ksh-20120801-254.0.1.el8.x86_64                                                                                                                                                      3/5
  Verifying        : libstdc++-devel-8.3.1-5.1.0.2.el8.x86_64                                                                                                                                             4/5
  Verifying        : oracle-database-preinstall-19c-1.0-2.el8.x86_64                                                                                                                                      5/5

Installed:
  ksh-20120801-254.0.1.el8.x86_64    libaio-devel-0.3.112-1.el8.x86_64    libnsl-2.28-127.0.1.el8.x86_64    libstdc++-devel-8.3.1-5.1.0.2.el8.x86_64    oracle-database-preinstall-19c-1.0-2.el8.x86_64

Complete!
1.1.A2. Validate user Oracle & groups: We can validate user Oracle and require groups created and align to user Oracle.
[root@DBsGuruN3 ~]# cat /etc/group| grep -i ora
libstoragemgmt:x:987:
oinstall:x:54321:oracle
dba:x:54322:oracle
oper:x:54323:oracle
backupdba:x:54324:oracle
dgdba:x:54325:oracle
kmdba:x:54326:oracle
racdba:x:54330:oracle
[root@DBsGuruN3 ~]# id oracle
uid=54321(oracle) gid=54321(oinstall) groups=54321(oinstall),54330(racdba),54322(dba),54323(oper),54324(backupdba),54325(dgdba),54326(kmdba)
1.1.B. Manual Setup: We need to follow the mentioned required setup in the manual.
Minimum Operating System Resource/Kernel Parameter Settings for Linux
semmsl 250
semmns 32000
semopm 100
semmni 128
shmall Greater than or equal to the value of shmmax, in pages.
shmmax    Half the size of physical memory in bytes
shmmni 4096
panic_on_oops 1
file-max    6815744
aio-max-nr    1048576
ip_local_port_range Minimum: 9000
ip_local_port_range Maximum: 65500
rmem_default 262144
rmem_max    4194304
wmem_default 262144
wmem_max    1048576
1.1.B1. Using any text editor, create or edit the /etc/sysctl.d/97-oracle-database-sysctl.conf file, and add or edit lines similar to: (value depends on your system configuration and requirements).
fs.aio-max-nr = 1048576
fs.file-max = 6815744
kernel.shmall = 2097152 ##Greater than or equal to the value of shmmax, in pages*1
kernel.shmmax = 4294967295 ##Half the size of physical memory in bytes*2
kernel.shmmni = 4096
kernel.sem = 250 32000 100 128
net.ipv4.ip_local_port_range = 9000 65500
net.core.rmem_default = 262144
net.core.rmem_max = 4194304
net.core.wmem_default = 262144
net.core.wmem_max = 1048576
By specifying the values in the /etc/sysctl.d/97-oracle-database-sysctl.conf file, the values persist on system restarts.
*1. If the server supports multiple databases or uses a large SGA, then set this parameter to a value that is equal to the total amount of shared memory, in 4K pages, that the system can use at one time.
*2. Review My Oracle Support Note 567506.1 for additional information about configuring shmmax.
1.1.B2. To change the current values of the kernel parameters: Change kernel parameters value without a reboot.
[root@DBsGuruN3 ~]# /sbin/sysctl --system
1.1.B3. Validate that the values are set correctly on OS: Validate the output. If the values are incorrect, edit the /etc/sysctl.d/97-oracle-database-sysctl.conf file, then execute the below command again.
[root@DBsGuruN3 ~]# /sbin/sysctl -a
1.1.B4. Using any text editor, create or edit the /etc/security/limits.d/oracle-database-preinstall-19c.conf file, and add or edit lines similar to: (value depends on your system configuration and requirements).
oracle   soft   nofile    1024
oracle   hard   nofile    65536
oracle   soft   nproc    16384
oracle   hard   nproc    16384
oracle   soft   stack    10240
oracle   hard   stack    32768
oracle   hard   memlock    134217728
oracle   soft   memlock    134217728
1.1.B5. Required packages: Below are the required packages including the 32-bit version of some of the packages. Many of the packages should be installed already.
For Oracle Linux: The following packages must be installed.
bc
binutils
elfutils-libelf
elfutils-libelf-devel
fontconfig-devel
glibc
glibc-devel
ksh
libaio
libaio-devel
libXrender
libX11
libXau
libXi
libXtst
libgcc
libnsl
librdmacm
libstdc++
libstdc++-devel
libxcb
libibverbs
make
smartmontools
You can use the command yum install -y <package name> (For Linux 7), dnf install -y package name> (For Linux 8) to install or download it from the site and apply it to the server.
1.1.B6. Verify installed packages: Using the blow command validate installed packages.
[root@DBsGuruN3 ~]# rpm -q binutils compat-libcap1 glibc-2.17 glibc-devel-2.17 ksh libaio libaio-devel libX11 \
libXau libXi libXtst libgcc libstdc++- libstdc++-devel libxcb make net-tools smartmontools sysstat
You can add more package names in the above command according to require validation.
1.1.B7. Create require groups and users: Create require groups and user oracle along with assigning primary and secondary groups to user Oracle.
[root@DBsGuruN3 ~]# /usr/sbin/groupadd -g 54321 oinstall
[root@DBsGuruN3 ~]# /usr/sbin/groupadd -g 54322 dba
[root@DBsGuruN3 ~]# /usr/sbin/groupadd -g 54323 oper
[root@DBsGuruN3 ~]# /usr/sbin/groupadd -g 54324 backupdba
[root@DBsGuruN3 ~]# /usr/sbin/groupadd -g 54325 dgdba
[root@DBsGuruN3 ~]# /usr/sbin/groupadd -g 54326 kmdba
[root@DBsGuruN3 ~]# /usr/sbin/groupadd -g 54327 asmdba
[root@DBsGuruN3 ~]# /usr/sbin/groupadd -g 54328 asmoper
[root@DBsGuruN3 ~]# /usr/sbin/groupadd -g 54329 asmadmin
[root@DBsGuruN3 ~]# /usr/sbin/groupadd -g 54330 racdba
[root@DBsGuruN3 ~]#
[root@DBsGuruN3 ~]# # /usr/sbin/useradd -u 54321 -g oinstall -G dba,oper,backupdba,dgdba,kmdba,asmdba,asmoper,asmadmin oracle
NOTE: You can create groups as required, above is the complete list of groups.
1.2. Change password: This is required to change the oracle password, either way, we used automatic or manual setup.
[root@DBsGuruN3 ~]# passwd oracle
Changing password for user oracle.
New password:
BAD PASSWORD: The password is shorter than 8 characters
Retype new password:
passwd: all authentication tokens updated successfully.
1.3. Validate new Oracle’s password: Upon completion of the above step, open a new terminal and login to oracle using a new password and validate groups.
[oracle@DBsGuruN3 ~]$ id
uid=54321(oracle) gid=54321(oinstall) groups=54321(oinstall),54322(dba),54323(oper),54324(backupdba),54325(dgdba),54326(kmdba),54330(racdba) context=unconfined_u:unconfined_r:unconfined_t:s0-s0:c0.c1023
1.4 Verify memory and server hardware configuration: In this section, we will verify memory & various type of server configuration which is required before installation and make the sure value of the below command meet the minimum requirement of Oracle 19c installation.
1.4.1. Validate total physical memory on server:
[root@DBsGuruN3 ~]# grep MemTotal /proc/meminfo
MemTotal:        6078828 kB
1.4.2. Validate configured swap memory on server:
[root@DBsGuruN3 ~]# grep SwapTotal /proc/meminfo
SwapTotal:       6217724 kB
1.4.3. Validate available space in a temporary directory: If space is less as required in directory /tmp so either remove unwanted files from this directory to reach to minimum require space or set the different temporary directory in your environment variables.
[root@DBsGuruN3 ~]# df -h /tmp
Filesystem           Size  Used Avail Use% Mounted on
/dev/mapper/ol-root   70G   14G   57G  19% /
1.4.4. Validate free RAM (memory) on the server.
[root@DBsGuruN3 ~]# free -m
              total        used        free      shared  buff/cache   available
Mem:           5936         563        4759          10         612        5274
Swap:          6071           0        6071
1.4.5. Validate the system architecture: It will help to install software i.e require 64-bit software.
[root@DBsGuruN3 ~]# uname -m
x86_64
1.4.6. Validate shared memory which is correctly mounted along with the required size.
[root@DBsGuruN3 ~]# df -h /dev/shm
Filesystem      Size  Used Avail Use% Mounted on
tmpfs           2.9G     0  2.9G   0% /dev/shm
1.4.7. Validate distribution and version of installed Linux: Execute anyone below command to validate it.
[root@DBsGuruN3 ~]# cat /etc/oracle-release
Oracle Linux Server release 8.3
[root@DBsGuruN3 ~]# cat /etc/redhat-release
Red Hat Enterprise Linux release 8.3 (Ootpa)
[root@DBsGuruN3 ~]# cat /etc/os-release
NAME="Oracle Linux Server"
VERSION="8.3"
ID="ol"
ID_LIKE="fedora"
VARIANT="Server"
VARIANT_ID="server"
VERSION_ID="8.3"
PLATFORM_ID="platform:el8"
PRETTY_NAME="Oracle Linux Server 8.3"
ANSI_COLOR="0;31"
CPE_NAME="cpe:/o:oracle:linux:8:3:server"
HOME_URL="https://linux.oracle.com/"
BUG_REPORT_URL="https://bugzilla.oracle.com/"

ORACLE_BUGZILLA_PRODUCT="Oracle Linux 8"
ORACLE_BUGZILLA_PRODUCT_VERSION=8.3
ORACLE_SUPPORT_PRODUCT="Oracle Linux"
ORACLE_SUPPORT_PRODUCT_VERSION=8.3
[root@DBsGuruN3 ~]# lsb_release -id
Distributor ID: OracleServer
Description:    Oracle Linux Server release 8.3
1.4.8. Validate installed kernel of Linux.
[root@DBsGuruN3 ~]# uname -r
5.4.17-2102.204.4.2.el8uek.x86_64
1.5. Validate hostname along with hostname resolution: Make sure hostname should be resolved either OS name or fully qualified name. To resolve a hostname, we can resolve it either DNS (Domain Name Service), NIS (Network Information Service), or a centrally-maintained TCP/IP host file, such as /etc/hosts. Use the ping command to ensure that your OS hostname is resolvable. Follow the below command to validate it.
[oracle@DBsGuruN3 ~]$ cat /etc/hosts  | grep -i dbsgurun3
192.168.56.107 DBsGuruN3.labdomain DBsGuruN3
[oracle@DBsGuruN3 ~]$ ping -c3 DBsGuruN3
PING DBsGuruN3.labdomain (192.168.56.107) 56(84) bytes of data.
64 bytes from DBsGuruN3.labdomain (192.168.56.107): icmp_seq=1 ttl=64 time=0.039 ms
64 bytes from DBsGuruN3.labdomain (192.168.56.107): icmp_seq=2 ttl=64 time=0.099 ms
64 bytes from DBsGuruN3.labdomain (192.168.56.107): icmp_seq=3 ttl=64 time=0.037 ms

--- DBsGuruN3.labdomain ping statistics ---
3 packets transmitted, 3 received, 0% packet loss, time 66ms
rtt min/avg/max/mdev = 0.037/0.058/0.099/0.029 ms
[oracle@DBsGuruN3 ~]$ ping -c3 DBsGuruN3.labdomain
PING DBsGuruN3.labdomain (192.168.56.107) 56(84) bytes of data.
64 bytes from DBsGuruN3.labdomain (192.168.56.107): icmp_seq=1 ttl=64 time=0.038 ms
64 bytes from DBsGuruN3.labdomain (192.168.56.107): icmp_seq=2 ttl=64 time=0.100 ms
64 bytes from DBsGuruN3.labdomain (192.168.56.107): icmp_seq=3 ttl=64 time=0.099 ms

--- DBsGuruN3.labdomain ping statistics ---
3 packets transmitted, 3 received, 0% packet loss, time 166ms
rtt min/avg/max/mdev = 0.038/0.079/0.100/0.029 ms
1.6. Set SELINUX=permissive: Change the value of SELINUX in the file /etc/selinux/config using any editor. Once you change the value immediately reboot the server to take effect of new values.
[root@DBsGuruN3 ~]# cat /etc/selinux/config | grep SELINUX | grep -v '#'  --Old value
SELINUX=enforcing
SELINUXTYPE=targeted
[root@DBsGuruN3 ~]# cat /etc/selinux/config | grep SELINUX | grep -v '#'  --New value
SELINUX=permissive
SELINUXTYPE=targeted
[root@DBsGuruN3 ~]# reboot now
1.7. Disable firewall on OS: Disable firewall if required, follow the below command.
root@DBsGuruN3 ~]# systemctl stop firewalld
[root@DBsGuruN3 ~]# systemctl disable firewalld
Removed symlink /etc/systemd/system/multi-user.target.wants/firewalld.service.
Removed symlink /etc/systemd/system/dbus-org.fedoraproject.FirewallD1.service.
[root@DBsGuruN3 ~]# systemctl status firewalld
  firewalld.service - firewalld - dynamic firewall daemon
   Loaded: loaded (/usr/lib/systemd/system/firewalld.service; disabled; vendor preset: enabled)
   Active: inactive (dead)
     Docs: man:firewalld(1)

Feb 05 17:14:18 DBsGuruN3 .labdomain systemd[1]: Starting firewalld - dynamic firewall daemon...
Feb 05 17:14:21 DBsGuruN3 .labdomain systemd[1]: Started firewalld - dynamic firewall daemon.
Feb 05 17:14:21 DBsGuruN3 .labdomain firewalld[924]: WARNING: AllowZoneDrifting is enabled. This is considered an insecure configuration option. It will be removed in a future release. Please...bling it now.
Feb 05 17:42:10 DBsGuruN3 .labdomain systemd[1]: Stopping firewalld - dynamic firewall daemon...
Feb 05 17:42:12 DBsGuruN3 .labdomain systemd[1]: Stopped firewalld - dynamic firewall daemon.
Hint: Some lines were ellipsized, use -l to show in full.
1.8. Create required directories.
[root@DBsGuruN3 ~]# mkdir -p /u02/app/oracle/product/19c/db_1
[root@DBsGuruN3 ~]# mkdir -p /oradata/software
[root@DBsGuruN3 ~]# mkdir -p /oradata/fra
[root@DBsGuruN3 ~]# mkdir -p /u01
[root@DBsGuruN3 ~]# chown -R oracle:oinstall /u02/ /oradata/ /u01
[root@DBsGuruN3 ~]# chmod 775 -R /u02/ /oradata/
[root@DBsGuruN3 ~]# ls -ld /u02/app/oracle/product/19c/db_1 /oradata/software /oradata/fra /u01
drwxrwxr-x. 2 oracle oinstall 6 Dec 30 16:37 /oradata/fra
drwxrwxr-x. 2 oracle oinstall 6 Dec 30 16:37 /oradata/software
drwxrwxr-x.  3 oracle oinstall   17 Dec 30 17:20 /u01
drwxrwxr-x. 2 oracle oinstall 6 Dec 30 16:36 /u02/app/oracle/product/19c/db_1
1.9. Unzip the software: Move the binary file to /oradata/software and unzip in the location ORACLE HOME /u02/app/oracle/product/19c/db_1. In 19c, this is mandatory to unzip directly in the home i.e where ever we unzip binary that would be the default ORACLE HOME. Alternatively directly copy binary file to HOME and unzip in the same location.
[oracle@DBsGuruN3 software]$ unzip V982063-01.zip -d /u02/app/oracle/product/19c/db_1/
Archive:  V982063-01.zip
   creating: /u02/app/oracle/product/19c/db_1/drdaas/
   creating: /u02/app/oracle/product/19c/db_1/drdaas/admin/
  inflating: /u02/app/oracle/product/19c/db_1/drdaas/admin/drdasqtt_translator_setup.sql
  inflating: /u02/app/oracle/product/19c/db_1/drdaas/admin/drdapkg_db2.sql
--------------Trimmed Data--------------
/u02/app/oracle/product/19c/db_1/javavm/lib/security/cacerts -> ../../../javavm/jdk/jdk8/lib/security/cacerts
  /u02/app/oracle/product/19c/db_1/javavm/lib/sunjce_provider.jar -> ../../javavm/jdk/jdk8/lib/sunjce_provider.jar
  /u02/app/oracle/product/19c/db_1/javavm/lib/security/README.txt -> ../../../javavm/jdk/jdk8/lib/security/README.txt
  /u02/app/oracle/product/19c/db_1/javavm/lib/security/java.security -> ../../../javavm/jdk/jdk8/lib/security/java.security
  /u02/app/oracle/product/19c/db_1/jdk/jre/lib/amd64/server/libjsig.so -> ../libjsig.so
[oracle@DBsGuruN3 software]$
2. Oracle 19c binary installation (runInstaller)
2.1. set DISPLAY as oracle user: Execute command export DISPLAY where IP depends on your configuration or tool being used for it, applicable if installing as a remote session.
[oracle@DBsGuruN3 software]$ export DISPLAY=192.168.1.87:0.0;
2.2. Launch Oracle Universal Installer: Go to directory ORACLE HOME and execute command runInstaller to launch Oracle Universal Installer (OUI).
[oracle@DBsGuruN3 software]$ cd /u02/app/oracle/product/19c/db_1/
[oracle@DBsGuruN3 db_1]$ ls -lrt
total 68
-rw-r--r--.  1 oracle oinstall   852 Aug 18  2015 env.ora
-rw-r--r--.  1 oracle oinstall  2927 Oct 14  2016 schagent.conf
-rwxr-x---.  1 oracle oinstall  1783 Mar  8  2017 runInstaller
drwxr-x---. 14 oracle oinstall  4096 Apr 12  2019 OPatch
drwxr-x---.  7 oracle oinstall    69 Apr 17  2019 xdk
drwxr-xr-x.  3 oracle oinstall    19 Apr 17  2019 wwg
drwxr-xr-x.  4 oracle oinstall    31 Apr 17  2019 usm
drwxr-xr-x.  5 oracle oinstall    45 Apr 17  2019 suptools
drwxr-xr-x.  6 oracle oinstall    54 Apr 17  2019 srvm
drwxr-xr-x.  3 oracle oinstall    17 Apr 17  2019 sqlj
drwxr-xr-x.  4 oracle oinstall    41 Apr 17  2019 sqldeveloper
drwxr-xr-x.  3 oracle oinstall    18 Apr 17  2019 slax
-rw-r-----.  1 oracle oinstall    10 Apr 17  2019 root.sh.old.1
drwxr-xr-x.  3 oracle oinstall    21 Apr 17  2019 relnotes
drwxr-xr-x.  4 oracle oinstall    29 Apr 17  2019 racg
drwxr-xr-x.  5 oracle oinstall    52 Apr 17  2019 R
drwxr-xr-x.  5 oracle oinstall    39 Apr 17  2019 perl
drwxr-xr-x.  4 oracle oinstall    33 Apr 17  2019 owm
drwxr-xr-x.  3 oracle oinstall    19 Apr 17  2019 oss
drwxr-xr-x.  6 oracle oinstall    52 Apr 17  2019 ord
drwxr-xr-x.  4 oracle oinstall    34 Apr 17  2019 oracore
drwxr-xr-x.  7 oracle oinstall    65 Apr 17  2019 opmn
drwxr-xr-x.  5 oracle oinstall    42 Apr 17  2019 olap
drwxr-xr-x.  5 oracle oinstall    46 Apr 17  2019 nls
drwxr-xr-x.  4 oracle oinstall    31 Apr 17  2019 mgw
drwxr-xr-x.  9 oracle oinstall    98 Apr 17  2019 md
drwxr-xr-x. 10 oracle oinstall   112 Apr 17  2019 ldap
drwxr-xr-x.  3 oracle oinstall    18 Apr 17  2019 has
drwxr-xr-x.  3 oracle oinstall    19 Apr 17  2019 dv
drwxr-xr-x.  3 oracle oinstall    20 Apr 17  2019 diagnostics
drwxr-xr-x.  3 oracle oinstall    20 Apr 17  2019 demo
drwxr-xr-x.  3 oracle oinstall    19 Apr 17  2019 dbjava
drwxr-xr-x.  3 oracle oinstall    20 Apr 17  2019 data
drwxr-xr-x.  7 oracle oinstall    71 Apr 17  2019 cv
drwxr-xr-x.  3 oracle oinstall    18 Apr 17  2019 css
drwxr-xr-x.  6 oracle oinstall    55 Apr 17  2019 crs
drwxr-xr-x.  6 oracle oinstall    78 Apr 17  2019 plsql
drwxr-xr-x.  2 oracle oinstall    22 Apr 17  2019 dbs
drwxr-xr-x.  2 oracle oinstall    33 Apr 17  2019 utl
drwxr-xr-x.  2 oracle oinstall    29 Apr 17  2019 instantclient
drwxr-xr-x. 13 oracle oinstall   198 Apr 17  2019 dmu
drwxr-xr-x.  3 oracle oinstall    35 Apr 17  2019 ucp
drwxr-xr-x.  3 oracle oinstall    35 Apr 17  2019 jdbc
drwxr-xr-x.  2 oracle oinstall    26 Apr 17  2019 QOpatch
drwxr-xr-x.  4 oracle oinstall    66 Apr 17  2019 ords
drwxr-xr-x.  5 oracle oinstall   119 Apr 17  2019 sdk
drwxr-xr-x.  6 oracle oinstall  4096 Apr 17  2019 apex
drwxr-xr-x.  8 oracle oinstall   101 Apr 17  2019 odbc
drwxr-xr-x.  2 oracle oinstall  4096 Apr 17  2019 jlib
drwxr-xr-x.  4 oracle oinstall    30 Apr 17  2019 drdaas
drwxr-xr-x. 11 oracle oinstall   119 Apr 17  2019 ctx
-rwx------.  1 oracle oinstall   786 Apr 17  2019 root.sh.old
drwxr-xr-x. 10 oracle oinstall   106 Apr 17  2019 network
drwxr-xr-x.  5 oracle oinstall    41 Apr 17  2019 hs
drwxr-xr-x.  9 oracle oinstall    93 Apr 17  2019 assistants
drwxr-xr-x.  6 oracle oinstall    53 Apr 18  2019 sqlplus
-rwx------.  1 oracle oinstall   638 Apr 18  2019 root.sh
drwxr-xr-x.  8 oracle oinstall   226 Apr 18  2019 oui
drwxr-xr-x.  5 oracle oinstall   191 Apr 18  2019 deinstall
drwxr-xr-x.  4 oracle oinstall    87 Apr 18  2019 clone
drwxr-xr-x.  2 oracle oinstall   102 Apr 18  2019 addnode
drwxr-xr-x.  4 oracle oinstall   236 Apr 18  2019 sqlpatch
drwxr-xr-x. 13 oracle oinstall   140 Apr 18  2019 rdbms
drwxr-xr-x.  6 oracle oinstall    56 Apr 18  2019 precomp
drwxr-xr-x.  4 oracle oinstall 12288 Apr 18  2019 lib
drwxr-xr-x.  6 oracle oinstall   219 Apr 18  2019 jdk
drwxr-xr-x.  8 oracle oinstall    82 Apr 18  2019 javavm
drwxr-x---. 13 oracle oinstall   219 Apr 18  2019 inventory
drwxr-xr-x.  2 oracle oinstall  8192 Apr 18  2019 bin
drwxr-xr-x. 10 oracle oinstall  4096 Apr 18  2019 install
[oracle@DBsGuruN3 db_1]$ ./runInstaller
In this attempt, runInstaller got failed with error [INS-08101] Unexpected error while executing the action at state: ‘supportedOSCheck’. This error occurred while 19c (19.3) binary installation on server Oracle enterprise Linux version (OEL) 8.3 or greater than version 8.1 i.e Oracle 19c supported up to version OEL 8.1 so far.
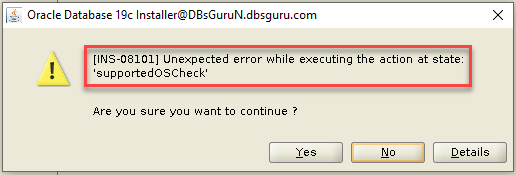
Click here to get a solution for [INS-08101] Unexpected error while executing the action at state: ‘supportedOSCheck’. I followed this article and solved this error and launch Oracle Universal Installer (OUI) successfully.
[oracle@DBsGuruN3 db_1]$ ./runInstaller
Launching Oracle Database Setup Wizard...

The response file for this session can be found at:
 /u02/app/oracle/product/19c/db_1/install/response/db_2021-12-30_05-21-35PM.rsp

You can find the log of this install session at:
 /u01/app/oraInventory/logs/InstallActions2021-12-30_05-21-35PM/installActions2021-12-30_05-21-35PM.log
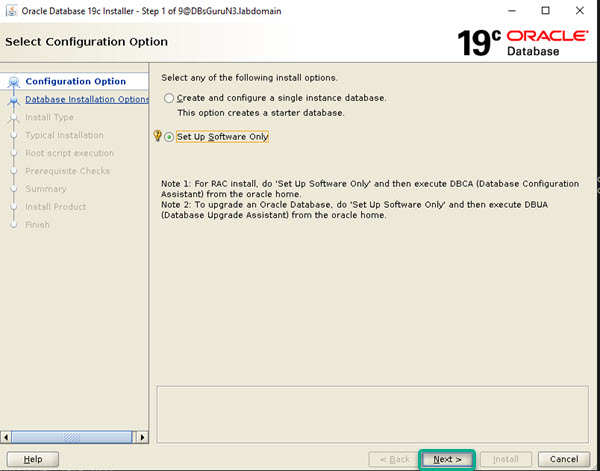
2.3. Configuration options: Here we have two options where we will select Install database software only as we decided to create a database in the next phase and click next.
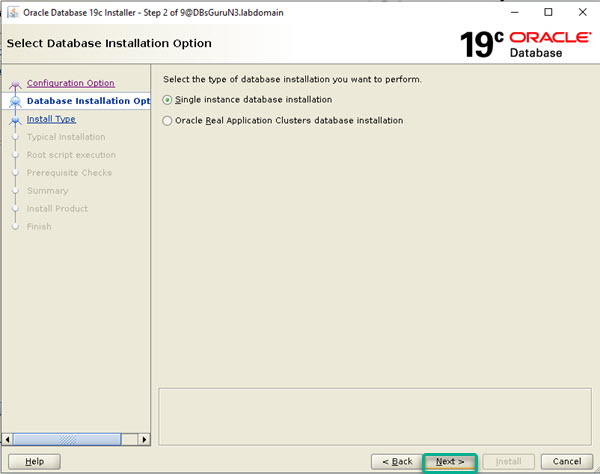
2.4. Database installation option: We are using a standalone server so select option 1 and click on Next.
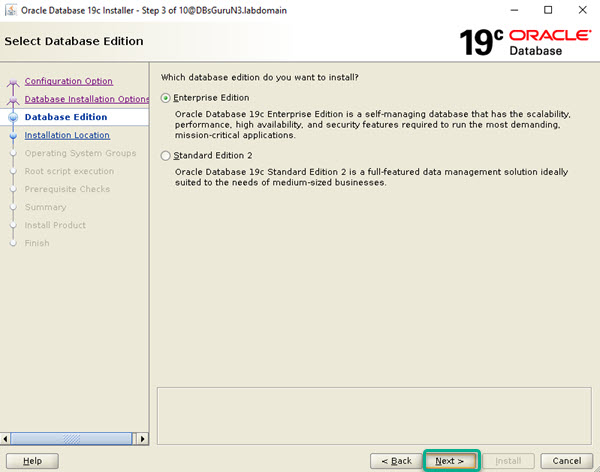
2.5. Database Edition: Select option Enterprise edition or according to your valid license if installing for client/organization then click Next.
2.6. Installation Location: In this section, OUI will select automatically the location of ORACLE_HOME as default and this is the same location of runInstaller, click on Next.

2.7. Operating System Groups: Assign appropriate groups according to require functionality and click on Next.

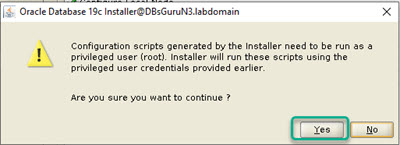
2.8. Root script execution: In this screen, you can pass root user credentials which can execute postscript in the background. Now click on Next and accept (Yes) on the next screen prompt.

2.9. Summary: Once click on Next on the previous screen, OUI performs prechecks. Upon completion of successful prechecks, preview summary page if anything requires to change in this screen still we have opportunity to edit options. Once validate and everything looks good, click on the button Install.

2.10. Install Product: Take a long breath and closely monitor the progress of the installation, keep monitoring until the next prompt.
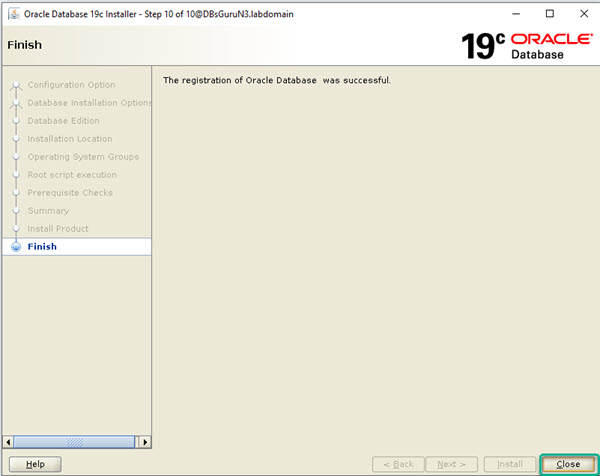
2.11. Finish: This is a final screen that shows successful installation, now click on Close and jump to post validation of installation.
2.12. Post validation: In post validation, we will validate the binary version.
[oracle@DBsGuruN3 db_1]$ export ORACLE_HOME=/u02/app/oracle/product/19c/db_1
[oracle@DBsGuruN3 db_1]$ export PATH=$ORACLE_HOME/bin:$PATH
[oracle@DBsGuruN3 db_1]$ sqlplus -v

SQL*Plus: Release 19.0.0.0.0 - Production
Version 19.3.0.0.0
3. Oracle database creation (DBCA)
Click here for Step by step silent installation of Oracle 19c on Linux 7
Click here for Step by Step manually creation of an Oracle 19c Database on Linux 7
Click here for Oracle Database 19c RPM Installation On Oracle Linux 7
This document is just for learning purpose and always validate in the LAB environment first before applying in the LIVE environment.
Hope so you like this article!
Please share your valuable feedback/comments/subscribe and follow us below and don’t forget to click on the bell icon to get the most recent update. Click here to understand more about our pursuit.
Related Articles
- Oracle Critical Database Patch ID for January 2025 along with enabled Download Link
- Oracle Critical Database Patch ID for October 2024 along with enabled Download Link
- Oracle Critical Database Patch ID for July 2024 along with enabled Download Link
- Oracle Critical Database Patch ID for April 2024 along with enabled Download Link
- Oracle Critical Database Patch ID for April 2023 along with enabled Download Link
![]()